How to Set Up Vendor Contract Costs in Sage Accpac ERP 5.4

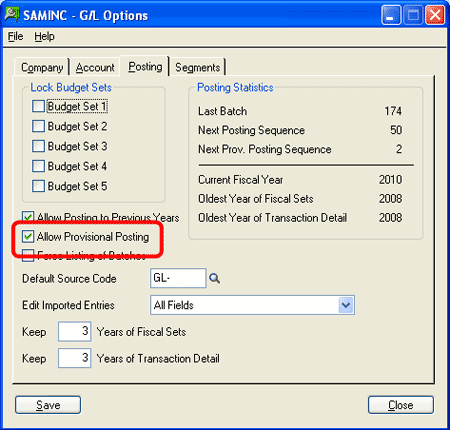
The vendor contract cost feature allows you to set up contract pricing for inventory items, including basic vendor costs, volume discounts, sale costs, item tax statuses, and default units of measure.

All vendors’ contract costs appear in the Finder on the Purchase Order, Receipt, Invoice, Return, and Credit/Debit Note entry forms. As a result, users can easily review vendors’ contract cost information while entering purchase order documents.
Vendor contract costs provide the default unit cost of items in Purchase Order documents. If contract costs don’t exist for an item, the program uses the default unit cost specified in P/O Options in the Purchase Order Entry or Receipt Entry form.

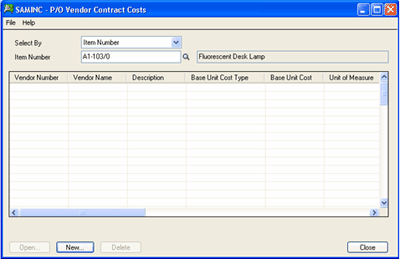
Vendor Contract Costs Form:

This form lets you:

  • Assign vendors’ prices to your inventory items, specifying:
  • Base unit costs for single or multiple units of measure.
  • Sale unit costs for single or multiple units of measure.
  • Volume discount amounts or percentages.
  • Tax authorities and tax statuses for the contract cost.

Vendor Contract costs appear by default when you add purchase orders, receipts, invoices, returns, and credit/debit notes. If no contract cost exists for an item and vendor, Purchase Orders displays the Default Item Cost specified in the P/O Options form.

You can also view all vendors’ contract costs in the item Finder for the Unit Cost field in the Purchase Order, Receipt, Invoice, Return, and Credit/Debit Note Entries forms.

Note: Vendor Contract Costs are not available in Sage Accpac 100 ERP.

Setting Up Vendor Contract Costs:

The Vendor Contract Costs form lets you set up contract pricing that you have arranged with specific vendors.
Vendor Contract costs appear by default when you add purchase orders, receipts, invoices, returns, and credit/debit notes. If no contract cost exists for an item and vendor, Purchase Orders displays the Default Item Cost specified in the P/O Options form.
You can also view all vendors’ contract costs in the item Finder for the Unit Cost field in the Purchase Order, Receipt, Invoice, Return, and Credit/Debit Note Entries forms.

To set up vendor contract pricing:

  • Double-click the Vendor Contract Costs icon in the P/O Setup folder to open the P/O Vendor Contract Costs form.
  • Click the New button to start adding vendor contract costs.

If reviewing costs, choose whether to view costs for an item number or a vendor.

  • On the form which appears, enter the vendor number  for whom you want to set up contract costs or select it using the Finder.

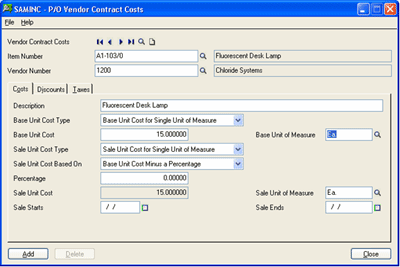
The Contract Costs form is similar to the I/C Item Pricing form in the Inventory Control module. It lets you specify basic and sale costs for single or multiple units of measure, and specify percentage or flat amount discounts based purchase volumes.

  • Select the first item number for which you want to enter costs.
  • Fill in the cost, discount, and tax information for the item.
  • Click the Add button to add the contract cost information.

Vendor Contract Costs Form — Costs Tab:

Use this tab to:

  • Change the description for the item on the purchase orders to match the vendor’s description.
  • Choose the base unit cost type (single unit of measure or multiple units of measure).
  • Enter the base cost or costs.
  • Enter the unit of measure for a single base cost.
  • If entering costs for multiple UOMs, specify the default cost and UOM for purchase orders.
  • Choose the sale unit cost type (single unit of measure or multiple units of measure).
  • Enter the sale cost or costs.
  • Specify how the sale cost is calculated:
  • Base unit cost minus a percentage.
  • Base unit cost minus an amount.
  • Fixed amount.
  • Enter the unit of measure for the cost.
  • If entering costs for multiple UOMs, specify the default cost and UOM for purchase orders.
  • Enter the sale dates for the item.

Vendor Contract Costs Form — Discounts Tab:

This tab lets you:

  • Select the method for calculating volume discounts on costs, and enter the discount percentages or amounts to use.
  • Discount Based On – Choose Percentage or Amount depending on how the discount is calculated. (For example, you might get 10% off when you order more than 100 items.)
  • Rounding Method – Rounding applies to percentage discounts only.

Specify if you want to round the discount unit cost of the item calculated by the program. You can choose no rounding, rounding up, or rounding down. If you round the amount, you can also specify the degree of rounding (such as to the closest dollar or closest 100 dollars).

  • Round to a Multiple Of – This field appears only if you select Round Up or Round Down in the Rounding Method field.

You might enter multiples such as “0.50,” “1.00,” “5.00,” or “10.00.”

  • From/To – Enter the minimum volume required for the discount in the From field.

The program automatically fills in the To value when you add a second discount level.
You can enter up to 10 different discount ranges in the discounts grid, specifying the From volume and the Discount Percentage or Amount (depending on the discount method).
The To field of the last line is always blank.

  • Discount Percentage / Discount Amount – Enter the discount available when you order the quantity specified in the From column. The program automatically fills in the To column if you add another discount level.

Enter the minimum volume required for the discount in the From field.
The program automatically fills in the To value when you add a second discount level.
You can enter up to 10 different discount ranges in the discounts grid, specifying the From volume and the Discount Percentage or Amount (depending on the discount method).

The To field of the last line is always blank.

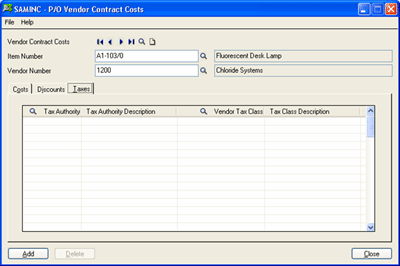
Vendor Contract Costs Form — Taxes Tab:

Use the tab to assign the tax authorities and vendor tax classes that apply to the item.

Posted in March 2007, Newsletter | Tagged , , , , , | Leave a comment

Six New Features in Sage Pro ERP 7.4 Accounts Payable

In the latest release of Sage Pro ERP 7.4, there are 12 new features in Accounts Payable that provide flexibility, better reporting, and much more to this very important module. This article will focus on six of the new features, which range from the ability to expand the invoice number to editing the void date on a check.  

Let’s start with one of the best ideas yet. The first new feature is one of the most convenient additions and is the ability to increase the size of the invoice number from 10 to 15 characters without requiring any changes to programs or screens. The invoice number is expanded in the data dictionary in System Manger.

The second new feature is the ability to enter descriptions and notes on each distribution line. Select Transactions > Enter Payables and enter all the pertinent information in the Invoice tab.

1.After entering the distribution amount, the user will be able to type in a description of the transaction as well as any notes they may want to add. Each distribution line can have its own unique description and notes, which makes it easier to determine what the distribution is for.

If we stay on the Distribution Entry tab, the third new feature can be found and it is the ability to retain the account selection for new lines.

2.When this box is checked, any subsequent distribution lines for this invoice will use this distribution account instead of the default account from the vendor file. This allows the user flexibility and reduces mistakes for vendors that have more than one distribution account.

This is a useful feature when a company has a General Ledger chart of accounts that includes departments. A user can use this new feature to assign the General Ledger account number and then change the department number on each subsequent line.

For example: Let’s say that there is one main segment in the account number for office supplies, and then a department number for sales, general office, warehouse and plant. The main segment is 6010, and the department segments are as follows:

  • Sales is department 100
  • General office is department 200
  • Warehouse is department 300
  • Plant is department 400

This provides for four different General Ledger account numbers: 6010-100, 6010-200, 6010-300 and 6010-400.

When the user checks the box “Retain account selection for new line”, using our example, they would only have to change the department numbers.

The fourth new feature is the ability to print an aged payable report for a particular General Ledger account number.

To print this report, select  Print > Payables Report > Aged Payables.

3. Enter the pertinent information on the option grid. If the report is to show all of the General Ledger accounts, leave this option as is. But, if the report is to show only a particular account, then enter that account number (which can be either the control account or a distribution account).

The fifth new feature is one that will save time for many users because there is now an option to void a payable at the same time that a check is voided.

Select Transactions > Void Checks/Direct Payment.

4. Enter the criteria that is appropriate in the option grid, making sure to change “Void Invoices” to Yes, and click on Proceed.

5.Select the check that is to be voided by hitting the space bar to select and unselect the check. Then click on the Void Invoices button.

6. Select the invoice that is to be voided by hitting the space bar. Click on the green save button and the system brings us back at the Void Checks/Direct Payments screen. Click on the green save.

7. Select Yes to complete the check voiding process.

8. Select Yes to void any associated invoices.

The sixth new feature also pertains to voiding checks and direct payments because a user can now edit the void date. This allows the user to control which fiscal period records the void, which is useful in creating reversing entries.

9. If the void date is different than the current date, select Yes.

10. Enter the void date next to the check number. Proceed as described above.

These new features bring flexibility, powerful reporting options, and clarity of entry to Accounts Payable. And, we’re not done yet! Stay tuned for the next installment when we look at the rest of the new features in Accounts Payable.

If you have any questions or need additional assistance, please contact your AXIS consultant or email us at info@axisglobalpartners.com for more information

Posted in March 2007, Newsletter | Tagged , , , , , | Leave a comment

Attention Sage Pro Users – Sage Pro and Microsoft Visual FoxPro

Following the announcement that Microsoft made on Tuesday, March 13, regarding future versions of Visual FoxPro, Sage Software wants Sage Pro ERP users to know their continuing position on Sage Pro ERP. Since VFP v9.0 will continue to be supported through 2015, Sage does not foresee any change in their development plans for Sage Pro.

Sage Software will continue to develop Sage Pro in order to offer the features and enhancements that they feel will address the needs of the market. And since Microsoft is opening up more of VFP’s extensibility features with Project Sedna, they encourage business partners to take advantage of these features for any modifications they market for Sage Pro.

Sage Software is committed to working with their clients and business partner community to meet the needs of their Sage Pro clients for the life of their business.

Read Microsoft’s announcement here.

Posted in March 2007, Newsletter | Tagged , , , | Leave a comment

Frequently Asked Questions

Sage
Accpac ERP

Q – Can we set an optional field to be required without selecting a Default Value?

A – In version 5.3 of Sage Accpac ERP, you had to specify a default value for any optional fields that were required in transaction forms or records. This is no longer the case in Sage Accpac ERP v5.4.

User can select to make an optional field required in the modules Optional Field setup window.  When adding an optional field, change the Required Field to “Yes”.  You no longer have to select a Default Value

Note, however, that making the optional field required without a default value, you must now make an entry for all required fields before you can save records or post transactions.

Q – Can we setup Accpac to automatically post General Ledger and Accounts Payable
batches created from the Purchase Order module?

A – To setup Accpac to automatically post Purchase Order transactions in the General Ledger, open the G/L Integration window under the Setup folder in Purchase Orders, select “Creating and Posting a New Batch” from the drop down list for the “Create G/L Transactions by” setting.

To setup Accpac to automatically post Purchase Order transactions in Accounts Payable, open the Options window under the Setup folder in Purchase Orders.   On the Processing tab, select the “During Day End Processing” from the drop down list for the “Post A/P Batches” setting.

Sage Accpac
CRM

Q –   I am unable to attach multiple files when sending outbound emails.  When I try to attach a second file to an email CRM replaces the first attachment with the second attachment.

A – This behavior is typically caused by having the Default E-mail template setup under My CRM -> Preferences that is conflicting with the e-mail editor.

In order to resolve this, go to My CRM -> Preferences and click Change.

Select none in Default E-Mail template field and click Save.

You should still be able to use the E-mail Template by selecting the template of your choice when composing the email.

Q – Is there a way to copy or create a backup of the Workflows?

A – There is no direct functionality to copy a workflow and create a new one in CRM. But you can make use of the Component Manager to accomplish this.

Make sure you have the latest backup of CRM database before attempting the following procedure.

  1. Logonto CRM and go to Administration -> Advanced Customization ->Workflow.
  2. Selectthe Workflow that you want to backup or Copy from andclick ChangeWorkflow edit button.
  3. Renamethe Workflow to any name of your choice but different than the originalname and click Save.
  4. Now, click the PreviewList go button on the right, which should give you the Script Previewof Workflow.
  5. Selectall the contents of script and copy it to a .TXT file.
  6. Rename the.TXT file to CopyWorkflow.es file.
  7. Create a new folder called CopyWorkflowunder a temporary folder e.g. C:\TEMP\CopyWorkflow.
  8. Copythe CopyWorkflow.es created in step 5 to C:\Temp\CopyWorkflow folder
  9. Createanother text file with the following two lines of text, Description= Directory=CopyWorkflow and save it.
  10. Renamethe file to CopyWorkflow.ecf and copy it to C:\TEMP\CopyWorkflow folder and CopyWorkflow.ecfare at the same level i.e. under C:\TEMP folder.
  11. Now, select the both the items i.e. CopyWorkflowfolder and file, Right ClickàAdd to Zip. (See attached document for clarification)
  12. Namethe archive or zip file CopyWorkflow.zip and click Add (seeattached) Now, you have the zip file ready to be installed as a componentwhich will create the original workflow again.
  13. Goto Administration -> Customization -> Component Manager, under Add Componentpanel, click the Browse to locate and select the CopyWorkflow.zipthat we have created above.
  14. ClickUpload new component optionafter specifying the file.
  15. Youwill see CopyWorkflow component appear under Available Components box.
  16. Selectthe component in the Available Componentsbox and click Install Componentbutton on the right.
  17. Youmay receive a message No parameter information found in ‘CopyWorkflow.ecf’, ignore this message and click the Install Component button again.
  18. This will install the component and the originalworkflow will be created. You can confirm that by going to Administration àAdvanced Customization àWorkflows.
Sage Pro ERP

Q – How can I identify what tables get updated during a transaction?

A –
Since the release of Sage Pro ERP 7.1 Build 3001.10, the PROTRANSACTIONPAUSE utility was added to the product. It allows the ability to identify which tables are updated throughout a particular transaction.

This utility must first be activated by setting the following environmental variables on the Microsoft Windows workstation:
Environmental Variables Required

Variable Name

Variable Value

SBTDUTIL

ON

PROTRANSACTIONPAUSE

ON

Once these environmental variables are set on the workstation, logon to Sage Pro. When saving any transactions in any module, the program will pause before and after each table is updated. This helps to identify which tables are being accessed at any particular point of a transaction. This utility may be turned off by setting one or both of the environmental variables "OFF."

The same transaction may update different tables depending on the system settings. For example a purchase order receipt would update the ICCOST table if using a FIFO or LIFO costing system. However, it would not update ICCOST if using a Weighted Average costing system. Other factors, such as serial numbers, also affect which tables are updated. This utility only pauses on those tables that are specifically updated by the transaction in progress.

Important
This utility is not meant for the Job Cost or any Manufacturing module. It may be use in any module that supports Multiple-Document Interface (MDI) screens.

Q – How do I add additional User Licenses?

A –
The number of user licenses is updated in System Manager; however, this does not update the number of users allowed into the installation. This may occur even if a message appears indicating that it did. A corrupt user license file may be indicated by the following message:

Check User License

This also results in a reduction of the number of users allowed. This solution may also be used to restore user licenses to previously assigned limits.
To add additional users to Sage Pro, please follow the steps below:

  • All users must be out logged of Sage Pro.
  • Login as a Sage Pro administrator.
  • Open System Manager.
  • Under the Maintain, point to Setup and click User License.
  • Type in the Activation Code. Important:  This is different from the Activation Code used during installation.
  • Click OK.
  • The following message appears:

    The maximum number of users allowed has been updated. 

    Click OK.

  • Exit Sage Pro and login again. This step is mandatory in order to correctly update the number of user licenses.

Q – What are the New Modules and Options Available in Sage Pro ERP 7.4?

A –

 Option or Module

 100 Edition

 200 Edition

 Comments

 Dashboard

 No

Yes 

 Included as enhancement for System Manager
 LAN or Remote version

 RMA

 Yes

Yes 

 Full Module, with Order Entry (OE)

 AP EFT

 Yes

Yes 

 Add on module, option

 Routing

 No

Yes 

 Included with OE and Purchase Orders (PO)
 Works with OE, PO and RMA

 RFQ

 No

Yes 

 Option, works with PO

Back to Top^
Posted in March 2007, Newsletter | Tagged , , , , , , , , , , , , , , | Leave a comment

Microsoft Launches Windows Vista. Know The Impact To Your Company

As of January 30th, the Windows Vista operating system is available for sale to the public.   Microsoft Windows Vista, the new desktop computer operating system recently released by Microsoft, will replace the very familiar Windows XP.

Computer manufacturers such as Dell, HP, and Panasonic are shipping machines that have Vista preinstalled on them.  If the near future, around late fall, these manufacturers will no longer offer Windows XP as an operating system.

Every corporation will be impacted by this change.  Your organization needs to manage the transition from Windows XP to Vista in order to ensure that your mission critical applications are not adversely affected.

How does this impact our corporation’s Sage applications?

Sage ACCPAC reports:
“Vista is currently going through the process of certification by our QA team and we should have a statement ready at that time.  To date, we haven’t run across any showstoppers yet but customers should install the latest GL 5.4 Service Pack to work with Office’s Excel 2007 for financial reporting.”

Compatibility between Sage ACCPAC products and Vista is in Q & A and Sage has not certified the programs complete compatibility.  Although Sage ACCPAC products may seem to function properly on Windows Vista, there is no certainty that data loss or corruption will not happen. We strongly recommend that you do not install Windows Vista on machines which use Sage ACCPAC or any of its third party products until the Vista operating system is certified.

Sage MAS Division reports:

“The currently shipping versions of Sage MAS 90, Sage MAS 200, Sage MAS 500 ERP systems as well as Sage MAS 200 – SQL Server Edition are not completely compatible with windows Vista.

It is important to note that the compatibility issues with Vista are not isolated to Sage’s accounting software – Vista also impacts many of the third-party products currently working with Sage software, including Crystal Reports® from Business Objects and Microsoft FRx.

The Sage MAS Product Team is currently looking into all third-party programs and other Sage MAS Product software to develop an idea of how long it will take to solve these compatibility issues, and will be posting a Vista Compatibility update on March 1, 2007 on http://www.sagesoftwareonline.com.”

What should I do?

Currently, AXIS and Sage encourages all customers to wait on upgrading to Vista until they can offer full support for Vista. Since Windows Vista is not a supported platform, any issues arising as a result of running Vista will not be supported by Sage or AXIS.  Sage also recommends that any customers contemplating a new computer purchases request Windows XP Professional rather than Windows Vista at this time.

Where can I get more information on Windows Vista?

Windows Vista homepage for general information:  http://www.microsoft.com/windows/products/windowsvista/default.mspx
Windows Vista Editions for information about the variety of Vista software.  http://www.microsoft.com/windows/products/windowsvista/editions/default.mspx

What if I am using Microsoft SQL Server?

The following was taken directly from Sage to ensure total clarity:

Earlier versions of Microsoft SQL Server, including SQL Server 2000 as well as the Desktop MSDE edition, SQL Server 7.0, and SQL Server 6.5, will not be supported on Windows Server "Longhorn" or Windows Vista.

http://www.microsoft.com/sql/howtobuy/sqlonvista.mspx

For users of SQL Server 2005, Microsoft plans to support SQL Server 2005 on Vista and Windows Server "Longhorn". Microsoft has not released the required service pack as of this January 30th, 2007. When Microsoft releases the required service pack, Sage will test and ensure compatibility before certifying its applications.

Can other software my company uses be impacted by Vista?

Yes!  Your corporate IT department should check with each software publisher or vendor to ensure compatibility that the software versions being utilized by your company are compatible with Vista before any upgrades of operating systems or new Vista machines are installed in your network.

AXIS strongly recommends that your company become as informed as possible on Windows Vista to ensure changes to your business computing systems are planned, staged, tested and implemented in the smoothest possible manner.

Please do not simply begin adding workstations to your organization that have Windows Vista without having performed the necessary due diligence and planning.  You may even want to ensure that any possible disruption to your business is minimized by purchasing workstations with Windows XP before it becomes discontinued.

Please feel free to contact Axis Integrated Solutions, your trusted advisor, at info@axisglobalpartners.com if you have any questions on the transition to Windows Vista.

Posted in February 2007, Newsletter | Tagged , , , , , | Leave a comment

The Paperless Company – A Winning Example

Last month, we covered the history of document imaging and the benefits of having a paperless organization. This month, we will provide you with a business scenario and sample success story.

NowFORMS, the document imaging solution being highlighted in this article can scan or import directly from Sage’s Accpac ERP. Documents are converted, indexed using one or many parameters, and stored in an electronic archive. Images stored in the electronic archive can be instantly viewed or shared via email, print or fax.

  • Complete Sage Accpac ERP integration up to v 5.4
  • Runs on Pervasive and MS SQL
  • Web-based (asp.net 2.0)
  • Scaleable and easy-to-use
  • Username and password protected
  • Compatible to Accpac modules: Accounts Receivable, Accounts Payable, Order Entry and Canadian and US Payroll

A Winning Example

There is a direct relationship between business documents and business performance.

Recently, NowDocs, Inc. helped a large distributor improve their invoice processing and delivery needs by implementing a system that manages the convergence of paper to digital documents with their web-based solution (NowFORMS). This change increased their ability to distribute documents electronically and alleviated rising costs associated with customer complaints, service interruptions, and mailing expenses.

The Challenge

Refrigeration Supplies Distributor (RSD) is one of the leading HVAC parts suppliers in the west. With over 60 locations in 9 western states, RSD is still able to expand in a commodity driven marketplace and is planning to add additional locations and distribution centers in the coming years. RSD attributes its growth to innovation and customer service. Prior to implementing NowFORMS, RSD was mailing up to 12,000 invoices a week and they were sent from each of 60 plus locations. RSD’s largest customers could receive up to 25 different envelopes containing invoices from their various locations on any given day. This was not only impacting RSD’s bottom line with the added expense of mailing 25 different envelopes, it also had a detrimental effect on their receivables.

When looking for a document distribution solution, RSD wanted to not only consolidate mailings to their customers, they wanted to move into the digital age and send them electronically. “We are continually looking for ways to improve our customer’s experience. NowFORMS has helped make it easier for our customers to do business with us.”
Gordon Olson – VP of
Technology – RSD

The Solution

With NowFORMS, RSD was able to automate the transfer and conversion of paper documents, such as: invoices, statements, bill of adding, pick tickets and more … into print format for postal delivery, or into electronic formats for delivery via fax, email, print, web and digital archive. NowFORMS offered RSD a comprehensive solution combining document assembly, high-quality printing with NowFORMS’ e-document delivery capabilities for RSD’s customers and trading partners who prefer to receive business documents electronically.

“The NowFORMS solution has allowed RSD to reduce cost, improve efficiencies and increase customer satisfaction within our organization.” Gordon Olson – VP of Technology – RSD

Now, when a form change is required, it can be updated within the NowFORMS system and is available immediately at all of RSD’s locations. RSD further reduced its cost by combining invoices to individual customers from multiple branch locations. These invoices can be printed and mailed together, faxed, emailed or reviewed and
printed at the customers location via the web. RSD was able to convert fifty-percent of their customers to receive their invoices and statements electronically in the first
year. The centralized processing of invoices and the increased speed in which RSD’s customers receive them reduced their accounts receivable by at least two days. This resulted in RSD decreasing their printing and mailing expenses by eighty-percent.

RSD has recently implemented NowFORMS’ Self Service Web Portal. This web-based interface gives RSD’s customers a secure way to view, print and electronically distribute their own invoices and statements. By giving their customers this ability, RSD has given their Branch and Credit Mangers more time to run the business.

Rapid Return On Investment (ROI)

Return on RSD’s investment was immediate. In less than 6 months, RSD realized annualized savings of $10,000 on postage, forms, and dedicated labor. They also avoided the cost of new equipment and the effort of new implementation. Best of all their correspondence is professional-grade, delivery is fast and guaranteed, and they have document options to satisfy every customer’s need.

Learn how you too can save thousands of dollars by automating e-document processing and delivery with NowFORMS.  To view a comprehensive self-running demo of NowDocs visit us at AXIS-NowDocs or e-mail us at info@axisglobalpartners.com.

Posted in February 2007, Newsletter | Tagged , , , , , , , | Leave a comment

What is an ERP System?

We often hear IT personnel, consultants and software publishers refer to ERP systems, but what exactly is ERP?

ERP (Enterprise Resource Planning) is a business management system that integrates all facets of the business, including finance, planning, manufacturing, warehouse, sales, and marketing.  To be considered an ERP system, a software package generally would only need to provide functionality in a single package that would normally be covered by two or more systems.

Small and medium businesses (SMB) face very similar challenges when choosing an ERP system for their organizations.  To reduce the chances of a failed implementation several important steps need to be considered up front.  Design a plan that includes among other things, the definition of functional requirements, documentation of your current business processes, a cost analysis for the software and hardware and the benefits that will be derived from the implementation.  The plan should also include milestones and due dates that are critical to controlling the scope and cost of these projects.

Companies often require the assistance of a third-party consulting company to implement an ERP system.  The consultants involved in the implementation require both business and technical skills.  A business consultant studies and gains an understanding of an organization’s transaction flows and business processes and matches them to the corresponding processes in the ERP system.  Thus the organization’s business strategies are the central focus of the implementation and technology is being adapted around such practices and not the other way around.

Other factors to address:

  • Executive sponsorship
  • Resources both financial and human
  • Managing change within the organization
  • Communication
  • Technical competency (internal and external)
  • Project management
  • User training and support both pre & post implementation
  • Integration to other verticals or other key applications

There are numerous software publishers in the SMB-ERP space. They include:

  • Sage Software – Sage Accpac ERP 500, Sage Pro ERP 500, Sage MAS 500
  • Microsoft Business Solutions – Great Plains, Navision
  • SAP – SAP Business One
  • Oracle – NetSuite
  • Intuit – QuickBooks

These applications enable small and medium businesses to implement the solution quickly with a rapid return on investment.  The offerings include core accounting modules (financial and operational), customer relationship management (CRM), human resources (HR), warehouse management (WMS), e-commerce solutions, business analytics and point of sale, among others.  Selecting the right vendor is important.

For SMB’s, an ERP project will set their operational direction for several years into the future.  Key features to look for are flexibility and freedom of choice!  The SMB market encompasses many different types of industries with vast operational requirements.  One size does not fit all.  With respect to the accounting modules, the solutions currently being offered are mature and functional.  SMB’s need to expand beyond their financial departments and require extended functionality to include customer relationship management, business analytics and logistics, among others.  In addition to flexibility, ERP applications need to be modifiable.  Integrating third party solutions and in-house developed applications is often required to deliver a “complete” solution.

As an SMB owner or manager I would also look at other key features that are listed below:

From a product perspective:

  • Freedom to choose operating systems (Windows, Linux)
  • Freedom to choose databases (Microsoft SQL, Pervasive, DB2, Oracle)
  • Integration out of the box with the extended offerings (CRM, HR, WMS, EDI)
  • Scalability
  • Multi-lingual
  • Multi-currency
  • Multi-tiered architecture

From a software publisher perspective:

  • Ascertain that software publisher is economically viable
  • Size of install base in the SMB market
  • Commitment to the SMB market
  • Commitment to R & D

From a channel perspective (if applicable):

  • Competency and industry experience of the value added reseller
  • Number of other business partners in your local area (Plan B)
Posted in February 2007, Newsletter | Tagged , , , , , , , , , , , , , , , , , , , , , , | Leave a comment

Efficient Warehousing Warehouse Efficiency Strategies Pyramid Level 1 – Current Process Automation

Axis Global Partners is introducing a series of articles over the next few months that will address how companies can strive to improve their warehouse efficiencies.  These articles are provided from the experience that AXIS Integrated Solutions has gained over the years on “onsite” implementations and from the publishers of the software products implemented.

These articles will be a warehouse technology and process selection roadmap, giving Small and Mid-sized Business (SMB) distributors insight into initial investments that they can afford. Additionally, it outlines an upgrade path with incremental investments that result in greater operational sophistication and savings.

Warehouse Efficiency Strategies Pyramid
In light of the proliferation of Warehouse Management Systems (WMS) in the SMB market, we suggest the following pyramid as a model to consider when formulating your own strategy for implementation. This model allows you to start small, think big, and step up your savings over time while keeping business disruption at a minimum.

We selected a pyramid structure because as you ascend the pyramid, each layer of technology represents process improvement and cost savings over the previous layer. Companies may elect to skip stages in the pyramid. The appropriate approach for each company depends on organizational resource availability, tolerance to change over time, and requirements that will define the scope of the solution. This paper describes the different levels of possible incremental investment.

Stage 1 – Current Process Automation
Stage 2 – Business Process Re-engineering
Stage 3 – Infrastructure & Business Process Re-engineering
Stage 4 – Integrating Warehouse Automation Equipment into Business Processes

Stage 1 – Current Process Automation
The first level of the pyramid allows you to maintain your current processes and still realize significant improvements to your bottom line. By simply automating current processes with barcode data collection devices and software, manufacturers and distributors can dramatically increase the accuracy of inventory and order shipments.
Before wireless mobile computing, warehouse related information was communicated in “batch” to the business system through the use of paper, pencil, and data entry at a stationary warehouse terminal. Instead of carrying around paper and a pencil, warehouse staff can be equipped with PDA’s to record functions performed in the warehouse. Simply “mirroring” current processes with wireless PDA devices is the premise for Stage 1 of the strategies pyramid.

The benefits of going paperless include:
Better data for the enterprise

  • One time data entry – Rather than handling data twice (pencil and paper, then data entry into the terminal), scanning facilitates data entry at the time warehouse activities are performed.
  • Efficient data entry – Scanning barcodes is much more efficient than writing data on a piece of paper. The time required for data entry, sending paper orders to the warehouse, searching for misplaced paperwork and filing and maintaining paper documentation are all eliminated. This alone can result in significantly increased efficiency and cost savings both in labor and paper-related expenses.
  • Accurate data entry – Scanning barcodes eliminates data entry errors. Furthermore, every step through the warehouse can be interactively verified using barcode and RF technology. This ensures a high level of accuracy in filling orders, product check-in, putting away products into the correct locations, and accurate replenishment of pick-bins. Costs associated with shipping, receiving and inventory errors can be virtually eliminated.
  • Timely information and integration of warehouse data into the ERP System – If data is captured at the time that processes are performed, the system can provide real time information back to the enterprise. At a minimum, the warehouse solution requires software that allows sales/work orders, purchase orders, and inventory information to flow seamlessly between the warehouse and ERP system as processes are performed. Electronic data transfer between the warehouse and ERP system also ensures timely and accurate data for invoicing, purchase order payment, and inventory tracking and management, all without manual keyboard data entry.

Optimized inventory management

  • Improved inventory accuracy – Inventory carrying costs have an important effect on business viability. Inventory accuracy can reach approximately 99.9% when inventory is tracked using barcodes and RF handheld inventory functions. Inventory accuracy is ensured by scanning and validating locations and product barcodes.
  • Reduce your safety stock – With the higher levels of inventory accuracy, a business can expect to diminish the quantities of required stock on hand and the carrying costs of that extra inventory, while at the same time maintaining adequate stock levels to fulfill orders.
  • Improve inventory counting efficiency – Warehouse software should facilitate ongoing cycle counts, reconciled with financial data in real-time. This is an enormous benefit to the warehouse because the warehouse does not need to shut down operations. Performing regular cycle counts reduces the frequency requirement of full inventory counts and the cost associated with closing down the warehouse and the additional staff needed to perform the count.

Improved warehouse efficiency

  • Eliminate searching for lost products! – With real-time inventory, wireless devices can accurately direct the order fulfillment process by ensuring that pickers travel to the correct pick–bin locations. Searching for product is eliminated and accuracy is ensured by scanning and validating locations and quantities.
  • Reduce picker walk time! – The typical warehouse solution sequences item picking to minimize walk time throughout the warehouse thereby reducing travel time, even if the business system does not have bin locations.
  • Monitor warehouse activity and order status in real-time – Using real-time wireless data collection equipment and software to record and store activity records in a database, a warehouse solution can provide visibility into your companies warehouse productivity, activity and trends.

This visibility can be on-line, presented in real-time, or through reporting that looks at both current and historic data. Effective use of the data can positively affect the warehouse’s ability to forecast resource requirements, recognize and remedy productivity problems, track errors, and monitor customer issues.

Improved customer service

  • Improve your service level – Order fulfillment time can be significantly decreased. Many companies need to improve cycle time to meet customers’ growing expectations for same day, or rapid shipment.
  • Eliminate order shipment errors – Reducing errors in order fulfillment and shipping not only lowers the monetary cost of errors, but keeps customer satisfaction and return business levels high. Order accuracy of 99.9% can be achieved.
  • Improve your fill rate – The ability to fill orders completely, thanks to an accurate, automated inventory management facility lets you keep those sales. You won’t lose customers because you can’t fill their orders.
  • Provide your customers with improved visibility – Keep your customers updated with real-time information about order status. This information is always available to your customer service staff, on-request and without delay.
  • Meet tough customer demands – A system can be used to facilitate compliance requirements such as adopting specific labeling, or tracking lot and serial numbers. Using a solution like a WMS can automate compliance with greater ease and more cost-effectively.

This article has provided some insight on why now more and more business are moving to improve their warehouse operations to gain efficiencies.  If you are interested in obtaining more information on warehousing, please feel free to contact us directly via email at info@axisglobalpartners.com

Posted in February 2007, Newsletter | Tagged , , , , , , , , , | Leave a comment

What’s New in Sage Pro ERP 7.4

In the latest release of Sage Pro ERP, there are six new robust features in Inventory Control that take this module to a new level. Let’s take a tour of the new and improved Inventory Control.

The first new feature is the ability to do inventory transfers across companies. Sage Pro ERP users that have multiple companies will find the process is very simple. Go to Inventory Control > Transactions > Inter Company Transfers and then select either issues or receipts.

1.When issues are selected, the user will be asked for the location that the items are being issued from as well as the target company ID, the company that the transfer is going to. The rest of the transfer proceeds per usual.

The second new feature is the ability to add multiple inventory items to price groups instead of one item at a time.  This makes the maintenance of the pricing structure (the feature or its maintenance) much easier and more flexible. Additionally, the price groups can be exported to Excel, changes made to the data (such as the pricing structure), and then imported back into Sage Pro ERP.

In Inventory Control > Maintain > Price Groups, the user can select or create a price group and then add items to that price group.

2. After entering the price group, description, whether it is a price for a customer group, customer, or sale and the pricing method, the user enters the level information. This is the  standard in other versions of Sage Pro ERP. What is new is the items tab and the customer groups tab.

3. The items tab allows the user to select items items that will be part of this price group.

4. The customer groups tab allows the selection of customers for this price group or the selection of customers with certain price codes.

The third new feature in Inventory Control actually involves two new options for cycle counting. The first is the ability to import cycle counts if bar codes are being used in Sage Pro ERP 7.4.  The second is the ability to disable the cycle count freeze, but only after a cycle count worksheet is printed. In past version,  once a cycle count code was activated, there was no way to “unfreeze” items that may be needed for shipment. Now, we can disable the freeze which allows the users much more flexibility in cycle counting.

5.When selecting the option to disable the cycle count freeze, this warning appears. As stated, the “unfreezing” process allows the on hand quantity to be adjusted. This can cause confusion if the transactions aren’t documented. But for many companies it is imperative to be able to unlock the cycle count. With that in mind, when the user begins entering the cycle count, the screen shows the inventory on hand when the cycle count worksheet was printed as well as any subsequent transactions for that item. This helps with the reconcilation process.

It is important to note that, if both the option to freeze inventory for cycle count and use bar codes are set in the Inventory Control system setup, the option to import cycle counts is not available.

The fourth new feature pertains to enhancements to the Stores and Bins.

6. In the Inventory Control system setup, default bins and stores are available by location. Additionally, there is an option to prevent blank Stores and Bins which is very useful because it forces the user to pick a bin or make a new bin (depending on the process) instead of accepting blank bins. This makes the bin system much more accurate.

The fifth new feature is the option to print packing slips for inventory transfers. This is a very welcome addition to the printing options in Inventory Control. For inter company transfers and for transfers between locations this gives the warehouse a document that they can rely on.  Under the Print menu option, select Packing Slips. The user will have the option to print an individual packing slip or a batch of slips.

7. Then, the user can enter the criteria that meets the needs of the company.

The sixth new feature in Inventory Control is the addition of a date range to the inventory adjustments report. This will allow the filtering of dates, which is a welcome option indeed.

To run the report, go to Print > Transaction Reports > Inventory Adjustments.

8. Enter the transaction date for this report. The rest of the options are the same as in previous versions of  Sage Pro ERP.

In conclusion, from the ability to do inter company transfers to mass additions to the price groups to improved cycle counts and enhanced reporting, these new additions to Sage Pro ERP featured above have dramatically improved the processes within the Inventory Control module.

If you have any questions or need additional assistance, please contact your AXIS consultant or email us at info@axisglobalpartners.com for more information

Posted in February 2007, Newsletter | Tagged , , , , , | Leave a comment

Frequently Asked Questions

Sage
Accpac ERP

Q – Can you please explain what the provisional posting function does?

A – The “Allow Provisional Posting” setting is selected in the General Ledger Setup Options window on the Posting tab.

General Ledger allows you to temporarily post batches of transactions to accounts so you can test their affects. You can include provisionally posted amounts in financial statements.

You can edit provisionally posted batches until you post them permanently (or discard them). General Ledger assigns a posting sequence number to each batch of transactions you post provisionally.  This number is listed on the Provisional Posting Journal. General Ledger automatically creates and maintains provisional fiscal sets for each account to which a provisional amount has been posted. The set is deleted when the provisional data is deleted or posted permanently.

In addition to the Financial Reports, you can include Provisional Posted amounts in the Trial Balance report:

If you want to provisionally post multiple batches at the same time, you must mark each batch as “Ready to Post” in the G/L Batch List.

Next, open the Post Batches window and click on the Prov. Post button.

NOTE

Please keep in mind if you have provisional posted batches, and you post or provisional post other batches without resetting the Ready To Post flag to Yes, the formerly provisional posted batches will be reset to open.  In addition, marking a provisional posted batch Ready To Post will also reset the batch to an Open-Ready To Post status.

Q – What is the difference between the setting “Cost Inventory Items” During Post vs. Day End Processing?

A – This inventory setting option lets you choose whether to cost items as soon as transactions are posted in Order Entry, Inventory Control, and Purchase Orders or at chosen times when you run an Inventory Control Periodic Process called Day End Processing.

  • If you cost inventory items at posting, every shipment, receipt, and transfer will update item costs—although this also means that posting orders from Order Entry can take longer.  Depending on the transaction that is posted, other processes are completed in addition to updating the cost: General Ledger, Accounts Receivable, and/or Accounts Payable batches are created as well.
  • If you process a large number of transactions, you may choose to update costs at day end.  While inventory quantities are updated immediately in Inventory Control regardless of the selection chosen, costs, General Ledger, Accounts Receivable and Accounts Payable batches will not be created until the Day-End process has been run.  For example:
    • All Order Entry shipment entries and Purchase Order receipts entries posted through out the day will not appear in the General Ledger until the Day End process has been run.
    • All Order Entry Invoices will not appear in Accounts Receivable until the Day End process has been run.
    • All Purchase Order Invoices will not appear in Accounts Payable until the Day End process has been run

In order to change this setting:

  • Verify all users have all Order Entry, Inventory Control and Purchase Order windows closed for this company.
  • Open the Options window located under Inventory Control – I/C Setup.
  • On the Processing tab, click the drop-down arrow next to the Cost Items During and select either “Posting” or “Day End Processing”.
  • Click on Save and then on Close
Sage Accpac
CRM

Q – When clicking on the ‘Export To File’ Icon, nothing happens. The pop up window flashes and disappears. I am unable to export the list.  How can I fix this?

A – This behavior is due to Internet Security settings. Follow the below steps to resolve the issue.

  1. Right Click on the Internet Explorer Icon.
  2. Click on Properties.
  3. Click on Security Tab.
  4. Click on ‘Local Intranet’ or ‘Internet’ depending on the zone of CRM you use (Hosted or In house).
  5. Click on Custom Level Button.
  6. Enable the ‘Automatic Prompting for File Downloads’ and ‘File Download options under  Downloads Category.
  7. Click on OK.

Now you will be able to successfully launch the Export to File download pop up screen.

Q – Can you pass parameters to a Crystal Report from within CRM?

A – You can use the following method to get a "search criteria screen" when using Crystal Reports with CRM.
This process allows you to pick search criteria like you would when doing a standard CRM report but passes the "where" clause on to the Crystal report.

  1. Set up a standard Crystal report – following the steps in Chapter 38 in the Accpac CRM v5.8 System Administrator’s guide.
  2. Create a text file using the following naming convention:

      reportname.rpt.search 
For example: companysummaryreport.rpt.search
Where “companysummaryreport” = “reportname”

  1. The first line of this file should contain the view/table the report is based on.
  2. The subsequent lines should contain the names of the fields you want to search on:

For example:    vsummarycompany
                              comp_name
                              comp_createddate
Where vsummarycompany is the View and comp_name and comp_creditdate are the field names to be used to search on.

  1. Save this file in the same directory as the crystal report.

Now when you run the report you get a CRM screen allowing you to set your search criteria.

Sage Pro ERP

Q – How can I add a New Module or Option to Sage Pro ERP?

A – Follow the steps below to add a new module or option to an existing installation:

Important:
Before proceeding with the installation, verify that there is a full and verified backup of the installation. Additions to existing installations should be done by Sage Certified Consultants and Business Partners.

  1. Launch the installation routine from the CD or web download.
  2. Click Next in the Welcome screen.
  3. Click I Accept in the Software License Agreement screen.
  4. In the Choose Destination Location screen, select the folder which contains the existing Sage Pro installation.
  5. Click Next.
  6. Click Next in the Conversion Information screen.
  7. In the ACCPAC Product Registration screen, enter the Company and new Product and Add-on activation codes when prompted. The Product activation code should include all previous applications as well as the new additions. The Add-on activation code should include all previous options and any new additions – if applicable. Both codes are required even if only one has changed.
  8. Click Next.
  9. In the Setup Type screen, click Custom Install.
  10. Click Next.
  11. In the Select Components screen, deselect all modules and options that have already been installed.

    Important:
    If the new modules or options are not included in the selection list, the new activation codes may be incorrect and did not include them. Also when to installing on a SQL installation, Pro SQL Manager must be selected. Otherwise a message may appear stating that the system is trying to change the database and will not allow the installation to proceed. Please refer to Knowledgebase article 20515 for additional information.

  12. Select System Files.
  13. Select all new module and options that are being installed. If this is a Microsoft SQL Server (SQL) installation, select Pro SQL Manager.
  14. Click Next.
  15. Select the appropriate program folder and click Next.

The system will now complete this installation. Once completed, confirm that the new modules and options can be accessed from within Sage Pro. Also, all applicable service packs, patches, and hot fixes should be reapplied once the installation is complete. When System Files are reinstalled and new modules and options are added, they may overwrite certain files.

This process may also be used to change the licensed company name of an installation. In that case, only System Files need to be selected installation. As of Sage Pro 7.3 or later, this can be done without reinstallation of the product. Please refer to Knowledgebase article 21090 for additional information on this feature.

Q – How do I use the GLBLREC Tool with Sage Pro ERP 7.3B?

A – In some cases, General Ledger (GL) balances may become out of balance due to network failure, power outage or other interruptions. The GLBLREC program may be used to correct the balances in GL. For Sage Pro 7.3B and prior this is an external utility available to Sage Business Partners as part of the Developer Tool Kit. This article explains how to obtain and install this program in Sage Pro 7.3B.
As of Sage Pro 7.4, this program is now included with the program and does not need to be installed separately.
Follow the steps below to install the GLBLREC program:

Warning
Ensure that there is a full and verified backup of the installation and data before proceeding. Also verify that all users have logged out of the installation; run the clear flags utility in System Manager to ensure that all modules are clear and no files are locked. This program operates completely independent of Sage Pro and running this program while another user is logged in may cause severe problems. Once completed, verify that the data is clean, accurate and stable.

  1. Copy the GLBLREC.FXP into the same directory as SYSDATA. This is generally the root directory of the Sage Pro installation.
  2. Under the File menu, point to Open and click FoxPro Access.
  3. Type the following commands into the VFP command window:

    DO [pathname]\SQLTEST
    DO GLBLREC

    For example if this tool is installed at C:\PRO73\TOOLS, the commands would look as following:

    DO C:\PRO73\TOOLS\SQLTEST
    DO GLBLREC

Note: When running the GLBLREC tool there will be a prompt for the Company number. The value accepted will be case sensitive. Therefore if the company ID has alpha characters in the ID it should be entered in upper-case characters. Otherwise the “Company [Company ID] is not found.” message will appear.

It is essential to also run the SQLTEST.PRG for VFP in order to create common data objects that are required by the program.

Warning
The documentation that comes with the developer toolkit states to use the commands below to runs GLBLREC:

DO TOOLS\SQLTEST
DO GLBLREC

This is incorrect and must be revised. The commands described in this article should be used instead.

Back to Top^
Posted in February 2007, Newsletter | Tagged , , , , , , , , , , , , , , | Leave a comment