| Sage Accpac ERP |
||||||||||||||||||||||||||||||
|
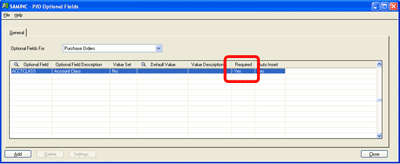
Q – Can we set an optional field to be required without selecting a Default Value? A – In version 5.3 of Sage Accpac ERP, you had to specify a default value for any optional fields that were required in transaction forms or records. This is no longer the case in Sage Accpac ERP v5.4.
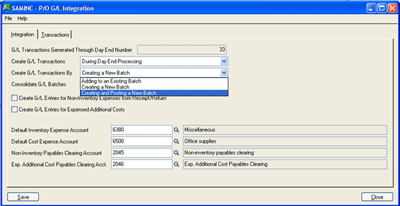
User can select to make an optional field required in the modules Optional Field setup window. When adding an optional field, change the Required Field to “Yes”. You no longer have to select a Default Value Note, however, that making the optional field required without a default value, you must now make an entry for all required fields before you can save records or post transactions. Q – Can we setup Accpac to automatically post General Ledger and Accounts Payable A – To setup Accpac to automatically post Purchase Order transactions in the General Ledger, open the G/L Integration window under the Setup folder in Purchase Orders, select “Creating and Posting a New Batch” from the drop down list for the “Create G/L Transactions by” setting.
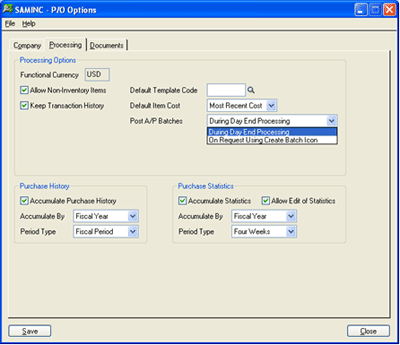
To setup Accpac to automatically post Purchase Order transactions in Accounts Payable, open the Options window under the Setup folder in Purchase Orders. On the Processing tab, select the “During Day End Processing” from the drop down list for the “Post A/P Batches” setting.
|
||||||||||||||||||||||||||||||
| Sage Accpac CRM |
||||||||||||||||||||||||||||||
|
Q – I am unable to attach multiple files when sending outbound emails. When I try to attach a second file to an email CRM replaces the first attachment with the second attachment. A – This behavior is typically caused by having the Default E-mail template setup under My CRM -> Preferences that is conflicting with the e-mail editor. In order to resolve this, go to My CRM -> Preferences and click Change. Select none in Default E-Mail template field and click Save. You should still be able to use the E-mail Template by selecting the template of your choice when composing the email. Q – Is there a way to copy or create a backup of the Workflows? A – There is no direct functionality to copy a workflow and create a new one in CRM. But you can make use of the Component Manager to accomplish this. Make sure you have the latest backup of CRM database before attempting the following procedure.
|
||||||||||||||||||||||||||||||
| Sage Pro ERP | ||||||||||||||||||||||||||||||
|
Q – How can I identify what tables get updated during a transaction? A – This utility must first be activated by setting the following environmental variables on the Microsoft Windows workstation:
Once these environmental variables are set on the workstation, logon to Sage Pro. When saving any transactions in any module, the program will pause before and after each table is updated. This helps to identify which tables are being accessed at any particular point of a transaction. This utility may be turned off by setting one or both of the environmental variables "OFF." The same transaction may update different tables depending on the system settings. For example a purchase order receipt would update the ICCOST table if using a FIFO or LIFO costing system. However, it would not update ICCOST if using a Weighted Average costing system. Other factors, such as serial numbers, also affect which tables are updated. This utility only pauses on those tables that are specifically updated by the transaction in progress. Important Q – How do I add additional User Licenses? A – Check User License This also results in a reduction of the number of users allowed. This solution may also be used to restore user licenses to previously assigned limits.
Q – What are the New Modules and Options Available in Sage Pro ERP 7.4? A –
|
||||||||||||||||||||||||||||||
| Back to Top^ |
Search The Site
RSS & Newsletter Subscription
Axis Videos
-
Recent Posts
Categories
Blog Archives


 Download our corporate brochure for more facts about us, our
clients and our solutions.
 Driving Revenue Growth 1
 Satisfying Customers 1