Setting Up price Lists in Sage Accpac ERP

Set up price lists in Sage Accpac ERP v5.4 Inventory Control module to meet your company’s needs. You can have as many price lists for your items as you need in order to handle different locations, different countries, and different currencies.

Each price list you create allows you to select default options for calculating customer discounts (by customer type or by volume purchased) for the items you add to price lists. You can override these discount options when adding item prices to the price lists.

The price lists you setup can be used to store the following pricing information by item:

  • Regular prices.
  • Sale prices.
  • Wholesale prices.
  • Regional prices.
  • Prices that take into account volume discounts to customers who make large purchases.
  • Prices in each currency with which your company deals (if you use multicurrency accounting).

As you will read later in this article, there are several methods for pricing items:

  • By Customer Type
  • By Discount Percentage (Percentages can be entered with up to six decimal places.)
  • By Discount Amount
  • By Cost Plus a Percentage (Percentages can be entered with up to six decimal places.)
  • By Cost Plus Fixed Amount
  • By Fixed Price

Once you setup your price lists, the next step is to assign the inventory items to the price list. This step is completed in the Item Pricing window in the Inventory Control module.

The price lists you setup are also used in the Order Entry and Accounts Receivable modules as well.  A price list can be assigned to specific customers within the Accounts Receivable to ensure the correct pricing is used when entering orders into the Order Entry module.

To begin the process of adding new Price List Codes, select I/C Setup and click on the Price List Codes icon.

1. The user assigns a unique code to identify the price list.

2. The user can specify if the price of the item is based upon quantity or weight.

3. Once the basis for the pricing is determined (either quantity or weight), the user can then decide the method of determining the selling price basis.
If the pricing is by quantity, then the calculation for the selling price is based upon one of the following:

  • Discount on the selling price
  • Markup on the markup cost
  • Markup on the standard cost
  • Markup on the most recent cost
  • Markup on the average cost
  • Markup on the last cost
  • Markup on the landed cost

If the pricing is by weight, then the calculation for the selling price is based upon one of the following:

  • Discount on the selling price
  • Markup on the markup cost

4. The next step is to determine if the discount on the price is by a percentage or a specific amount.

5. The next step is to decide if the pricing is determined by the customer type or if there are volume discounts. If the pricing is by quantity, then the volume discount refers to the number of items purchased. If the pricing is by weight, then the volume discount refers to the weight of the items purchased.

6. If the user selected the Discount on Price by Percentage, the user will also determine the discount (if the selling price is based upon discount) or markup (if the selling price is based upon markup) percentage for up to 5 pricing levels.

7. If the user selected the Discount on Price by Amount, the user will also determine the discount (if the selling price is based upon discount) or markup (if the selling price is based upon markup) amount for up to 5 pricing levels.

8. The user will also choose the rounding method (no rounding, up, or down) that will be used when calculating the discount or the markup prices. If either Round Up or Round Down is selected, then the user can designate the number that prices will be rounded to, such as the nearest five cents.

The next step is to click on the Price Check tab.

9. The Price Check Type determines whether applications (such as Order Entry) should check price overrides and, if so, how the system should handle them. The options are:

  • None. This option will not check for price overrides and will allow them to occur.
  • Warning. This option will display a warning message that the user is about to override a price will pop up but still allow the user to continue.
  • Error. This option will display an error message and not let the user override the price.
  • Approval. This option will require the user to get a supervisor’s approval on the price.

10. The user will then determine if the system should check the unit price or the sales margin.

11. If the user selects to Check the Unit Price, the next step is to select the base from which to check. The options are:

  • Cost Plus a Percentage
  • Cost Plus a Fixed Amount
  • Fixed Amount

If the user selects Check Sales Margin, the Check Base pull down does not exist.

12. The next step is to select the Cost Base. The options are:

  • Markup Cost
  • Standard Cost
  • Most Recent Cost
  • Average Cost
  • Last Cost
  • Landed Cost

13. Once the cost base has been determined, the user will enter a default range of price adjustments or enter the ranges of price adjustments available by user ID.
Now that the fields in the Price Check tab have been entered, the next (and last) tab is the Taxes tab.

14. If there are tax authorities and customer tax classes that apply to the sale of the items on this price list, enter that information on the Taxes tab.
15. Click on “Add” to complete the process of adding the new Price List.

If you have any questions or need additional assistance, please contact your AXIS consultant or email us at info@axisgp.com for more information.

Posted in April 2008, Newsletter | Tagged , , , , , | Leave a comment

Frequently Asked Questions

Sage
Accpac ERP

Q – Is there a way to search for duplicate Social Security numbers in Payroll?

A – Yes. In Sage Accpac ERP v5.4, you can search for duplicate numbers in the Find Duplicate SSN window.

When setting up employees, you may have inadvertently assigned the same social security to more than one employee.  This report will help you identify employees who have been assigned the same number.

The Find Duplicate SSN icon can be found under the Payroll Periodic Processing folder:

Q – We have run into issues with units of measure when setting up new items in the Inventory Control.  Our users are using different codes for “EACH”.  Is there a way to set up a standard list of units of measure and set Accpac so only these selections are available?

A – Yes. In Sage Accpac ERP v5.4, you can now set up a centralized list of the units of measure that you use for your inventory items, along with conversion factors for converting between different units, so you can add them more easily to item records in the Inventory Control module.

Units of measure are the quantities in which you buy, sell, price, and stock your goods. Units of measure can be numbers of items, dry measures, liquid measures, or weights. 

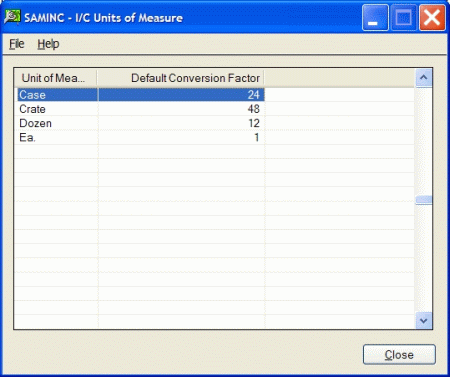
You can add all of your stocking units and multiples of stocking units to the Units of Measure window located under the Inventory Control Setup folder.

To add new units of measure enter the following information (If units of measure have already been added to the Units of Measure form, you will have to press the Insert key to start a new line):

  1. The unit of measure code.
  2. The default conversion factor between the stocking unit of measure and this unit of measure.
    This is a default conversion factor. You can change it when you add units of measure to item records.

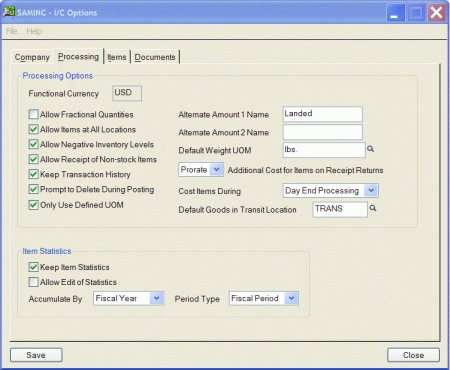
The next step is to set the “Only Use Defined UOM” setting:

  1. Open the Inventory Control Options window located under the Inventory Control Setup folder and click on the checkbox next to the “Only Use Defined UOM” setting
  2. Click on Save

Note:  This option only affects new inventory items or new units of measure that you add to existing items. If you turn on this option, it will have no effect on existing items unless you add new units of measure to item records.

Sage Accpac
CRM

Q – Can I add new On-screen Coaching?

A – Yes. As an administrator, you can add on-screen coaching for any screen in CRM. You can also edit existing on-screen coaching. To add on-screen coaching to a CRM screen:

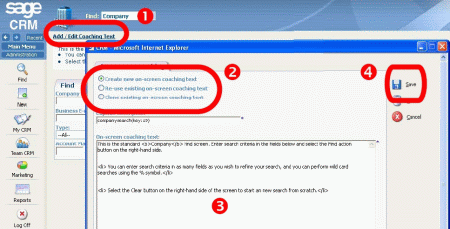
  1. Select Administration | Customization | Translations. Select the Inline Coaching Caption Editing checkbox and then return to the screen to which you wish to add on-screen coaching. Then click on the Add/Edit Coaching Text link.
  2. Select the appropriate radio button on the on-screen coaching dialog box.
    Create New On-screen Coaching Text allows you to add on-screen coaching for the current screen.
    Re-use Existing On-screen Coaching Text allows you to select and re-use text that is already being used on another screen. When using this option, any changes you make to the on-screen coaching text appear on all other screens that use this text. Select the caption you wish to re-use from the Existing On-screen Coaching Entries list.
    Clone Existing On-screen Coaching Text allows you to select and re-use text that is already being used on another screen. When using this option, any changes you make to the on-screen coaching text will not appear on any other screens. Select the caption you wish to clone on the Existing On-screen Coaching Entries list.
  3. Enter your on-screen coaching text.
  4. Click on the Save button.

Q – Can I check if an Outlook contact already exists in CRM?

A – Yes. When adding a contact from Outlook to CRM, users are presented with a list of possible matches for the new contact that are already in the CRM system.

If the new contact already exists in CRM, the user can select this person from the available list. If no matching contact exists, the user can choose to ignore the list offered by CRM and continue adding their new contact.

To check if an Outlook contact already exists in CRM:

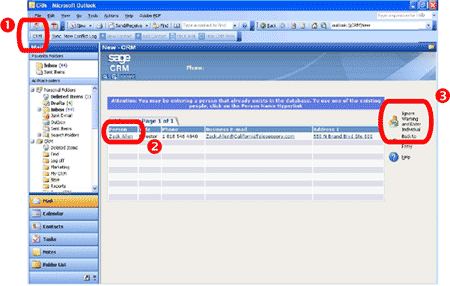
  1. Select the CRM button in Outlook and log on to CRM.
    CRM is displayed within Outlook. In Outlook Contacts, select the contact you wish to add to CRM and click on the Add Contact button. If CRM detects possible matches to the new contact, a list of possible matches is offered.
  2. If a record in the list matches the new contact you are adding, click on the hyperlink for the person.
    The new person screen is displayed. From here, you can add further details for the new contact if you wish. Select the Save button to finish adding the contact.
  3. If the new contact does not match any record in the list, click on the Ignore Warning and Enter Individual button to continue. The person summary screen is displayed.
Sage Pro
ERP

Q – How can I have General Ledger account balances recalculated?

A – Discrepancies in the GLBALS table can cause serious problems with critical financial reports such as the Income Statement and Balance Sheet. The Recalculate GL Account Balances function identifies and repairs out-of-balance batches and accounts. This feature replaces the FIXBALS and GLBLREC programs that were separately installed in previous versions.

Follow the steps below to execute this function:

Important
Create a full and verified backup before proceeding. The data in the tables will be updated when choosing to repair discrepancies.

  1. Open System Manager.
  2. Under the Transaction menu, point to System Recovery and click Recalculate GL Account Balances.
  3. Select all appropriate options and click Proceed.
  4. Click Yes when asked if ready to recalculate.
  5. Once complete, a message appears stating how many discrepancies were found and fixed.
  6. Click OK.

The recalculation routine performs a number of validations. Refer to the table below for a list of routines that will be fixed if Update Records was enabled in the option grid.
Recalculate Routines

 Validation

Update Records Enabled

Check for blank records

Records with a blank account number deleted

Check for duplicates

Duplicate records deleted

Check for missing records

Missing records added to the GL balance table

Check for unbalanced records

Unbalanced batches are reported but not corrected

Check posting amounts

Discrepancies in period-to-date debits, period-to-date credits, and year-end closing amounts in the GL balance table updated.

Check YTD amounts

Discrepancies updated

Checks fiscal year beginning balance amounts

Discrepancies updated

Checks file totals

 Totals reported but not corrected

Q – How can I show components of a bill of material on a Sales Order?

A – There are two methods by which components appear on a sales order (SO). Review the descriptions below to determine which option will best meet the needs of the organization. These should best tested in a test environment before implementing in a live company.

Kit During SO Entry: This option treats the BOM as a kit item. All of the components will appear on the SO when this kit item is ordered.

Example One

"KIT1" is a kit item which has components "C1," "C2" and "C3." The SO will display "C1," "C2" and "C3" as line items on the order and "KIT1" will not appear.

Note:
Two options are presented when adding a kit item to a sales order: Kit Now or Sell Item. The components of the kit item will appear on the SO if Kit Now is clicked. However if Sell Item is clicked, the kit item will appear on the SO without any components.

SO Note Type: This option will send the BOM information to the SO as a customer note, internal memo or both. The notes, memo, or both settings should be used to allow components to appear on the sales order the Component list into. See below to review how each setting will appear:

  • Components list into notes: The components of the BOM will appear on the SO under the BOM item line.
  • Component list into memo: The components of the BOM will appear on the picking ticket for internal use only; not on the SO.
  • Component list into both: The components of the BOM will appear on both the picking ticket and the SO, under that line item.

Note: There are other settings for the SO Note Type field; this article only discusses three of them. For more information regarding this option, please refer to "Adding a New Bill of Materials" in the BOM documentation.

Q – Is it possible to setup cost levels in Purchase Orders?

A – In Sage Pro ERP 7.3, cost level functionality was introduced in Purchase Orders (PO). Here is explained how cost levels are setup and how to best use this feature.

Cost levels may be used to specify costs for different quantity ranges of items that are purchased from vendors. This may be especially useful when dealing with vendors who offer differentiated pricing based on the quantity purchased. This feature also allows for setting effective date ranges that can be useful for limited-time or announced vendor price changes for the future.

Cost levels are not required for items and vendors. If there is no cost level available for an item while entering a purchase order, the last cost recorded for the vendor will be used. This value is obtained from ICSUPL.Lastcst (as it works in Pro Series 7.2 and prior versions).

However, if a cost level is defined for a particular item, the appropriate cost will be applied rather than the last cost. Please refer to Knowledgebase article 20480 for more information.

Note: Cost levels are not maintained for product returns or for Job Cost.To setup cost levels, follow the steps below. For the purpose of this demonstration, data in Company 99 will be used.

  1. Open PO
  2. Under the Maintain menu, click Cost Levels. The Cost Level Maintenance screen should appear.
  3. Enter a vendor ID ("ABC1") into the Vendor field. This vendor must have items assigned to it.
  4. Click Add when prompted with the message "No cost levels exist for ABC1."
  5. Select an item or select a vendor part number and select which item this cost level will be applied to, such as "A2EW."
  6. Click Add when prompted with the message "No cost levels exist for item A2EW supplied by vendor ABC1."
  7. Specify dates to define a period of time that this cost level will be effective. These fields may be left blank.
  8. The Ending Quantity field should be available. Type a value, such as "50," to define the first cost level.
  9. Specify the unit cost for this quantity range, such as "500." The unit cost must a value greater than "0" and can be entered in both base and foreign currency.
  10. Click Save Line.Note: The Beginning Quantity field will be automatically populated with a value of "51" and the Ending Quantity field should be available to specify the next quantity range. No value is ever manually typed into the Beginning Quantity field; it is always automatically calculated by the system for the creation of a new quantity range.
  11. Specify a second Ending Quantity value for the second quantity range. For example, type "100."
  12. Continue specifying as many quantity ranges as required. The last range entered should have a value of "99999999.999" which is the default value. This is the maximum quantity that can be purchased for this item. All purchase orders that fall within this range, will use this unit cost.Note: If the ending quantity value is edited, preceding and succeeding quantity ranges will be adjusted accordingly. Changing the ending quantity to the maximum value will remove any quantity ranges that do not fall within this new range. For example, a quantity range of 51-100 is changed to 51-99999999.999 (the maximum). All subsequent ranges (101-150, 151-200, and so on) will be deleted.
  13. Save.

Note: This should be tested in the sample company before implementing in a live system. Enter purchase orders for various quantities and notice how the price fluctuates based on the cost levels

Back to Top^
Posted in April 2008, Newsletter | Tagged , , , , , , , , , , , , , , , , , , | Leave a comment

Sage ERP & SageCRM Tips & Tricks

Here are this month’s Tips & Tricks videos to help you learn new features and become more productive with your Sage Accpac ERP and SageCRM systems. Just click the thumbnails to watch and learn! We hope you enjoy them and find them useful. Your feedback is encouraged.

Adobe Flash Player is required

Posted in April 2008, Newsletter | Tagged , , , , , , , , , , , , , , , , , , | Leave a comment

Invest In Your Company Without Breaking The Bank

We were recently involved in negotiations with a client for the purchase of a customer relationship management (CRM) and business intelligence solution.  Our client acknowledged the need for the solution as well as the benefits and return on investment they would receive upon completing the implementation.  However, this client was experiencing rapid growth and they were concerned about the impact the purchase would have on cash flows and working capital.  Having your cash reserves invested in equipment makes you asset rich and cash poor. Cash poor companies cannot take advantage of new opportunities or respond to changing market conditions.

Solution – equipment leasing!  One way to determine the appropriate level of investment for a lease is by doing a simple cost/benefit analysis that compares the periodic leasing payment to the revenue you expect to generate from using the equipment will help you determine this.

Axis Global Partners has made it even easier for our customers to acquire our products and services. Through our financing partner, Key Equipment Finance, we are offering competitive and affordable lease terms. Key’s credit review process is very quick and generally little-to-no financial information is required to get approved.  Key Equipment finance has numerous leasing options that include:

No Payments for 90 Days! on 24, 36, 48, and 60 moth leases from 4.9% ($1 end-of lease option).

6 Months at $99 followed by 18, 30, 42, and 54 moth leases from 6.5% ($1 end-of lease option).

Other benefits include:

  • Improved cash-flow management
  • Protection from owning outdated technology
  • 100% financing, including soft-costs such as installation, conversion and training
  • Savings on down payment
  • Easier financing than bank loans
  • Potential tax benefits (*We recommend that you consult your tax advisor to find out the tax benefits specific to your business.)

If you are interested in more information, please contact us at info@axisgp.com.

Posted in March 2008, Newsletter | Tagged , , , , , , , , , , , , , , , | Leave a comment

Strengthen Your Sales Efforts with Industry Intelligence

In today’s competitive business environment, the sale usually goes to the company that best demonstrates the ability to understand a prospect’s business issues and how your product offering resolves them.

Industry Intelligence allows you to be strategic through every stage of the sales cycle. Instead of focusing on your products, you bring value to the table with industry insights that your prospects and clients can use to make more informed decisions and better meet their own goals. In doing so, it is easy to engage Business Decision Makers (BDMs) while positioning your products and services as solutions that address the industry and economic developments already impacting their business.

As a subscriber to First Research (www.firstresearch.com), we believe that having access to Industry Intelligence Tools eliminates the guess work of identifying critical issues and enhances our credibility with our prospects.  First Research is the leading provider of Industry Intelligence Tools that help sales and marketing teams perform faster and smarter, open doors and close more deals.

First Research performs the “heavy lifting” by analyzing hundreds of sources to create insight­ful and easy to digest Industry Intelligence that can be consumed very quickly to better understand a prospect’s or client’s business issues. Customers include leading companies in banking, accounting, insurance, technology, telecommunications, business process outsourcing and professional services.  Used by more than 83,000 sales professionals, First Research can benefit any organization which has prospects in multiple industries.

ESSENTIAL CORE TOOLS

As a subscriber, we have ready access to:

  1. INDUSTRY PROFILES. Easy to read and updated quarterly, Industry Profiles offer a guide to over 700 industry segments. These in-depth summaries are carefully organized and easily customizable, so current information about your target markets’ challenges, opportunities, critical industry statistics, issues and changes is always on hand.
  2. CALL PREP SHEETS. First Research Call Prep Sheets help you understand the issues before you pick up the telephone. These one-page industry overviews help you quickly tailor sales calls, gain confidence, streamline conversations and refine sales messages.
  3. EMAIL ALERTS. First Research Email Alerts automatically deliver at-a-glance insight directly to your in-box each quarter, keeping you abreast of critical issues, business trends and industry-specific changes affecting your clients.
  4. STATE & PROVINCE PROFILES. First Research State & Province Profiles help you bring regional insight to prospects and clients. They offer a concise view of shifting economic and business issues using state and province specific employment data, real estate insight, business news updates and Web resources.
  5. INDUSTRY PROSPECTOR.  First Research Industry Prospector allows you to select and rank industries based on industry drivers and key economic metrics.  Benchmark industries according to opportunity versus risk to benefit the front end of your sales or marketing process.

First Research has exciting enhancements on the way.  Industry Express, audio versions of Industry Intelligence content, will be available soon.  The enhancement allows users to access and download Industry Intelligence to portal audio devices for added convenience while you travel.  Look for more details shortly!

Having these Industry Intelligence Tools in your arsenal will give your firm the competitive edge you need to win more business.  For more information, contact us at info@axisgp.com or contact First Research at 866-788-9389.

Posted in March 2008, Newsletter | Tagged , , , | Leave a comment

Increase revenues, gross profit and lower selling costs through CRM Analytics

In small and medium sized business, economic events are captured, recorded, and reported from their ERP systems and financial statements are generated monthly for management to discuss.  The income statement is analyzed and compared to a previous period, variances are investigated, and this process is repeated throughout the year.  From a 40,000 foot view, this process seems complete and appropriate, but do you have a complete picture?  Managers today must replace the traditional emphasis on products and revenues with more customer-centric and profit-centric business models.  They need to identify the key performance indicators (KPI) that are critical to their company’s success.

In “The Multi-Dimensional Manager”, by Richard Connelly PhD, he identifies two of these drivers that increase revenue by isolating what combinations of product mix and customer segments are driving growth.  They increase gross profit (GP) by targeting prospects with the greatest profit potential.  They lower selling costs as a % of sales by increasing the return on investment (ROI) on promotional dollars.

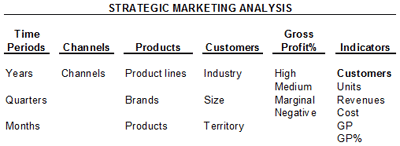
These key performance indicators capture the profitability profile of the existing customer base.  The first, called strategic marketing analysis organizes customers from most profitable to least valuable, charts their lifetime value to date and captures the number of customers in each profitability tier so the trend in profitability mix can be seen easily over time.  Managers in marketing can compare the profitability mix of their customers by geography, industry, volume of business by the number of different products they buy and by any number of other characteristics (color, quality, type or package size).  You can view the popularity of a color over all plastic products or kitchenware, material type, or combination of both.  You can also untangle a complex hierarchy into independent dimensions such as product line, finishing and handle type.  You can even map these attributes by customer, channel, and organizational responsibility.

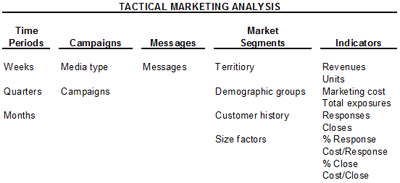
The second key performance indicator is the tactical marketing analysis.  It evaluates the effectiveness of marketing campaigns. You can use it to do a cost per close which is more powerful than cost per response and percentage response.  You can compare the cost per response between advertising, direct mail, and trade shows.  Lastly, you can compare the profile of response against the ideal profile of high profit customers – the right customer for the future.  By calculating the profitability equation, the company can now link its investments in customer relationships specifically to the returns those customers generate.

If you are interested in more information, please contact us at info@axisgp.com.

Posted in March 2008, Newsletter | Tagged , , , , , , , , , , , , , , , , , , , , | Leave a comment

Automating Benefits with the Saves HR Time and Money

HR departments have a mandate to reduce costs at a time when the cost of managing benefits has increased dramatically. To do that successfully, organizations must invest in effective and automated HR and benefits management systems.

The amount of paperwork generated in traditional benefits management is staggering – for both the employer and employee. As a result, accuracy becomes a critical issue. If every enrollment form is filled out by hand and the data is transcribed and submitted to the carrier by the HR department, the room for error is considerable. There is also the potential for HR errors to cause an employee or a member of their family to be without coverage for a period of time creating a liability problem for the organization.

The answer to these problems is to provide employees with an online benefits enrollment system that allows them to take control of their benefits data and its accuracy. With automated systems, the HR department can control the process by monitoring an employee’s whereabouts within the enrollment cycle, and creating communications that encourage employees to complete and submit their information on time.

It is also important that the payroll and HR systems are fully integrated so that the payroll process highlights any changes. With payroll integration, HR departments are granted greater payroll independence and can easily connect to one of the many leading payroll solutions on the market. When Payroll Connect is initiated, it compares the HR database against the payroll solution’s database to ensure that both systems are synchronized and working off the same employee and benefits data, supporting consistency and accuracy. New hire, benefits, bonuses, attendance and leave information are transferred automatically between the systems.

With HR solutions, workforce management becomes a fully integrated and centralized HR function that promotes connectivity, communication and control. Thousands of organizations rely on HR systems to reduce inefficiencies and increase productivity. Contact Axis Global Partners today, and find out how an HR system can revolutionize the way you do business.

Posted in March 2008, Newsletter | Tagged , , , , , , , | Leave a comment

Sage Pro ERP 7.4

In Sage Pro ERP 7.4 there are 3 features that enhance the data management capabilities and provide users with more flexibility and control over the data then ever before. It is important to note that only users with the correctly assigned user privileges are able to perform these tasks.

The first feature is the ability to import Sales Orders, Purchase Orders, and Inventory Control Receipts from external files. The tables are updated using Sage Pro ERP 7.4’s business logic and thus it is transparent as to whether the Sales Order, Purchase Order, or Inventory Control Receipts was entered manually or via the import. Additionally, users can save and reuse the field mapping schemas used for importing

For the purpose of this article, the Sales Order import will be used as an example. The import for Purchase Orders and Inventory Control Receipts function the same way.

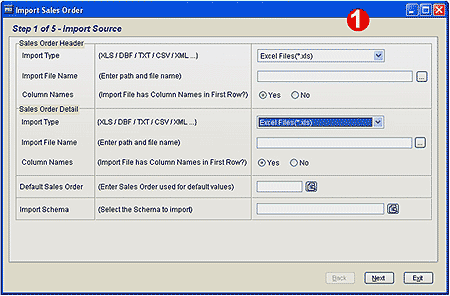
To import a file into a Sales Order, from any module (other than the System Manager module) select File > Import > Sale Order.

1. The first step is to enter the import source.

First, the Sales Order master file external file needs to be selected. Enter the type of file, which can be an Excel spreadsheet, a Visual FoxPro table, a text file, a comma delimited file, or an XML file. In this article we will use an Excel file. Then, select the path and the file name of the external file.

Secondly, the Sales Order detail file needs to be selected. Enter the type of file, which can be an Excel spreadsheet, a Visual FoxPro table, a text file, a comma delimited file, or an XML file. (In this article the Excel file will be used as an example.) Then, the user will select the path and the file name of the external file.

Now, the user needs to decide if there is a Default Sales Order that you want to use. This will determine the default values. It is not necessary to select a Default Sales Order.

And lastly for this step, the user will select an Import Schema or leave this blank if the standard Import Schema will be used.

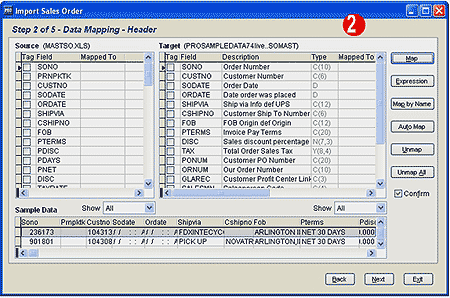
2. The next step is to map the header record.

The header record is also known as the master record and there is one master record per sales order. On the left side is the file that was selected in the previous step (which is identified as the source) and on the right side is the Sales Order master file (which is identified as the target). At the bottom of the screen is an example of what the data looks like based upon the import file. This is a where a review of the import data can occur and will show how the fields in the import file line up with the target tables. Next to the Sales Order master file are a series of buttons. These buttons allow the user to select the mapping criteria. The mapping criteria selection is as follows:

Map: Allows the user to go field by field and map the fields on the left side to the fields on the right side.

Expression: Allows a more sophisticated user to write programming expressions to map the fields.

Map by Name: Allows the user to match the field names from the source file to a field in the target file with fields that have the same name.

Auto Map: Allows the fields of the target file to be mapped to the fields in the source file in the order that the fields are listed.

Unmap: Allows the user to de-select the mapping field by field.

Unmap All: Allows the de-selection of all the mapped fields.

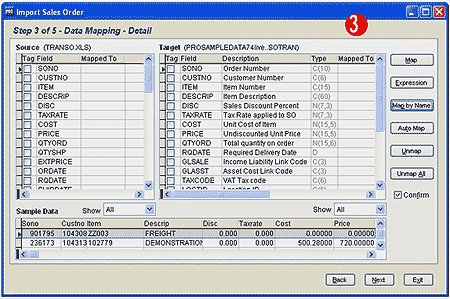
3. The next step is to map the detail record.

The detail is also known as the transaction record and there can be many transaction records per sales order. On the left side is the file that was selected in the previous step (which is identified as the source) and on the right side is the Sales Order transaction file (which is identified as the target). At the bottom of the screen is an example of what the data looks like based upon the import file. This is a where a review of the import data can occur and will show how the fields in the import file line up with the target tables. Next to the Sales Order transaction file are a series of buttons. These buttons are explained in Step 2.

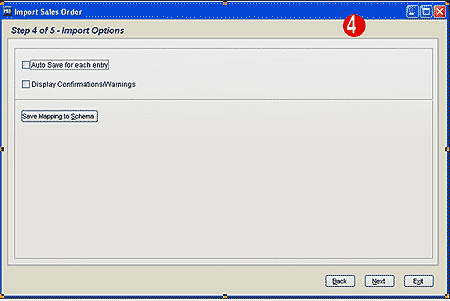
4. The next step is to select the Import Options.

Auto Save for each entry: If this is selected, then the user will be prompted to save each line and each sales order. If it is not selected, then the system will do the save automatically.

Display Confirmations/Warnings: If this is selected, then the user will be prompted for each confirmation and warning.

The Save Mapping to Schema allows the user to save this mapping for additional imports.

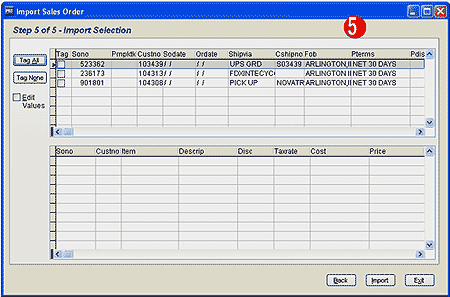
5. The final step is to select which records to import.

The Tag All button selects all the records while the Tag None button clears all the selected lines. If a user wants to change the information in a field, the user will select the Edit Values and make the change right here.

When the user is satisfied that all the data is ready, they will click on the Import button and the records will be imported into Sage Pro ERP 7.4.

___   …   ___   …   ___

The second feature that enhances the data management capabilities is the redesign of the customer, vendor, and item history files to retain details for an unlimited number of periods. Balances are now linked to fiscal periods rather than period close and can be recalculated whenever required.

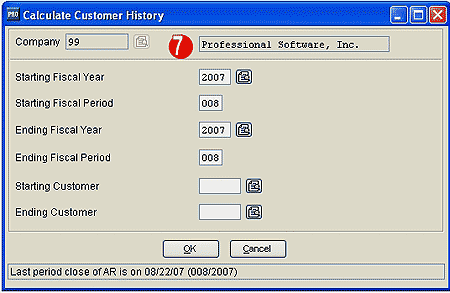
For the purpose of this article, the customer history will be recalculated. The vendor history and item history recalculation process is the same as the customer history. This changes the 24 month rolling window that users see when the History Inquiry is selected. The default is the most recent 24 months (for example March 2006 to March 2008). If the user wants to see March 2004 to March 2006, they would do the recalculation. A user might want to do this so they could use the charts and graphs available in the History Inquiry.

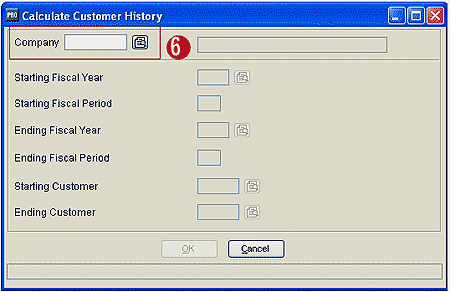
In the System Manager module, select Transaction > System Recovery > Recalculate History > Customer.

6. Enter the company ID.

7. Enter the new Starting Fiscal Year, Starting Fiscal Period, Ending Fiscal Year and Ending Fiscal Period. If the recalculation is for all customers, leave the Starting Customer and Ending Customer blank otherwise enter the customer number. Click on OK and the recalculation will be completed.

___   …   ___   …   ___

The third feature has been eagerly anticipated by the Sage Pro ERP community. How many times has a user, without realizing it, entered the same customer under two different customer numbers or entered the same vendor under two different vendor numbers? Now, there is the ability to combine codes for two customers or two vendors. There is even a provision to handle duplicate invoice numbers when merging vendors. For the purpose of this article the vendors will be used as an example.

In the System Manager module, select Transactions > Merge Key > Enter Merge Key > Vendors.

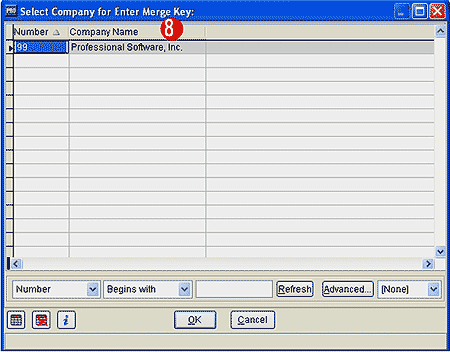
8. Select the company ID that has the vendors that are going to be merged.

9. Select the order that the vendor numbers will appear.

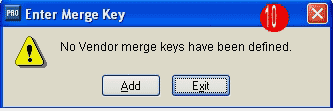
10. Select Add to begin the process.

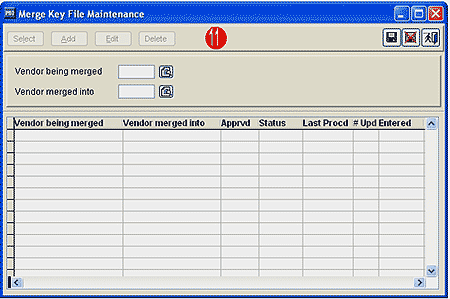
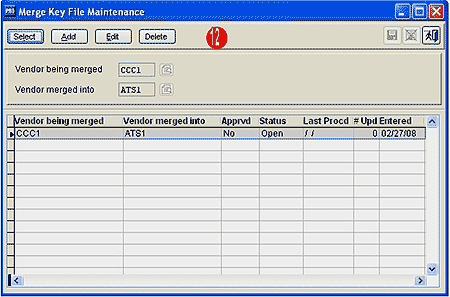
11. Enter the vendor number that will be merged. When the merging process is completed, this vendor number will no longer exist. Then, enter the vendor that is going to get all the information (invoices, payments, etc) from the first vendor.

12.  The grid will show data is being merged into the vendor. Select Transaction > Merge Key > Approve Merge Key > Vendors.

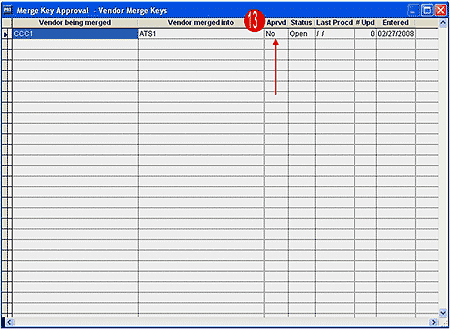
13. Note that the column labeled Aprvd is No. This is the approval column. To approve the merger of the vendors by highlighting the row and press the space bar.

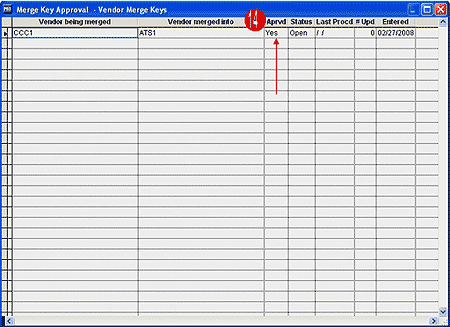
14. The Aprvd column has now changed from No to Yes. Press the Enter key and the approval process is completed.

The next step in the merging process is to actually merge the approved keys. Select Transaction > Merge Key > Process Merge Key.

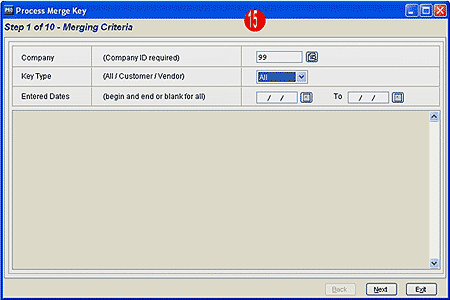
15. Step 1 in the merging process is to select the Merging Criteria. Select your company ID, key type, and date the merge key changes were entered. The date can be left blank.

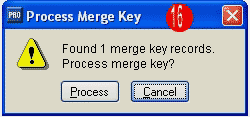
16. The user will be prompted as to how many merge key records were found. In this example there is only 1 merge key, so click on the Process button.

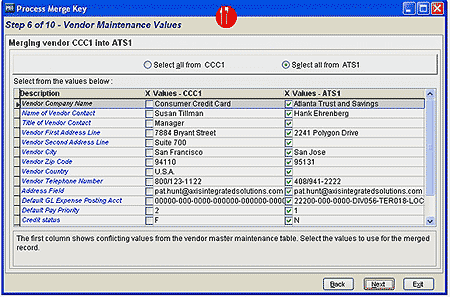
17. If there are conflicts, the user will be prompted to select which values to use for the merged file. All the values from one vendor or the other vendor can be selected or the user can pick and choose. In this example the values that will be chosen are from the vendor that is being merged into, not the other vendor. Click on the Next button when the values are correct.

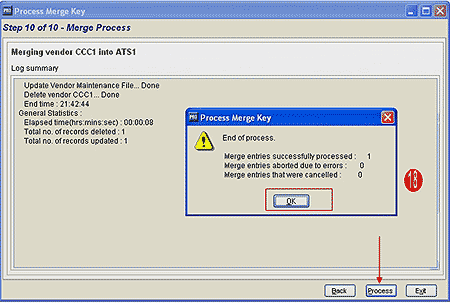
18. The actually merging of the vendors will occur once the Process button is selected, so it is critical that the user is certain that these vendors should be merged because once the process has begun there is no turning back.

After the vendors have been merged, a log appears as well as a screen showing the number of successful processes, the errors, and the cancelled entries.

___   …   ___   …   ___

By giving users the ability to import Sales Orders, Purchase Orders, and Inventory Control Receipts from external files, retain details for an unlimited  number of periods for the customer, vendor and item history files, and merging two customers or two vendors the data management has become easier, more flexible, and user control.

If you have any questions or need additional assistance, please contact your AXIS consultant or email us at info@axisgp.com for more information.

Posted in March 2008, Newsletter | Tagged , , , | Leave a comment

Frequently Asked Questions

Sage
Accpac ERP

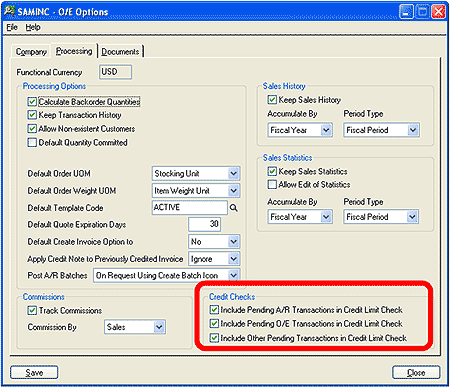
Q – Is there a way to include pending transactions when calculating the available credit amounts when entering orders within Order Entry?

A – Yes. In Sage Accpac ERP v5.4, you change the credit check settings for pending transactions on the Processing tab of the O/E Options form.

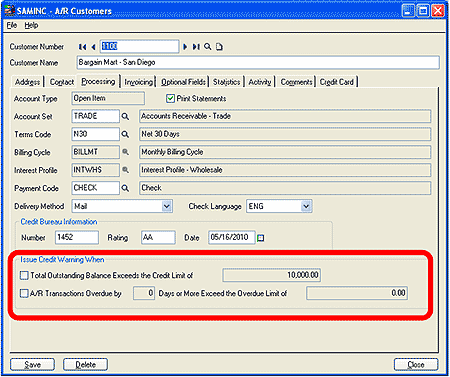
You can also set the credit limit balance for transactions in the individual customer records in Accounts Receivable, as well as set an overdue amount and number of days overdue in the Accounts Receivable customer record.

Q – Is there a way to setup Contract Costs for suppliers?

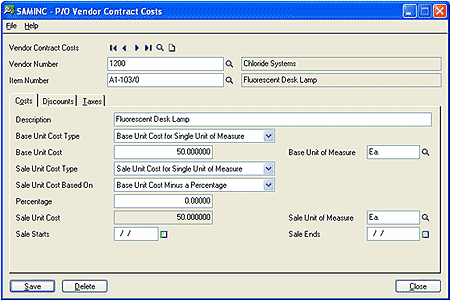
A – Yes. In Sage Accpac ERP v5.4, you can set up contract pricing for inventory items, including basic vendor costs, volume discounts, sale costs, item tax statuses, and default units of measure within the Purchase Order module.

Once you setup the vendor contract costs, all vendors’ contract costs appear in the Finder on the Purchase Order, Receipt, Invoice, Return, and Credit/Debit Note entry forms. As a result, users can easily review vendors’ contract cost information while entering purchase order documents.

Vendor contract costs provide the default unit cost of items in Purchase Order documents. If contract costs don’t exist for an item, the program uses the default unit cost specified in P/O Options in the Purchase Order Entry or Receipt Entry form.

Sage Accpac
CRM

Q – Can I change how on-screen coaching is displayed?

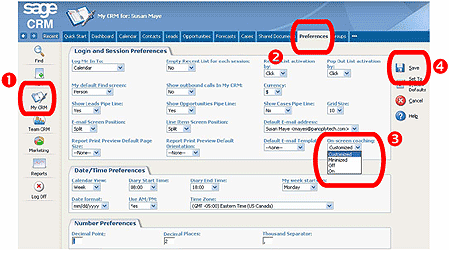
A – Yes. Users can control how on-screen coaching is displayed on screens for which coaching has been set up. To access on-screen coaching display settings:

  1. Select My CRM.
  2. Click on the Preferences tab and select the Change button.
  3. Select the required setting from the On-screen Coaching drop-down list.

‘On’ turns coaching on for all screens on which it is available. With this setting, the full coaching content is displayed in a frame at the top any screens that have coaching content.

‘Off’ turns all coaching off. With the ‘Minimized’ setting, the coaching frame does not appear automatically at the top of the screen. Instead, users can click on the Maximize On-screen Coaching button to view the full frame for an individual screen.

This setting might be used by users who are familiar with CRM and might only need to view coaching very rarely. The ‘Customized’ setting allows users to minimize coaching on some screens while leaving it maximized on others.

  1. Click on the Save button.

Q – Can I create a Company for an Outlook Contact when adding it to CRM?

A – Yes. When adding an Outlook contact to CRM you can now add a new company to CRM for that contact.

To add a new company for an Outlook contact:

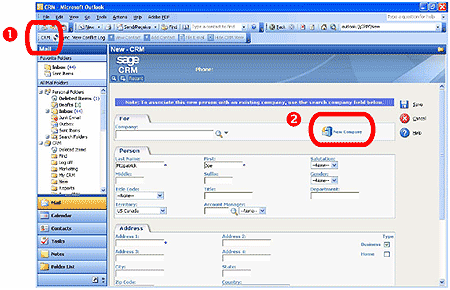
  1. Select the CRM button in Outlook and log on to CRM.

CRM is displayed within Outlook. In Outlook Contacts, select the contact to add to CRM and click on the Add Contact button.

If CRM detects possible matches with the new contact a list of possible matches is offered. You can select a record from the list or click on the Ignore Warning and Enter Individual button to continue.

  1. Click on the New Company button.

You can proceed to add the new company to CRM. Details from the Outlook contact display in the matching fields on the company summary screen.

Sage Pro
ERP

Q – What is the meaning of the ER and EI Values in the ICTRAN.Trantyp Field?

A – The “Trantyp” field may be used to identify which system process created the record in ICTRAN. Normally, this field is populated with an “I” which refers to an inventory issue or an “R” which refers to an inventory receipt. These values are created from sales orders being shipped or purchase orders being received. The appearance of an “ER” or “EI” value in this field usually indicates that a manufacturing process created the record. The ER value appears when the item was created via Work Order Processing (an inventory receipt) and the EI value appears when the item was used in Work Order Processing (an inventory issue). The following are examples of how certain manufacturing transactions affect the ICTRAN table:

  • Shipping an order with a finished good that has a Bill of Material setting of Explode on SO Shipment – see attachment ictran1.jpg
  • Using Post Completed Manufacturing in the Production Entry module to build an item into stock (back flushing) – see attachment ictran2.jpg
  • Completing and processing a work order in the Work Order module – see attachment ictran2.jpg

Note: For further information regarding the Trantyp field and the ICTRAN table, please refer to the Pro Series Technical Reference Guide.

Q – How can I determine what Service Packs are installed on Sage Pro ERP?

A – Follow the steps below to view the service packs installed on Sage Pro:

  1. Under the Help menu, click About Sage Pro ERP.
  2. Click Technical Info…
  3. Click the Service Pack tab.
  4. The service packs that are installed are listed in the Select Patch File to View list box.

The information that is displayed here is stored in PAT files which are installed into the root directory of the Sage Pro installation when the service pack is applied.

Technical Tip
The PAT file can be edited to record important information such as who did the service pack installation, date, modification notes, etc. This information will appear when viewing what service packs are installed in Sage Pro.

Related Solutions
Please refer to the newsletter from June 2006  for instructions on how to determine the number of user licenses  and solution 22669 on how to determine the version for a Sage Pro installation.
Q – When should I use the “Check Table Integrity” option?

A – The check table is used to verify the integrity of tables when a system crash occurs. This will detect corrupted tables that cannot be populated.

Example
When saving a purchase order, the power goes out on the server and the POTRAN table is corrupted. Clearing flags, re-index, Verify File Structures, and Validate Database all complete without error and more purchase orders can be entered without errors. However, the POTRAN table was not populated for any transactions entered since the crash. The table can be opened but no new records appear.

Solution
Check Table Integrity will attempt to write a temporary record to the selected tables and then verify if it exists. The program will notify of a problem if the record was not successfully saved. When choosing to fix the corruption, the table records will be copied to a temporary table and the existing table will be deleted. The records will then be copied back into a newly built table.

Check Table Integrity Tips

  • This tool should be run with the Fix Table option set to “N.”  The resulting text file is saved and can be previewed to evaluate the issue. The utility can be run again to fix the tables. This may correct the issue going forward but it will not restore missing records. Use a Microsoft Visual FoxPro repair utility if a problem is detected. 
  • This tool is only meant to identify and correct this particular kind of corruption. It will not correct other kinds of corruption, especially if the table cannot be accessed.
  • Corruption of tables is not a programming issue, it is the result of environmental failures. If this a recurring issue, evaluate possible causes of the crashes. The Error Log in Sage Pro ERP  may help identify the time, users, and nature of the issue.
  • No users should be in the program when running this tool.
  • It may be possible to correct this corruption by copying the structure of another company’s table, appending data from the damaged table into it, renaming that table and using it to replace the damaged table. Run Validate Database from the System Recovery menu once this is complete.
  • Use this tool as a part of regularly scheduled maintenance, after any system crash or power failure, and after a conversion.
Back to Top^
Posted in March 2008, Newsletter | Tagged , , , , , , , , , , , , , , | Leave a comment

Sage ERP & SageCRM Tips & Tricks

Here are this month’s Tips & Tricks videos to help you learn new features and become more productive with your Sage Accpac ERP and SageCRM systems. Just click the thumbnails to watch and learn! We hope you enjoy them and find them useful. Your feedback is encouraged.

Adobe Flash Player is required

Posted in March 2008, Newsletter | Tagged , , , , , , , , , , , , , , , , , , | Leave a comment