
| Sage Accpac ERP |
|
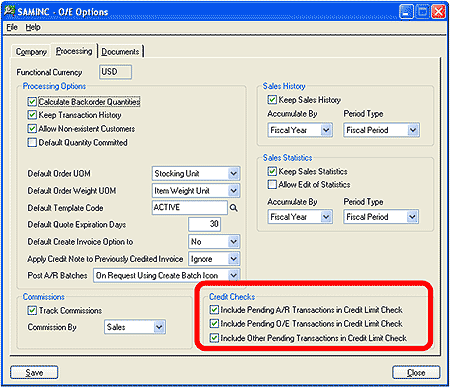
Q – Is there a way to include pending transactions when calculating the available credit amounts when entering orders within Order Entry? A – Yes. In Sage Accpac ERP v5.4, you change the credit check settings for pending transactions on the Processing tab of the O/E Options form.
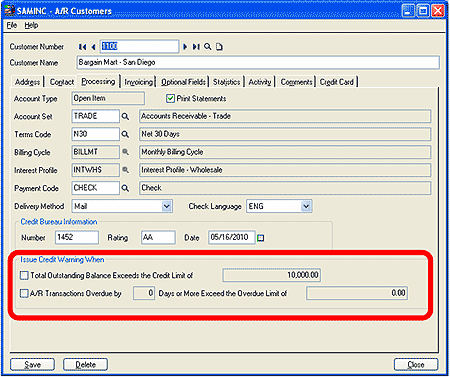
You can also set the credit limit balance for transactions in the individual customer records in Accounts Receivable, as well as set an overdue amount and number of days overdue in the Accounts Receivable customer record.
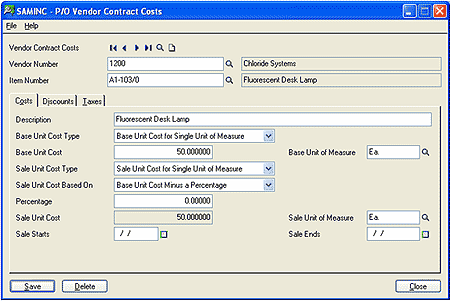
Q – Is there a way to setup Contract Costs for suppliers? A – Yes. In Sage Accpac ERP v5.4, you can set up contract pricing for inventory items, including basic vendor costs, volume discounts, sale costs, item tax statuses, and default units of measure within the Purchase Order module. Once you setup the vendor contract costs, all vendors’ contract costs appear in the Finder on the Purchase Order, Receipt, Invoice, Return, and Credit/Debit Note entry forms. As a result, users can easily review vendors’ contract cost information while entering purchase order documents. Vendor contract costs provide the default unit cost of items in Purchase Order documents. If contract costs don’t exist for an item, the program uses the default unit cost specified in P/O Options in the Purchase Order Entry or Receipt Entry form.
|
| Sage Accpac CRM |
|
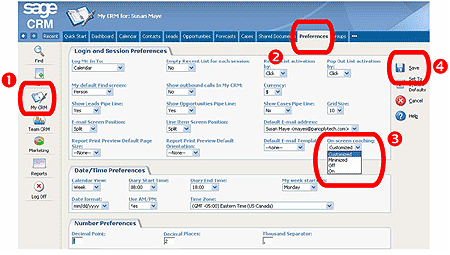
Q – Can I change how on-screen coaching is displayed? A – Yes. Users can control how on-screen coaching is displayed on screens for which coaching has been set up. To access on-screen coaching display settings:
‘On’ turns coaching on for all screens on which it is available. With this setting, the full coaching content is displayed in a frame at the top any screens that have coaching content. ‘Off’ turns all coaching off. With the ‘Minimized’ setting, the coaching frame does not appear automatically at the top of the screen. Instead, users can click on the Maximize On-screen Coaching button to view the full frame for an individual screen. This setting might be used by users who are familiar with CRM and might only need to view coaching very rarely. The ‘Customized’ setting allows users to minimize coaching on some screens while leaving it maximized on others.
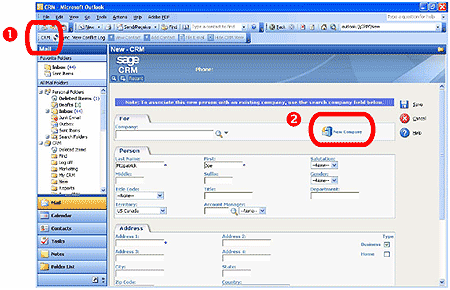
Q – Can I create a Company for an Outlook Contact when adding it to CRM? A – Yes. When adding an Outlook contact to CRM you can now add a new company to CRM for that contact. To add a new company for an Outlook contact:
CRM is displayed within Outlook. In Outlook Contacts, select the contact to add to CRM and click on the Add Contact button. If CRM detects possible matches with the new contact a list of possible matches is offered. You can select a record from the list or click on the Ignore Warning and Enter Individual button to continue.
You can proceed to add the new company to CRM. Details from the Outlook contact display in the matching fields on the company summary screen. |
| Sage Pro ERP |
|
Q – What is the meaning of the ER and EI Values in the ICTRAN.Trantyp Field? A – The “Trantyp” field may be used to identify which system process created the record in ICTRAN. Normally, this field is populated with an “I” which refers to an inventory issue or an “R” which refers to an inventory receipt. These values are created from sales orders being shipped or purchase orders being received. The appearance of an “ER” or “EI” value in this field usually indicates that a manufacturing process created the record. The ER value appears when the item was created via Work Order Processing (an inventory receipt) and the EI value appears when the item was used in Work Order Processing (an inventory issue). The following are examples of how certain manufacturing transactions affect the ICTRAN table:
Note: For further information regarding the Trantyp field and the ICTRAN table, please refer to the Pro Series Technical Reference Guide. Q – How can I determine what Service Packs are installed on Sage Pro ERP? A – Follow the steps below to view the service packs installed on Sage Pro:
The information that is displayed here is stored in PAT files which are installed into the root directory of the Sage Pro installation when the service pack is applied. Technical Tip Related Solutions Q – When should I use the “Check Table Integrity” option? A – The check table is used to verify the integrity of tables when a system crash occurs. This will detect corrupted tables that cannot be populated. Example Solution Check Table Integrity Tips
|
| Back to Top^ |
Search The Site
RSS & Newsletter Subscription
Axis Videos
-
Recent Posts
Categories
Blog Archives


 Download our corporate brochure for more facts about us, our
clients and our solutions.
Download our corporate brochure for more facts about us, our
clients and our solutions.
 Driving Revenue Growth 1
 Satisfying Customers 1