New I-9 Form Available for Employees

On June 16, 2008, the Department of Homeland Security released a newly-dated I-9 form which employers may begin using immediately.

You can download the new form at http://www.uscis.gov/files/form/I-9.pdf

The new form is the result of the Paperwork Reduction Act, and the Office of Management and Budget (OMB) must have current expiration dates on all approved forms, including the I-9.

The content of the form has not changed from last year’s version, the date of the form and OMB expiration date have been adjusted.

Posted in July 2008, Newsletter | Tagged , , , , | Leave a comment

Product Support Discontinuation – Sage Accpac ERP 5.3

Sage Accpac ERP 5.3 will no longer be supported effective September 30, 2008. We will continue to provide technical assistance to customers and partners for Sage Accpac ERP 5.4 and 5.5.

Posted in July 2008, Newsletter | Tagged , , , , , | Leave a comment

Frequently Asked Questions

Sage
Accpac ERP

Q – Can I change the customer’s account set when entering an invoice in Accounts Receivable?

A – Yes. In Sage Accpac ERP v5.5 Invoice Entry and Receipt Entry let you specify an account set that is different from the customer’s account set. In a
multicurrency ledger, the new account set must use the same currency as the customer.

Q – Can I default the posting date to be the session date when posting a transaction in Project and Job Cost?

A – Yes. In Sage Accpac ERP v5.5 the new Default Posting Date option on the Transactions tab lets you specify the type of date to use as the default posting date on transaction‐entry forms.  In version 5.5, each transaction uses
separate document and posting dates.

You can select Document/Transaction Date or Session Date as the
default posting date.

You can change the posting date for particular transactions when
you enter or edit them.

Sage Accpac
CRM

Q – Is there a way to merge territories in CRM?

A – Yes. The reorganization of territories is a common aspect of organizational change. In SageCRM 6.0 the new Territory Administration enables you to merge territories and, more significantly, the data associated with those territories.

To merge territories:

  1. Select Administration | Users | Security and click on the Merge Territory button.
  2. Select the source territory—which will be absorbed into the target territory—and click on the Next button.
  3. Select the target territory. After selecting the target territory, you are asked whether you also want to transfer Users and User Rights to the new territory. Click Next to start the merge.

Note: The merge process involves a major update to the database. This means that before committing to the merge, administrators should perform a backup of the database and ensure that all users are logged out of the system. Users should also be informed that they will be locked out of the system during the merge process.

Q – How do I perform a mass update in CRM?

A – The mass update feature can be used, for example, to update records belonging to a group called “US East Contacts.” We want to assign all the leads in this group to the user “Brian Little.” So the mass update task involves changing the value for the “Assigned to” field in every record in “US East Contacts” to “Brian Little.”

To perform a mass update on a group:

  1. Select My CRM | Groups and click on the group whose records you wish to update.
  2. All records are selected for inclusion by default. Select the records you wish to exclude in the Exclude column.
  3. Click on the Mass Update button.

The Fields screen displays all the fields associated with the entity’s records. Select the Assigned To checkbox and click on the Continue button.

The next screen allows you to enter values for the selected fields. Select the user to be assigned to all the selected leads from the group. Click on the Save button. A confirmation screen displays the number records changed.

Sage Pro
ERP

Q – Why does the post finance charges option grid close after specifying the Cust Misc Code field option?

A – When trying to post finance charges for customers in Sage Pro ERP, the Post button is disabled in the Post Finance Charges option grid after all options fields have been specified. The option grid screen disappears after specifying the Cust Misc Code option field.

To resolve the issue, verify the Default Transaction Category field is populated with a valid code located in the Change Account Receivable System Information screen. The first three characters of the Transaction Category code is the Sales Category code. If it is blank it will create this issue.

Follow the steps below to resolve this issue:

  1. Open the AR module.
  2. Under the File, click Change Setup Information.
  3. Type "DEFDEF" into the Default Transaction Category field.
  4. Click Proceed.
  5. Click  Save.
  6. The following message will appear:
    Key value DEF not found. Adding new record.
  7. Click OK.
  8. Type the appropriate information into the Description, Sales Revenue, Cost of Goods and Item Discount fields.
  9. Click Save.

Important
General Ledger accounts are needed to finalize the setup of the "DEFDEF" transaction category code. Please consult with the appropriate authority to determine the appropriate sales revenue, cost of goods sold and item discount accounts before proceeding.

Adding "DEFDEF" as the default transaction category code in the AR Change Setup Information screen should allow the Post button to be activated in the Post Finance Charges option grid. Finance charges can now be posted in Sage Pro.

Q – In Payroll, what is Accrual and Benefit Pay Type Rollover?

A – Benefit pay types can now rollover when printing checks. This occurs if Accrual Year Rollover is selected for that employee and pay type. The following two new fields have been added to the Employee Pay Type Maintenance screen:

  • Accrual Year Rollover – Rollover will commence on the Next Rollover Date. However if it is not selected, the rollover will occur when the Payroll year is closed.
  • Next Rollover Date – This field is compared with the Payroll system date during check printing.

Important
If the Next Rollover Date is less than the Payroll system date, the rollover will occur when regular checks are printed.

Q – Where is the reference to an Item Image File stored?

A – The ability to add a picture to an item was introduced in Sage Pro 7.2 Build 3200. In the Item Master Maintenance screen, an image can be added to an item in the Picture tab. Click Add to launch the Windows browsing screen and select the image file. When the image file is selected and saved, the path information for that file is saved to the ICIIMG table.

In the ICIIMG file the following 3 fields are used to reference the image file to the item:

  • Item – References the item that image file is associated with
  • Imgname – References the file name of the image
  • Imgfile – References the location of the image file

This feature support most image file types. For a listing of supported Microsoft Visual FoxPro image file types please refer to the following link:
http://msdn2.microsoft.com/en-us/library/7a4a6w5e(VS.80).aspx

Related Reading
For more information on this feature please refer to the Sage Pro Inventory Control documentation.

Back to Top^
Posted in July 2008, Newsletter | Tagged , , , , , , , , , , , , , , , , , , , , , , | Leave a comment

Sage ERP & SageCRM Tips & Tricks

Here are this month’s Tips & Tricks videos to help you learn new features and become more productive with your Sage Accpac ERP and SageCRM systems. Just click the thumbnails to watch and learn! We hope you enjoy them and find them useful. Your feedback is encouraged.

Adobe Flash Player is required

Posted in July 2008, Newsletter | Tagged , , , , , , , , , , , , , , , , , , | Leave a comment

What is the Extended Enterprise Suite that Sage keeps referring to?

Sage Accpac Extended Enterprise Suite consists of Sage Accpac ERP version 5.5 with integrated CRM. The Suite combines the benefits of ERP and CRM to support integrated front and back office business processes and workflow. This improves decision making ability by providing insight into what is happening within the business, enhances collaboration between departments and facilitates improved customer relationships by providing employees from across the business with one complete and consistent view of the customer.

“Small and medium-sized businesses need simple, integrated business processes, workflows, and access to reliable information,” said Laurie Schultz, Sage Software general manager for Sage Accpac. “An extended enterprise solution provides transparency and control over the entire business. With simplicity in product and pricing, new, improved support offerings, and better synchronization of complementary application availability, the convenience and value offered by our new Sage Accpac Extended Enterprise Suite is our next step in that direction, and you’ll see more of this approach from Sage Software in the future.”

Sage Accpac ERP now includes SageCRM, an easy-to-use, quick-to-deploy Customer Relationship Management solution comprising Sales, Marketing and Customer Service Automation. Simplified workflow is also supported through tighter integration with Sage Accpac HRMS (human resource management system) and Sage FAS Fixed Assets.

Also supporting an extended view of the enterprise is the new analytical dashboards feature. The dashboards provide easily accessed snapshots of the business that help managers better analyze, predict, and manage business performance. Key performance indicators, such as age of accounts, are instantly available, providing alerts that can be turned into actions through collections, payables and other tasks, resulting in potential cost and cash flow improvements.

This latest version of Accpac also provides significant usability enhancements throughout the system, including a new Account Rollup feature that supports automatic account consolidation in the general ledger, new multicurrency revaluation options, and streamlined processes for managing job tracking.

Best of all, the CRM server and a single user is FREE and now bundled with version 5.5 of Sage Accpac ERP, a value of approximately $6,000. For more information, please contact us at info@axisgp.com.

Posted in June 2008, Newsletter | Tagged , , , , , , , , , , , , , , , , , , , | Leave a comment

Attention Sage Pro Clients, 7.5 is released! What does this mean for you?

We are proud to announce that Sage Pro 7.5 is released and Master CD’s will become available in July.  The new features in 7.5 are based on what many end users have requested, including increased access to your business information, expanded business productivity tools and enhanced manufacturing modules.

This is also a great opportunity for those clients running older versions of Sage Pro to upgrade to 7.5. Please see the attachments that discuss some of the major features added since you last upgraded. (Attachment I)

A brief description of the new features available in Sage Pro ERP version 7.5 is divided into the following sections:

  • Application Features – features that are application-specific and relate to functionality within a selected application.
  • User Interface Features – features that are directly related to the Sage Pro ERP user interface, such as user maintenance, desktops settings, and so on.
  • Data Management Features – features related to how users manage their accounting data within the program, including program design changes.

Application Features
The following features are designed to enhance the core application modules in Sage Pro ERP 7.5:

Accounts Payable

  • Inquiry on Vendor shows all periods – Allows you to view historical data for vendors from all periods.
  • Support 2.0 OFX document in BRS (XML type) – Sage Pro ERP supports version 2.0 of Open File Exchange (.OFX) format for bank statements bank reconciliation.
  • EFT Enhancements – The AP Direct Payment Setup includes new settings to customize ACH outputs.

Accounts Receivable

  • Inquiry on Customer shows all periods – Allows you to view historical data for customers from all periods.
  • Void previous period invoice – Void previous period invoices in Sage Pro ERP if the date of the invoice falls within the current fiscal year. This eliminates the need to create credit memos to void previous period invoices.
  • Allow price edit during Invoice SO Shipment – Users can now edit prices before shipments are invoiced.
  • Rewrite eCardProc.Exe in other language – Used Sun Java version of card processing API eCardproc software to connect PCCharge and for credit card encryption for Sage Payment Solution Gateway integration instead of MS Java (eCardproc.exe).
  • Support Sage Payment Solutions Gateway – Sage Pro ERP Credit Card Processing now offers clients the option to integrate with the Sage Payments Solutions Gateway. This integration provides a complete line of credit card processing tools for clients that accept credit cards as a method of payments from their customers.
  • Support for Current Version of PCCharge – The credit card processing supports the latest PCCharge Software(5.7.1 SP8).

Dashboard

  • Dashboard Customer Maintenance – The dashboard tool has been enhanced with the addition of customer maintenance screens, which allow you to remotely manage your customers and review customer related inquiries such as Payments, Receivables, Invoices and Orders. Also, In 7.5 the dashboard tool has been improved to facilitate faster and easier development.
  • Dashboard Vendor Maintenance – The dashboard tool has been enhanced with the addition of vendor maintenance screens, which allow you to remotely manage vendors, remit-to addresses, and view vendor inquiries.

General Ledger

  • GL Drill down to PR Direct Deposits – Account inquiry screen in GL allows you to drill down to PR direct deposits.

Inventory Control

  • Inquiry on Item shows all periods – Allows users to view historical data for items from all periods.

Job Cost

  • Integrate JC with MFG – This new feature allows users to create a work order for a finished good item in the Job Cost module and associate the item directly to a job. Upon completion of the work order, the cost of the finished good item is issued to the job. This allows for the effective tracking and billing of finished good items manufactured for jobs setup in the Job Cost module.
  • Add to Job new lines during Invoice JC PO – Allows the user to add additional lines while invoicing JC purchase orders and post the lines to the job.

Order Entry

  • Validate Order Reference field on SO – The Order Reference field on sales orders is validated for other orders with the same purchase order number to avoid duplicates.
  • Warn SO edit with a WO – Work orders that are partially or fully released are prevented from being deleted while voiding a sales order, or while deleting a sales order line item. In addition to this, appropriate warning messages are provided indicating the reason the user cannot delete a work order associated with a sales order line, when the work order is either released or completed.
  • Assign Deposit to Sales Order – This feature allows users to enter an advanced payment against a sales order as a deposit. The user can assign the deposit when entering the sales order or later through enter cash receipts. During shipment the system prompts to apply the deposit against the AR invoice.

Payroll

  • Direct Deposit – The Payroll Direct Deposit Setup provides new settings to customize ACH outputs.
  • 940 Report for current year – The Payroll 940 form can be generated for the current year.

Purchase Orders

  • Landed cost – With support of landed costs, users can now include direct purchase expenses such as shipping, insurance (and so on), in the cost of items after they have been received into inventory. The Landed Cost feature includes the following:
    • Define landed cost codes for Duty, Freight, Insurance, and so on, and associate them with a landed cost account.
    • Set up landed cost estimates for inventory items using the landed cost codes.
    • Estimates can be established by item or item and location and can be calculated based on quantity, percentage, weight, and fixed.
    • Estimates can be set for each PO line during Purchase order entry. These estimates can be either defaulted from landed cost settings or entered on the fly.
    • While receiving the PO, the items flagged for landed cost are received into a special restricted location.
    • Actual costs can be distributed to items at a landed cost location using the Enter or Change Payables feature in the Accounts Payable module.
    • Landed cost transfers allow you to rollup actual and estimated costs into the cost of items before they are transferred to their stock location.
    • Landed cost receipts inquiry displays the cost details and allows you to drilldown into source documents for the details.

Return Merchandise Authorization (RMA)

  • RMA Advance Replacements – The Return Merchandise Authorization (RMA) module supports Advanced Replacements which allows users to ship a replacement before actually receiving the return.

Shop Control

  • Separate number for SC rather than using WO – Prior to Sage Pro 7.5, work orders and plan orders shared the same number scheme. In Sage Pro ERP 7.5, there is a separate scheme for plan order numbers so that the existing work order numbering sequence is used exclusively for work orders.
  • Interactive Scheduling – Shop Control module allows manufacturing companies to create a master production schedule for their work orders. The schedule determines the order precedence along with the start date and time of each manufacturing operation. The scheduling process has been enhanced to use a wizard to support the following:
    • Filter and prioritize work orders for scheduling
    • Forward and backward scheduling
    • Preview schedules on a grid
    • Export schedules to Pivot tables
    • Export schedules to Excel
    • Print Work Center reports

Work Orders

  • Changes to PESHIP.PRG – PESHIP.PRG and WOSHIP.PRG have been merged and rewritten in a new class called PESHIP.VCX. This new routine has been optimized and restructured for easy maintenance.
  • WIP & Release to GL – WIP is a comprehensive feature which gives the customer a decisive edge over its manufacturing phases and total control over inventory. In Sage Pro ERP 7.5 Work Orders, users are allowed to select a new work order status called “Released” and immediately issue on-hand components to WIP. The release process will post inventory issues to the WIP account associated with each work order. Users can release quantities partially or completely on a work order. They can also reverse the released quantities that are not used in the manufacturing process. Based on the component quantities issued to WIP, the finished good is completed and the WIP account cleared accordingly.
  • Allow assign Resource on Operation maintenance – In the Work Order module, operations can be defined to use machine and manpower components. Users can then assign specific resource instances, such as usage cost and overhead, to each machine and manpower component on a work order. In Sage Pro 7.5, you can directly assign default resource instances to operations.
  • Add Start date to Work Orders – Work orders default to a start date that is determined by reducing the BOM Total Lead Time from the Work Order required date. MRP reports have been enhanced to use the start date optionally.
  • MRP Report Enhancements – New options have been provided for the Shortages MRP report to generate by Finished Good start date, Finished Good required date, or Component required date.
  • Generate WO Enhancements – In the “Forecast” method, users have the option to use Order Quantity increments for calculating work order quantities. Additionally, when using the system date option, these quantities can be calculated for parent parts even if they are not over-allocated. When using the generate date option, users can carry forward prior period closing balances.

System Manager

  • Display System date in Standard Toolbar – The Sage Pro System Date is displayed in the Sage Pro ERP standard tool bar.
  • User-defined default search criteria for Pick Lists – Users can set the Search criteria for any dataview or picklist that would be used by default when the dataview or picklist is launched.
  • PDF writer – Sage Pro ERP 7.5 ships with a free copy of Amyuni PDF writer, for use with Message Master.
  • Client feed back system – Feedback from clients using Sage Pro ERP is important to Sage Software. A link to Sage’s product feedback system has been added to the About Sage Pro box in Sage Pro ERP 7.5.
  • Windows Fax – With the addition of this excellent utility in Sage Pro ERP, Reports generated in all modules can faxed using Windows Faxing. Reports can be faxed to customers, vendors and other users in the company. Users can send reports to management, such as Aged Receivables, Shortage MRP, or Open Orders or fax a Purchase Order to a vendor to expedite the delivery of needed materials.
  • Source code for SQL objects – Sage Pro 200 ERP 7.5 is available with source code for the SQL layer. This assists in troubleshooting and debugging the customized code for SQL Sever database installations.
  • Report customization improvements – With this feature, users can create custom codes, with the hooks provided, before and after the report call and report generation.
  • DrillDown Improvements
    • Show Report Drilldown only if the report has one – The “Drilldown view” option appears in the preview dialog box only if it exists for the report.
    • Setting up drilldown to be made easier – The entire drill down process has been designed to more user-friendly. Highly flexible options are available to the user for the drilldown. In the current version, the user is no longer required to write the script for drilldown. The user can use the “Copy script” feature to copy the existing menu script in the case of a form or report, and for dataviews, a standard template is generated for the dataview selected.
    • Supporting drilldown for report – The scope of the drilldown is greatly enlarged. Drilldown options are available for Customer, Vendor, Item, Invoice, PO Number and SO Number in selected reports.
  • Import wizard enhancements
    • Import AP Invoices – Import wizard now facilitates importing payables.
    • Import AR Manual invoices – Import wizard now facilitates importing AR manual invoices.
    • Importing Employees – The revised import wizard ensures quick and smooth capture of employee files from external systems. Only essential information such as employee name, social security number and pay cycle are needed for the import. Employee codes can be generated automatically.
    • Split Import process – The Sage Pro ERP import process which helps users to import external data has been streamlined. For the benefit of users, the process is split into two parts. Conversion of external data into VFP tables and Import of VFP tables into the Sage Pro ERP database.
  • Introduce Archive flags to aid performance – In Sage Pro ERP 7.5, archive flags were added to the master tables in AR, SO, PO, and AP. The flags are used to determine the necessity of opening archive tables when information is retrieved for a report resulting in improved performance.

User Interface Features
The following features are designed to enhance the usability and depth of the Sage Pro ERP user interface:

  • Debugging Upgrades – Installation program SBTLOAD.PRG has been split into private and public parts to allow debugging on upgrades for issues caused by data.
  • SQL System Table Update Optimization – For SQL upgrades, the system tables (excluding SYDFLDS) are updated on the SQL server.
  • MDI Conversion
    • Routes Maintenance Screen – The maintenance of Routes for Work Orders is now easily accessible as an MDI screen. The user-friendly treeview display is now available in Work Orders Route Maintenance to identify the route as well as the associated operations and finished goods. The option to switch between Routes, Operations, or Finished Goods, is available in the treeview display. Right-click functionality gives you the option to add, delete, edit, and renumber the options available for individual operations and finished goods.
    • Approve, Unapproved and Unexploded – Work Orders Approve, Un-Approve and Un-Explode screen have been converted to MDI, providing even more efficiency in Work Order transactions. These screens are redesigned to use wizard functionality, commonly used throughout Sage Pro, simplifying your processing.
    • WO Operations Maintenance Screen – The Operation Maintenance screen in the Work Order module is converted to MDI format. Operations can now be associated with a Resource instance.
    • WO Work Center Maintenance Screen – The Work Center Maintenance screen in the WO module was converted to MDI format, making it easier to maintain work centers.
  • Non-MDI Wizards
    • WO Completion – The easy-to-use wizard is available in the Work Order completion process, making it easy to complete a work order by walking you through the required steps.
    • WO Explode – The WO explosion screen was redesigned to use wizard functionality for ease-of-use.

Data Management Features
The following features are designed to help users manage their Sage Pro ERP data effectively:

  • SQL Enhancements
    • Primary Keys for SQL – ID COL – Every table in the SQL database has been defined with a primary key. With a declared primary key, you can publish a Sage Pro 7.5 database using transactional replication.
    • SOX Requirements – As part of SOX compliance, you can restrict the access by Sage Pro ERP Users to the Sage Pro Program folders. This is supported only for SQL Server installations.
  • Sample Data
    • Support Multiple Sample Companies – Users can flag any company as a sample data company so that each application’s system date is set to a date that falls within the sample company’s current fiscal year and period similar to Company 99. This makes it easier to use the sample data for testing purposes. An option is also provided to ignore sample companies in the picklist.
    • Reset Account structure in Sample Company to 14 characters – Sample company 99 data is based on a sample chart of account using 14 characters. The chart of account can still accommodate up to 36 alphanumeric characters.

For more information please download the “Sage Pro 7.5 Enhancement Summary” or contact us at info@axisgp.com.

Posted in June 2008, Newsletter | Tagged , , , , , , , , , | Leave a comment

Manage Resources, Products & Services with Technisoft Service Manager

Does your organization have a need for a job costing, equipment tracking, or maintenance scheduling solution for Sage ACCPAC ERP? Then Service Manager is the solution for any of these needs. Service Manager has been developed by Technisoft, a designated preferred developer by Sage ACCPAC. Preferred developers are independent software companies that provide quality, well tested solutions to expand the functionality of Sage ACCPAC. Service Manager is developed using the Sage ACCPAC software development tools allowing for the product to operate within Sage ACCPAC seamlessly following Sage ACCPAC’s entire framework allowing the user to have a consistent experience. Service Manager has been developed and implemented over the past 21 years and has matured to a robust and well tested solution.

At the heart of Service Manager are jobs. Jobs may be broken down into several phases. The key benefit to this is that each job and all phases within that job can collect cost information, track revenues, and do so for both actual and budget values. These lines may be detailed time entries from multiple individuals, usage records for assigned pieces of equipment, sub contractor services, and all billing documents per each job or phase. A purchase order may be created from within service manager to associate the receipts so that goods may be assigned to the job. A RMA and sales order may also be created within Service Manager that is associated to the job. The RMA may be either a return from your customer to your organization or a return to your vendor. Any job or job phase may have either type of RMA or even both.

Service Manager also enables you to correctly bill your jobs by issuance and tracking of service contracts. Service contracts may be sold as an individual item, or as warranty for services previously performed or for equipment sold. The ability to define the coverage for service contracts is robust allowing for a type of service to be covered while offering reduced rates or discounts on additional services or equipment purchases.

Equipment tracking can be either client / customer equipment or it can also be equipment that is internal to your organization. Details about equipment can be tracked based on the make and model of equipment in addition to the individual items. When equipment is associated with a job, the usage or meter reading can be tracked. This can then allow for advanced maintenance of the equipment such as scheduling preventative maintenance based on usage or service contract.

Service manager includes the ability to schedule jobs and maintenance tasks, and to see the availability of assets such as equipment and employees. To increase the productivity of assigned employees, additional service manager modules are available to add the ability to enter information on jobs while in the field either in an online or offline mode. The PDA service is the first such module. 

This module allows for the tracking and entering of data on mobile phones or PDA’s. The devices this operates on are Windows Pocket PC 2003 or Windows Mobile 5 devices. If the device has wireless internet access then the data is entered and updated to the Sage ACCPAC system live. If the devices do not have wireless internet access, then the job information is downloaded to the device and changes will take effect the next time the device is synchronized. 

If remote availability is needed on a PC, the employee web portal module for Service Manager is available. An employee may log into the internet site and enter new jobs or add additional information about jobs from any site with internet access. The employee portal can be a standalone web site or as a plug in to SageCRM. A separate login capability is included with the standalone employee portal and standard CRM security would apply when used as a CRM plug in. A customer portal will soon be available. This stand alone web site allows for customers to log in and create a service request. This web site is outside of SageCRM. A customer may also view the progress and status of existing jobs.

Another capability of Service Manager is the knowledge base. Faults, symptoms, and solutions are tracked allowing for the building of a knowledge base based on the make and model of equipment.

This knowledge base may be searched allowing for fast resolution to known issues. Many standard reports are available allowing for the analysis of types of jobs, an individual job, service contracts, or a make and model of equipment. Preconfigured forms such as invoices, work orders, purchase orders, and Return Authorizations are also included. Integration to Icinity Credit Card processing also expands the Service Module functionality so that credit cards may be authorized and accepted as payment for goods and services directly within Service Manager.

If you have any questions or need additional assistance, please contact your AXIS consultant or email us at info@axisgp.com for more information.

Posted in June 2008, Newsletter | Tagged , , , , , , , , , , , , , , , , , , , , , , | Leave a comment

General Ledger – Account Code Change

What is Account Code Change for Sage Accpac ERP?
Account Code Change for Sage Accpac ERP lets you change General Ledger account codes quickly and easily.

Just add the new account codes to the account code list, and post them to change all of the records in your Sage Accpac ERP database. After your changes have been posted, print the audit log to check the changes.

Account Code Change Key Features

  • Change account codes quickly. All information, including account balances, history, and transactions will be associated with the new number.
  • Print a list of changes before they are posted. After posting, an audit log of all changes is provided.
  • Change account codes in Accounts Receivable, Accounts Payable, Inventory Control, Order Entry, Purchase Orders, Canadian Payroll, US Payroll, Tax Services, and Bank Services.
  • Copy and combine change options, quickly creating new accounts based on existing accounts or combine several current accounts into a single account.
  • Use the Import features to import multiple changes, copies, and combines from one external file.  Use the Change By Example feature to make multiple changes from one example entry.
  • Change an account code to the same number but with a different structure.
  • Change the length of existing G/L account code segments, padding or removing numbers to the left or right end of segments that you are changing.
  • Change account code segment delimiters.
  • Use Toolbar buttons to access multiple change features.

The Change List Window
Account Code Change only makes changes that you explicitly define on the Change List window. Each Change List entry is a separate change task. These entries can be created, edited, deleted, and imported.

An additional function, Change By Example, allows you to make multiple changes using only one Change List entry.

The basic functions for editing an individual change are located to the right of the window.

Function Description

  • New – Adds a new Change List entry. From the Change List window press the Insert key, or click the New button. The New window appears allowing you to create a new entry.
  • Modify – Modifies a Change List entry. Highlight the entry then click the Modify button. You cannot alter the entry’s original change option (change, combine, or copy) but you can edit the structure code, account code, and description fields. Making greater alterations requires that you delete the entry and start over.
  • Delete – Deletes a Change List entry. Highlight the entry then from the Change List window press the Delete key or click the Delete button. A dialog box appears asking you to confirm your decision.

After completing your Change List, choosing the Post option makes the actual changes to your data.

Change List Entries
There are three ways of creating entries for the Change List for Account Code Change:

  • Adding entries to the Change List individually.
  • Using the Change By Example feature to create multiple entries.
  • Importing changes from external files.

Each entry option is discussed in turn.

Single Change Entry Options
Individual change entries are added to the Change List using the New button. Changes must be entered individually if:

  • You are changing account codes that are not in a range.
  • You want to change the structure code and description.
  • You want to combine account codes.
  • You want to copy account codes.

The Action Box Options
On the New window, the Action Box offers three different change options Change, Combine, and Copy. These options create single Change List entries.

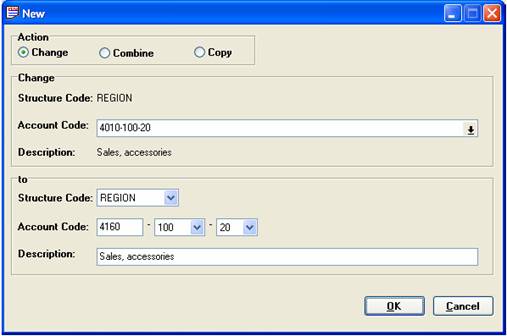
Using the Change Option
The Change option replaces the old account code with a new account code in your Sage Accpac data files. The old account code is removed from Sage Accpac ERP.

The following is an example of a Change action:

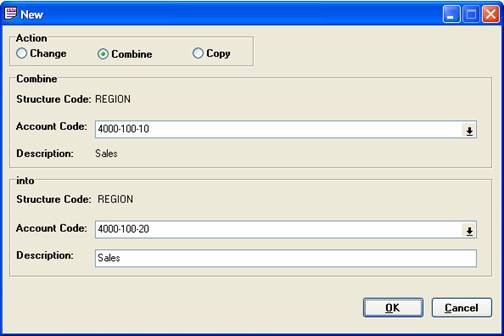
Using the Combine Option
The Combine option combines two or more accounts into a single target account. The target must be an existing account. Accounts cannot be created during the Combine process. All of the source account’s data records, including account balances, history, and transactions will be merged into the existing or target account. The source account code is then permanently removed from Sage Accpac ERP.

Unlike Change and Copy, you can Combine multiple source accounts into a single target account within the same Change List. Therefore, in one Change List you can have two or more Combine entries, each with different source accounts, combined into a single target account. Such a target account cannot be the source account of any other change action within the same Change List without producing an error.

The following is an example of Combining account codes:

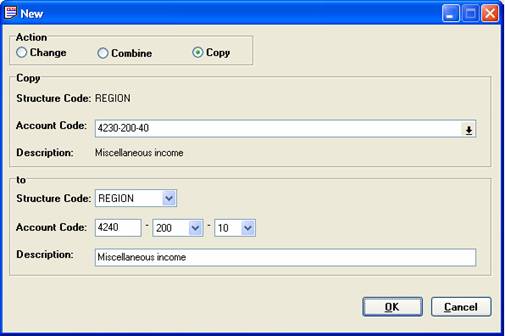
Using the Copy option
The Copy option allows you to quickly establish a new account based on an existing account. Basic information from an existing account master file is copied into a new account. The original account is left unchanged and no account activity or history information is copied.

The following is an example of a Copy action:

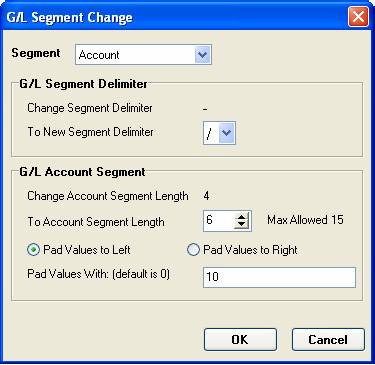
Changing G/L Account Segments
In addition to changing account numbers, you can also change the structure of account numbers.

You can change the delimiter that separates each of your account segments. For example, you could replace a dash (-) with a slash (/), so account 1234-100-10 would become 1234/100/10.

You can also change the length of account code segments in your account numbers (such as the account or department segment).

  • If you decrease the length of the segment, you can choose to truncate the characters from the left or right side.
  • If you increase its length, you can add the characters of your choice to the left or right of the existing segment.

For example, you might choose to increase the length of your account segment from 4 to 6 by adding the numerals “10” to the front of each segment, so account segment 1234 would become 101234.

Change By Example
The Change By Example feature creates a series of Change List entries through a basic pattern matching function. Before adding changes to the Change List, the Change By Example window searches the database for any account codes meeting the Change field criteria. Matching account codes changes are displayed in the Matches box. You can then review these suggested changes and, if they are acceptable, press the Done button to add them to the current Change List.

Making Backups
Making backups before posting should be a common procedure. For this reason, Account Code Change always prompts you to confirm backups have been made before proceeding with a posting. When starting a posting, the following message appears:

The importance of ensuring your Sage Accpac ERP data is safely backed up prior to posting changes cannot be overemphasized. When backing up your data, back up the whole data directory, including the *.ddf and *.dat files.

Performing a Data Integrity Check before backing up your data is also strongly recommended. Knowing that your backup data is sound provides a solid working foundation for resolving any future data integrity problems.

The Message Log window displays the following logs:

Audit Log – This log contains successfully posted Change List entries. Retaining a printed copy of this log helps you keep track of changes to your database. Entries remain in this log until they are purged.

Error Log – This log contains unsuccessfully posted Change List entries and a brief explanation of the failure. Retaining a printed copy of this log helps you resolve current errors and avoid future ones as well. Entries remain in this log until they are purged.

Warning Log – This log contains warnings of potential database problems, unrelated to Account Code Change, which were detected during a posting. Entries remain in this log until they are purged.

Viewing, Printing, and Purging Message Logs
The Message Logs — Audit, Error, and Warning — can all be viewed, printed, and purged using the following procedures.

Printing / Purging Any Message Log
Purging clears message logs of their entries. Entries remain in any Message Log until it is purged. Message logs must be printed before being purged so the purge utility is part of the printing process.

Before posting another Change List, the Error Log must be printed and purged in order to continue. If the Error Log has not been purged and you attempt a posting, the following error message is displayed:

Purge Error Log warning message

The following procedure can be used to both print and purge any of the Message Logs. You can also review a log before printing using Print Preview. A full discussion of print preview’s review options is found in the “The Print Preview” section, earlier in this chapter.

Posted in June 2008, Newsletter | Tagged , , , , , | Leave a comment

IRS Mileage Rates Change July 1, 2008

The Internal Revenue Service is trying to cope with rising gas prices by increasing the optional standard mileage rates that taxpayers can use to calculate the deductible costs of operating an automobile.

The change will take effect on July 1, earlier than usual. The rate will increase to 58.5 cents a mile for all business miles driven from July 1, 2008, through Dec. 31, 2008, an increase of 8 cents from the 50.5 cent rate in effect for the first six months of 2008, as set forth in Rev. Proc. 2007-70.

The IRS made the special adjustment for the final months of 2008 in recognition of recent gasoline price increases. It normally updates the mileage rates once a year in the fall for the next calendar year.

While gasoline is a significant factor in the mileage figure, other items also enter into the calculation of mileage rates, such as depreciation, insurance, and other fixed and variable costs, the IRS noted.

The optional business standard mileage rate is used to compute the deductible costs of operating an automobile for business purposes through the end of the year in lieu of tracking actual costs. This rate is also used as a benchmark by the federal government and many businesses to reimburse their employees for mileage.

The new six-month rate for computing deductible medical or moving expenses will also increase by 8 cents to 27 cents a mile, up from 19 cents for the first six months of 2008. The rate for providing services for charitable organizations is set by statute, not the IRS, and remains at 14 cents a mile. Taxpayers also have the option of calculating the actual costs of using their vehicle rather than using the standard mileage rates.

Posted in June 2008, Newsletter | Tagged , , , , , , , , , | Leave a comment

Frequently Asked Questions

Sage
Accpac ERP

Q – Is there a way to check for duplicate customer purchase orders when entering new orders in Order Entry?

A – Yes. Sage Accpac ERP v5.5 lets you specify whether Order Entry displays a warning, an error message, or no message when you process an order or a standalone shipment that uses the same purchase order number as an existing order or shipment for the customer.

The setting can be found on the Invoicing tab of the A/R Customer maintenance window.

If you want Order Entry to check whether you have already processed a specified purchase order, select the type of message you want to display. You can select one of the following messages:

  • Warning – If you select this option, Order Entry displays a warning message if the purchase order number is used on any existing orders or standalone shipments for the customer when you try to process an order or a shipment that uses the purchase order number. You can still process the duplicate order or shipment when you receive a warning.
  • Error – If you select this option, Order Entry displays an error message when you enter a duplicate order or standalone shipment for the customer, and you cannot post the duplicate order or shipment.

Q – Is there a setting the General Ledger module that would allow new recurring entries to be added to an existing open batch?

A – Yes. In Sage Accpac ERP v5.5, the users have the ability to choose method for creating the recurring entry batch. 

In the Create Recurring Entries Batch window, you can select the appropriate method. The options available are Default, Create a New Batch, or Add to an Existing Batch.

  1. Default – When you select this method, the batch will be appended to an open batch if the existing batch has the same run date as the new recurring batch, otherwise, a new batch is created.
  2. Create a New Batch – When you select this method, a new batch is created.
  3. Add to an Existing Batch – When you select this method, a Finder field appears. Click the Finder to select an existing open batch to add this batch to (the run dates can be different
Sage Accpac
CRM

Q – Can I perform a mass filing of Outlook e-mails in CRM?

A – Yes. You can select a set of sent or received e-mails in Outlook and file them to CRM in a single action. When you perform this action, CRM will look only for a match with the first e-mail address in the batch you have selected.

For example, if you select two e-mails in Outlook, the first one from William Dolan and the other from Karen Ward, CRM will look to match a person or company against William Dolan’s e-mail address only and will file both e-mails against this record in CRM.

If CRM does not find a match for the first e-mail, the user must manually match the e-mail batch to a record in CRM.

To perform a mass filing of Outlook e-mails in CRM:

  1. Select the CRM button in Outlook and log on to CRM. Click on the Sent Items button.
  2. Select the e-mails you wish to file in the Sent Items pane and click on the File E-mail button. The File E-mail screen is displayed. You can view details of the first e-mail and the CRM record against which the e-mail will be matched. All of the e-mails filed in this batch will be saved under this record in CRM.
  3. Click on the File E-mail button.

Q – Can I add a shared document to an Outlook e-mail as an attachment?

A – Yes. You can add documents from the My CRM | Shared Documents tab as attachments to an e-mail sent from Outlook.

To send a shared document as an attachment to an Outlook e-mail:

  1. Select the CRM button in Outlook and log on to CRM.
    Select New | Mail Message.
  2. Click on the Attach Shared Doc button.
    A list of shared documents is displayed. Select the document you wish to attach to the e-mail and click on the Attach button.
    Note: If the Attach Shared Doc button does not appear automatically on the New E-mail window, select View | Toolbars | CRM to activate it.
Sage Pro
ERP

Q – How do I change Control Accounts when closing Unbilled PO Receipts?

A – Sage Pro ERP 7.4
In Sage Pro 7.4, the control account will be populated with the item control account used when creating the PO by default, for all the lines in the Closed Unbilled PO Receipts screen grid. To change the control account, place the cursor on the column with the header X for the specified item record and press CTRL+E. This will display the Select Account screen where you can select another control account.

  1. Open the AP module.
  2. Under the Transaction menu, click Close Unbilled PO Receipts.
  3. Select the unbilled PO receipt that needs to be closed for the vendor.
  4. Place the cursor on the column with the header X for the specified item record and press CTRL+E. 

This will bring up the Select Account screen where you can change the control account.

Versions Prior to Sage Pro 7.4
For versions prior to 7.4, to change the control account, place the cursor on the column with the header X for the specified item record and press the spacebar. This will display the Select Account screen where you can select another control account.

  1. Open the AP module.
  2. Under the Transaction menu, click Close Unbilled PO Receipts.
  3. Select the unbilled PO receipt that needs to be closed for the vendor.
  4. Place the cursor on the column with the header X for the specified item record and press the spacebar.

This will bring up the Select Account screen where you can change the control account.

Q – How are Prepayments identified on the AP Aging Report?

A – Prepayment checks will result in a prepayment debit memo that must be applied to an invoice at a later time. The As of Aging report reflects prepayments as a negative amount based on the check date used.

Example
A prepayment check for $100 with the date 01/01/05 will appear on the As of Aging report as "-100" with the date of 01/01/05 (this date refers to the invoice date, post date, due date). This negative amount will remain on the reports until the Prepayment Debit Memo is applied to an invoice. The date used for applying the debit memo will determine the date it will no longer appear on the As of Aging reports. For example, if the prepayment debit memo above is fully applied to an invoice using the date 02/01/05, the negative amount will appear on As of Aging reports up until 01/31/05. It will not appear if using an as of date of 02/01/05 or later.

Q – How can I setup a Change Log for a Table?

A – To setup a change log for a table, use the steps below:

Record changes to any key files:  

  • Open System Manager (SM).
  • Under the Maintain menu, point to Dictionary and click Tables.
  • Select a table from the Table ID picklist.
  • Click Edit.
  • Select the Log Changes option from the General tab.
  • Update from Data Dictionary for this table. In the System Manager documentation refer to "Using System Utilities" for more information on using this utility. 

Important

  • The Log Changes option is only available to specific Sage Pro tables. There are Sage Pro tables that do not have the capability of tracking changes in a log. Please refer to the System Manager documentation under the Data Dictionary section to find which tables that cannot log changes.
    Only payroll files are automatically configured to track changes.
  • Only payroll files are automatically configured to track key changes.


To view the system log report:

  • Open System Manager.
  • Under the Print menu, point to System Logs and click Change Log.
  • Enter the appropriate parameters into the options grid and generate the report.

The Change Log report will display any changes made to key files.

Back to Top^
Posted in June 2008, Newsletter | Tagged , , , , , , , , , , , , , , | Leave a comment