What is Account Code Change for Sage Accpac ERP?
Account Code Change for Sage Accpac ERP lets you change General Ledger account codes quickly and easily.
Just add the new account codes to the account code list, and post them to change all of the records in your Sage Accpac ERP database. After your changes have been posted, print the audit log to check the changes.
Account Code Change Key Features
- Change account codes quickly. All information, including account balances, history, and transactions will be associated with the new number.
- Print a list of changes before they are posted. After posting, an audit log of all changes is provided.
- Change account codes in Accounts Receivable, Accounts Payable, Inventory Control, Order Entry, Purchase Orders, Canadian Payroll, US Payroll, Tax Services, and Bank Services.
- Copy and combine change options, quickly creating new accounts based on existing accounts or combine several current accounts into a single account.
- Use the Import features to import multiple changes, copies, and combines from one external file. Use the Change By Example feature to make multiple changes from one example entry.
- Change an account code to the same number but with a different structure.
- Change the length of existing G/L account code segments, padding or removing numbers to the left or right end of segments that you are changing.
- Change account code segment delimiters.
- Use Toolbar buttons to access multiple change features.
The Change List Window
Account Code Change only makes changes that you explicitly define on the Change List window. Each Change List entry is a separate change task. These entries can be created, edited, deleted, and imported.
An additional function, Change By Example, allows you to make multiple changes using only one Change List entry.
The basic functions for editing an individual change are located to the right of the window.
Function Description
- New – Adds a new Change List entry. From the Change List window press the Insert key, or click the New button. The New window appears allowing you to create a new entry.
- Modify – Modifies a Change List entry. Highlight the entry then click the Modify button. You cannot alter the entry’s original change option (change, combine, or copy) but you can edit the structure code, account code, and description fields. Making greater alterations requires that you delete the entry and start over.
- Delete – Deletes a Change List entry. Highlight the entry then from the Change List window press the Delete key or click the Delete button. A dialog box appears asking you to confirm your decision.
After completing your Change List, choosing the Post option makes the actual changes to your data.
Change List Entries
There are three ways of creating entries for the Change List for Account Code Change:
- Adding entries to the Change List individually.
- Using the Change By Example feature to create multiple entries.
- Importing changes from external files.
Each entry option is discussed in turn.
Single Change Entry Options
Individual change entries are added to the Change List using the New button. Changes must be entered individually if:
- You are changing account codes that are not in a range.
- You want to change the structure code and description.
- You want to combine account codes.
- You want to copy account codes.
The Action Box Options
On the New window, the Action Box offers three different change options Change, Combine, and Copy. These options create single Change List entries.
Using the Change Option
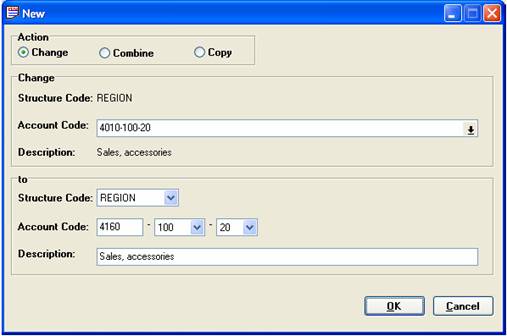
The Change option replaces the old account code with a new account code in your Sage Accpac data files. The old account code is removed from Sage Accpac ERP.
The following is an example of a Change action:

Using the Combine Option
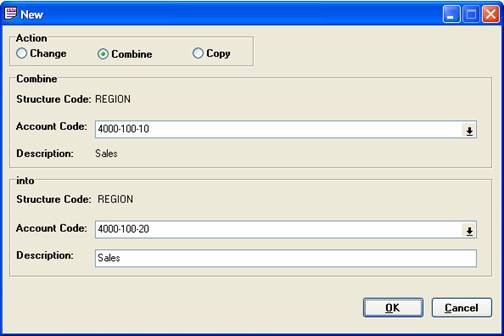
The Combine option combines two or more accounts into a single target account. The target must be an existing account. Accounts cannot be created during the Combine process. All of the source account’s data records, including account balances, history, and transactions will be merged into the existing or target account. The source account code is then permanently removed from Sage Accpac ERP.
Unlike Change and Copy, you can Combine multiple source accounts into a single target account within the same Change List. Therefore, in one Change List you can have two or more Combine entries, each with different source accounts, combined into a single target account. Such a target account cannot be the source account of any other change action within the same Change List without producing an error.
The following is an example of Combining account codes:

Using the Copy option
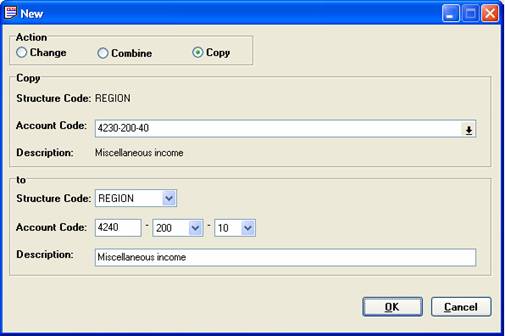
The Copy option allows you to quickly establish a new account based on an existing account. Basic information from an existing account master file is copied into a new account. The original account is left unchanged and no account activity or history information is copied.
The following is an example of a Copy action:

Changing G/L Account Segments
In addition to changing account numbers, you can also change the structure of account numbers.
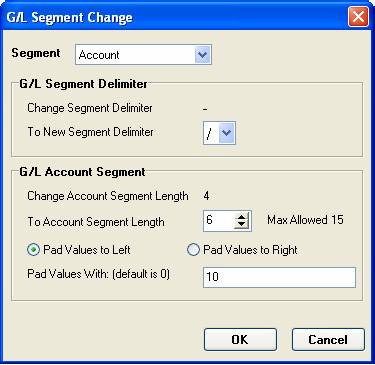
You can change the delimiter that separates each of your account segments. For example, you could replace a dash (-) with a slash (/), so account 1234-100-10 would become 1234/100/10.
You can also change the length of account code segments in your account numbers (such as the account or department segment).
- If you decrease the length of the segment, you can choose to truncate the characters from the left or right side.
- If you increase its length, you can add the characters of your choice to the left or right of the existing segment.
For example, you might choose to increase the length of your account segment from 4 to 6 by adding the numerals “10” to the front of each segment, so account segment 1234 would become 101234.

Change By Example
The Change By Example feature creates a series of Change List entries through a basic pattern matching function. Before adding changes to the Change List, the Change By Example window searches the database for any account codes meeting the Change field criteria. Matching account codes changes are displayed in the Matches box. You can then review these suggested changes and, if they are acceptable, press the Done button to add them to the current Change List.
Making Backups
Making backups before posting should be a common procedure. For this reason, Account Code Change always prompts you to confirm backups have been made before proceeding with a posting. When starting a posting, the following message appears:
The importance of ensuring your Sage Accpac ERP data is safely backed up prior to posting changes cannot be overemphasized. When backing up your data, back up the whole data directory, including the *.ddf and *.dat files.
Performing a Data Integrity Check before backing up your data is also strongly recommended. Knowing that your backup data is sound provides a solid working foundation for resolving any future data integrity problems.
The Message Log window displays the following logs:
Audit Log – This log contains successfully posted Change List entries. Retaining a printed copy of this log helps you keep track of changes to your database. Entries remain in this log until they are purged.
Error Log – This log contains unsuccessfully posted Change List entries and a brief explanation of the failure. Retaining a printed copy of this log helps you resolve current errors and avoid future ones as well. Entries remain in this log until they are purged.
Warning Log – This log contains warnings of potential database problems, unrelated to Account Code Change, which were detected during a posting. Entries remain in this log until they are purged.
Viewing, Printing, and Purging Message Logs
The Message Logs — Audit, Error, and Warning — can all be viewed, printed, and purged using the following procedures.
Printing / Purging Any Message Log
Purging clears message logs of their entries. Entries remain in any Message Log until it is purged. Message logs must be printed before being purged so the purge utility is part of the printing process.
Before posting another Change List, the Error Log must be printed and purged in order to continue. If the Error Log has not been purged and you attempt a posting, the following error message is displayed:
Purge Error Log warning message
The following procedure can be used to both print and purge any of the Message Logs. You can also review a log before printing using Print Preview. A full discussion of print preview’s review options is found in the “The Print Preview” section, earlier in this chapter.


 Download our corporate brochure for more facts about us, our
clients and our solutions.
 Driving Revenue Growth 1
 Satisfying Customers 1