Sage ERP & SageCRM Tips & Tricks

Here are this month’s Tips & Tricks videos to help you learn new features and become more productive with your Sage Accpac ERP and SageCRM systems. Just click the thumbnails to watch and learn! We hope you enjoy them and find them useful. Your feedback is encouraged.

Adobe Flash Player is required

Posted in June 2008, Newsletter | Tagged , , , , , , , , , , , , , , , , , , | Leave a comment

Sage Accpac ERP 5.5 is here! What does this mean for you?

Sage Software announced the release of the latest version of Sage Accpac ERP version 5.5 as part of the new Sage Accpac Extended Enterprise Suite.  With the release of version 5.5 of award-winning Sage Accpac ERP you will benefit from the many new enhancements including:

  • Sage Accpac Extended Enterprise Suite includes integrated SageCRM to give you true visibility across your entire organization
  • Accounts Receivable, Accounts Payable and Sales Analysis dashboards providing you an up-to-date snapshot of your company’s financial and operational health
  • Greatly improved integration within the family of Sage Accpac Extended Enterprise Suite products including SageCRM, Sage FAS, Sage Accpac HRMS
  • New multicurrency capabilities
  • New GL Account roll up feature
  • Increased number of Account segments
  • Increased number of years of history
  • Popular Options products are bundled in with corresponding core modules at no additional charge

The new features and added functionality are too numerous to detail in this article.  Please visit the link provided to watch Sage Software’s series of on-demand demonstrations or download the “What’s New in Sage Accpac ERP attached.

For more information, please contact us at info@axisgp.com

Posted in May 2008, Newsletter | Tagged , , , , , , , , , , , , , , | Leave a comment

Voice Activated Technology in the Warehouse

Voice activated technology is the newest trend in the warehousing industry and it is gaining momentum.  The key feature of this solution is the interface with the user which allows for “hands free”, “eyes free” processing.

Using only a head-set and voice terminal, this technology yields two immediate benefits:

  1. Improved accuracy – the user is not distracted by having to enter data into a RF terminal resulting in fewer picking errors. The voice synthesizing software “learns” the user’s voice which allows the solution to adapt itself to different dialects and ethnicities.  This will require each user to complete this process prior to being able to use the system.
  2. Real-time validation – verification of item and quantity are accomplished while the user continues working which also increases productivity.  This technology does not, however, eliminate the requirement to scan the item and bin location and a handheld scanner will still need to be utilized.  In some cases, a scanning gun may have to be used in lieu of the scanning pen due to warehouse layout.

It is important to understand that the type of technology currently in operation will determine the true incremental benefit of implementing voice technology.  A business currently using a RF solution can expect minor accuracy improvement but a significant rise in productivity, while a business using a paper-based system can expect marked improvement in both areas.  While each business is unique, it is not unusual for this type of solution to pay for itself within the first year of use.

In addition, there are indirect benefits to this type of solution as well:

  1. Ease of use – the technology is intuitive which eliminates the need for lengthy and costly training session.
  2. Equipment wear – units are light weight and worn on the belt, reducing the risk of damage to the unit due to mishandling.
  3. Safety – greater awareness of surroundings and possible hazards as well as decreased risk of repetitive motion injuries from constantly picking up and putting down an RF unit.

This technology is currently in use at many locations throughout the world and has proven to be accurate and reliable in environments that prior RF technology could not and further improvements are currently being discussed.

If you are interested in implementing a WMS solution or upgrading your current WMS environment to utilize voice technology, please contact us at info@axisgp.com.

Posted in May 2008, Newsletter | Tagged , , | Leave a comment

How to Use the New GL Rollup feature in Sage Accpac ERP 5.5

What are Rollup Accounts in the General Ledger module?

A rollup account is an account that shows the relationships between accounts that can be used for classification, budgeting, and reporting. Creating a relationship between accounts lets you consolidate or rollup account balances (and quantities, if applicable) to provide a summary balance similar to the consolidation options provided in Financial Reporter.

When you designate an account as a rollup account, you can also add member accounts to it (using the fields in the Rollup tab that appears when this option is selected). You can also add rollup member accounts to an account’s member accounts, creating a tree.

Note: This feature is available only in the Sage Accpac 500 ERP version 5.5 of the product.

You can print rollup information on the following reports:

  • Chart of Accounts:
    • The Rollup Accounts report is an additional selection in the Report Format field on the Chart of Accounts report. The Rollup Account/Members report displays all rollup accounts and their directly related rollup member accounts.
    • The Rollup Accounts option on the Chart of Accounts report displays the member accounts only if it has parent rollup accounts.
    • The Fiscal Set Comparison Report has an option to include rolled up amounts.
  • Transactions Listing report.
  • Trial Balance reports.

Financial Reporter has been enhanced to include the following:

  • Rollup commands in FRAMT, FRAMTA, FRDEBIT, FRCREDIT.  The rollup command has a prefix of R (for example, FRAMT(“RBALP”).
  • RD consolidation switch (for rollup account detail) to show only the top-level rollup accounts within the selected range.
  • FR Paste – Choose the Rollup Members Account option in the FR Paste function to include balances or quantities for rollup member accounts whose balances or quantities are also being rolled up to their rollup account in the same paste function in the report.

Adding Rollup Accounts

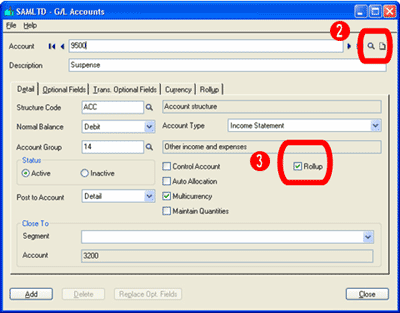
  1. Click the Accounts icon in the G/L Accounts folder of General Ledger. This opens the G/L Accounts form.
  2. Use the Finder in the Account field to select the account you are designating as a Rollup account.
  3. Select the Rollup option on the Detail tab.
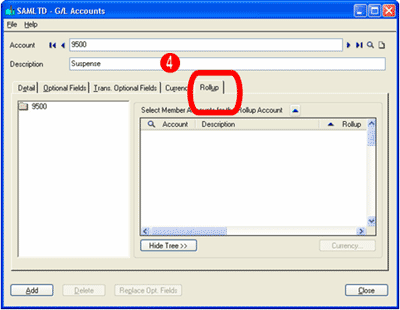
  4. Click the Rollup tab that appeared when you performed step 3. The Rollup tab looks like this:

To add individual member accounts, or a range of accounts:

  1. To add individual accounts, click the Finder in the Account column to open the Account Finder, where you select the account you wish to add.
  2. To add a range of member accounts, click the Zoom button beside “Select Member Accounts…”.
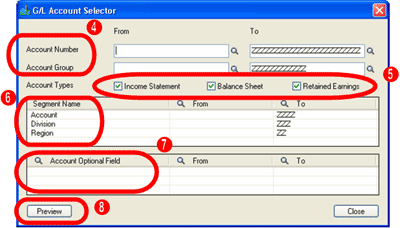
  3. The G/L Account Selector popup appears:
  4. Select the ranges of Account Numbers, Account Segments, or Account Groups that will be members of this rollup.
  5. Select Account Types.

Note: Accounts selected will include only those accounts whose account types match the Account Types selected here. For example, if the Income Statement option is not selected, then even if the Account Number range includes income statement accounts, those accounts will not be copied into the grid.

  1. Select criteria ranges based on your Account Segments (optional).
  2. Select criteria ranges for Account Optional Fields (optional).
  3. Click the Preview button to view your choices, then click Copy to return to the Rollup tab.
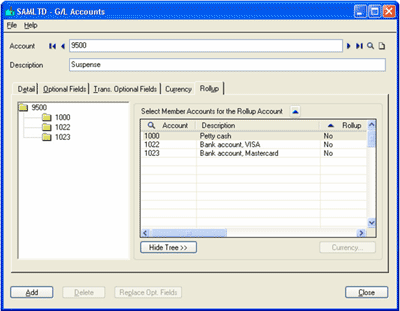
    Accounts that meet all the criteria of the Select By fields and Account Type options are copied to the grid, and appear in the tree, as shown below:

    Note: If the rollup account is single-currency, only single-currency accounts which meet the G/L Account Selector will be generated in the Preview window. 
    Accounts that already exist or were already added in the Rollup grid will not be shown again in the Preview window.
  4. Upon previewing accounts in the G/L Account Selector Preview screen, if there are accounts which should not be added as members, you can double-click Yes in the Add column to toggle it to No, or use the space bar in the grid in the Rollup tab to toggle to No.
  5. Click Add, then click Close.

To delete member accounts from a rollup account:

  1. Highlight the account in the grid to delete an individual member.
  2. Press the Delete key on your keyboard.  Do not click the Delete button, as that deletes the Account itself, with all its rollup members.

Additional information:

  • To view details about the currency of a multicurrency member account, highlight the account, then click the Currency button.
  • To hide the tree, click the Hide Tree button. To view it again, click the Show Tree button.
  • Rollup is multi-level. You can double-click the account number in the tree to open the G/L Rollup Accounts form, where you can add accounts to this rollup account. (You can also do this by double-clicking on the member account in the grid, by clicking on the Rollup zoom form, or by pressing Shift+F9 to assign a member as a rollup account.)
  • If an account being copied to the grid is already on the grid, it will not be copied again; an account cannot be a rollup member of itself.

After Using

Print a listing of the Chart of Accounts using the Print command on the File menu in this form or Chart of Accounts in the Reports folder.
Cautions – You should be aware of the following when setting up rollup groups:

  • Parent/Child – A parent account cannot be a child of itself. That is, when you create a rollup group, you cannot add the top account as a member of that same group.
  • New accounts – New accounts do not get added automatically to existing rollup groups.
  • Prohibit Posting option – When you prohibit posting to a rollup account, you can still post to that account in other ledgers (A/R, A/P etc), but not in G/L.
  • Security rights – Be aware that if a user is granted security rights to view a parent account, they also will be able to view the member accounts in the group.
  • Member of multiple groups – An account can be a member of more than one rollup group.
  • Double balances – Be careful how you set up the rollup groups so as to avoid double-balances in reports.
Posted in May 2008, Newsletter | Tagged , , , , , | Leave a comment

New Features in Sage Pro ERP General Ledger

In the latest release of Sage Pro ERP 7.4, there are four new and exciting features in the General Ledger module that provide flexibility and improved functionality to this core module.

The first new feature is an expanded GL account structure. There are two options for the account structure:

  1. A standard account structure that is 36 characters in length with a maximum of 10 segments.
  2. A user-defined account structure that is 90 characters in length with a maximum of 15 segments.

By giving the user options on the account structure when setting up the General Ledger, the General Ledger accounts are much more versatile and accommodating than before.

The second new feature is the ability to release applications to General Ledger from within General Ledger at the same time. This provides the user with convenience because the release is now done from General Ledger instead of from the subledgers.

The first step is to create a Release Preference. This is a one time set up that is provides the parameters for the release. In the General Ledger module, select Maintain > Release Preferences.
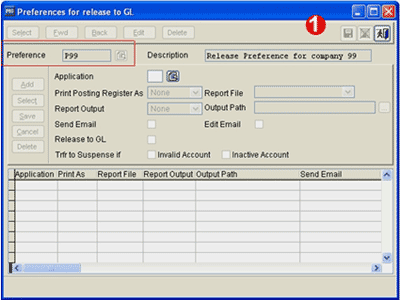
1. Enter a preference code and a description. In this example, we will create preference code P99.
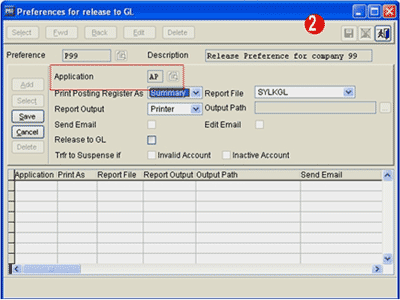
2. Enter the module that you want to release to General Ledger. In this example we will start with Accounts Payable. Enter the following:

Print Posting Register As: You have the options of detail, summary, or none.
Report Output: You have the options of Printer, PDF or none.
Output Path: If you select PDS as the report output, this field allows you to save the PDF to disk.
Send Email: If you selected PDF as the report output, then if you check this field the PDF report is automatically sent as an email attachment.
Edit Email: If you selected Send Email, then by checking this field a screen appears where you can enter email information.
Release to GL: Check this box to allow the release to General Ledger.
Trfr to Suspense if: Check Invalid Account and/or Inactive Account to automatically post entries having invalid/inactive account information to the suspense account that is designated in GL setup. If this box is unchecked, if invalid/inactive accounts are contained in the release process, the process is aborted.
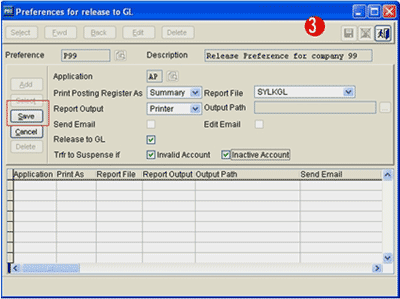
3. Once you have filled out all of the fields, click on the Save button on the left hand side. You are now ready to enter the next module.
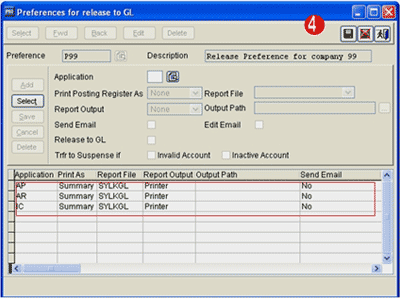
4. Once you have entered all of the modules for this preference, click on the green Save button in the upper right hand corner. Remember, this is a one-time setup.

Now we can discuss the process of releasing the applications to the General Ledger module. In General Ledger, select Transactions > Release Applications to GL.
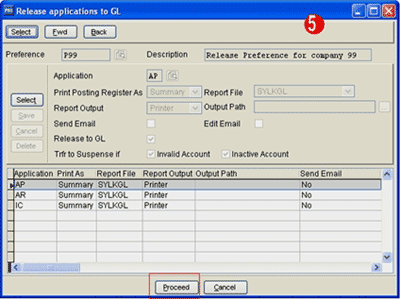
5. Select the preference and then click on the Proceed button. You will see the status and processing time of the release to General Ledger.
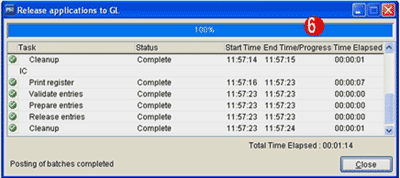
6. Once the release is completed, you can close the window. The batches are now ready to be posted.

The third new feature is an enhanced drill down that makes use of the notes from either the subledgers or batches created in the General Ledger module. This provides information that is very useful for the audit trails.

Go to Maintain > Accounts > Single Accounts.
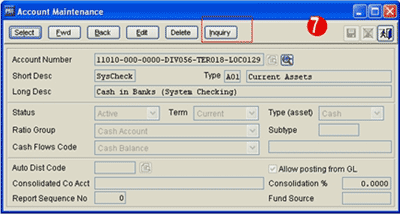
7. Select the General Ledger account that you want to drill down from. In this example, we will use the checking account. Click on the Inquiry button.
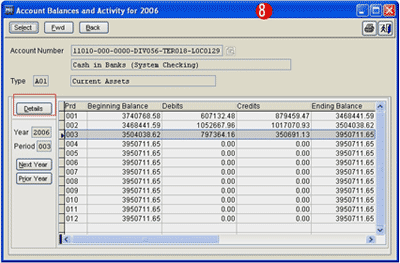
8. Select the year and period and then click on the Details button.
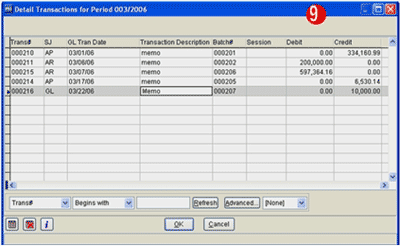
9. Select the line that you are interested in and double click on the Transaction Description column.
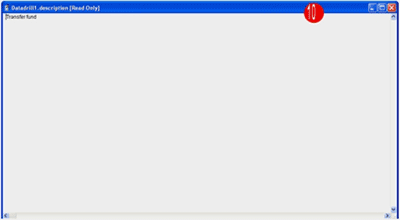
10. You will see the information that was entered in the subledger or General Ledger for this entry.

The fourth new feature is a Copy From option when creating a new batch. This feature allows users to copy from a posted or an option batch, which makes the data entry much easier.

Select Transactions > Create Batch Journal.
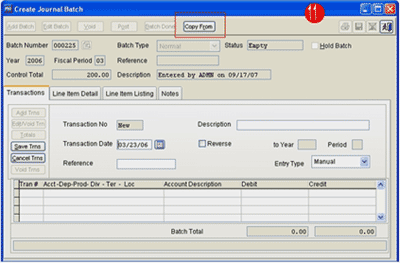
11. Enter the information on the Transaction tab as you would normally. Then, click on the Copy From button.
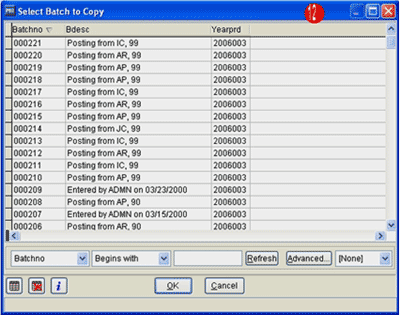
12. Select the batch that you want to copy and click OK.
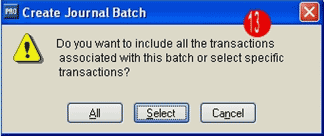
13. At this point you can decide whether to include all the transaction within the batch or only certain transactions.

14. If you chose Select, a screen appears where you will select which transactions to copy by placing an X in the first column.

15. Whether you chose All transactions or Selected transactions, you will be asked if you want to reverse the original entries.
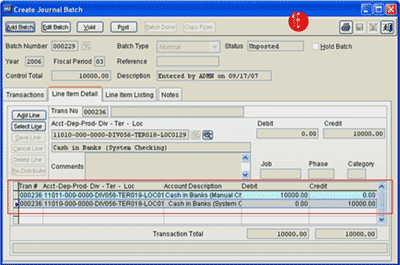
16. Once the transactions are in the new batch, you can edit or delete these transactions as you would any other transaction. Additionally, you can add more transactions to this batch.

As you have seen, the new functionality in the General Ledger module of Sage Pro ERP 7.4 provides flexibility and makes processing easier while adhering to GAAP standards.

If you have any questions or need additional assistance, please contact your AXIS consultant or email us at info@axisgp.com for more information.

Posted in May 2008, Newsletter | Tagged , , , | Leave a comment

Frequently Asked Questions

Sage
Accpac ERP

Q – Are distribution codes required when using Distribution Sets in the Accounts Payable module?

A – Prior to Sage Accpac ERP v5.5, distribution codes were required for creating distribution sets.  In Sage Accpac ERP v5.5, the Distribution Sets form lets you enter General Ledger accounts as well as distribution codes.

To reuse the description and discount status from an existing distribution code, insert the distribution code in the distribution set, as usual. Then clear the code, and enter the General Ledger account you want to use.

A distribution set is a group of distribution codes and general ledger accounts that represents a standard group of distributions you would make when entering vendor transactions. Distribution sets are used to speed data entry.

The following distribution set contains two codes that distribute a supplies purchase to two general ledger accounts using a fixed percentage (You can choose Manual, Spread Evenly, Fixed Amount, or Fixed Percentage for the distribution methods when setting up the Distribution Set).

Q – Is there a way to setup security to allow a user to enter a journal entry but not post in the General Ledger?

A – Yes. In Sage Accpac ERP v5.5, Journal Posting rights and Journal Entry rights are now separate security settings.  The separate settings allows better separation of duties so that when a user is assigned Journal Posting rights only, the system will not automatically assign Journal Entry rights to them.

Journal Posting rights gives access to Post Batches and inquiries associated with posted transactions.  In addition, Journal Entry rights are not automatically given when Journal Posting is assigned to a user.

Security is setup and maintained under Administrative Services.

Sage Accpac
CRM

Q – How can I tell if e-mails have been filed to CRM?

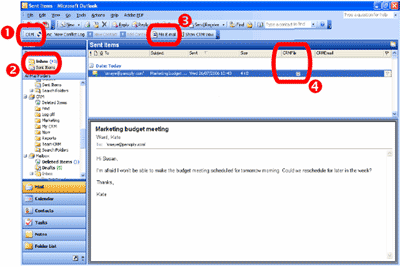
A – With CRM v6.0, the standard messages pane in Outlook now has two new columns by default – CRM Email and CRM File. In all other Outlook folders, these columns can be added to the current view by using the Show CRM View button.

The CRM File column is checked if the user successfully files an email to CRM. The CRM Email column is checked if it is detected during synchronization that an e-mail is from a CRM contact. When an e-mail is checked as either CRM File or CRM Email, the envelope icon also changes. If a user drags an email to another Outlook folder, the email will retain the CRM File and CRM Email markers.

The check box and column are displayed below in step 4 of the filing emails from Outlook to CRM procedure.

To file a sent e-mail to CRM:

  1. Select the CRM button in Outlook and log on to CRM.
  2. Select the Outlook Sent Items button. The Sent Items pane displays.
  3. Select the e-mail to file to CRM and click on the File E-mail button.
  4. E-mails filed to CRM are indicated in the CRM File column.

Q – Can I file emails into CRM that were sent from Outlook?

A – E-mails sent from Outlook can be filed in CRM.

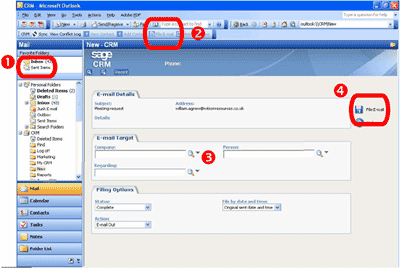
If an e-mail address match is found in CRM for an e-mail sent from Outlook, the Company, Person, and Regarding fields on the File E-mail screen are automatically matched with the associated person or company record in CRM.

Alternatively, if no match is found, you can file the e-mail against any recipient.

To file an e-mail sent from Outlook in CRM:

  1. Click on the Sent Items button.
  2. Select an e-mail in the Sent Items pane and click on the File E-mail button. The File E-mail screen is displayed.
  3. If no matching e-mail address has been found in CRM, use the Search Select Advanced buttons to specify which record you want the e-mail filed against.
  4. Click on the File E-mail button. Sent e-mails are saved in CRM as E-mail Out. Attachments are filed automatically with the associated e-mail.
Sage Pro
ERP

Q – Why is the “Expression” button disabled when importing Sales Orders?

A – The Expression button (in step 2 of 5) is enabled when importing dbf files. If you require using the Expression feature, you will need to convert the external file to a dbf format before importing.

Q – Why can Customer’s Credit Limit not be exceeded while editing a Bid?

A – The SOCRED02 privilege is required to be able to exceed a customers’ credit limit for a bid. Users with this privilege can enter bids in Order Entry (OE) that exceeds a customers’ credit limit. However when the same user edits this bid and attempts to save it, the following message appears:

Credit limit exceeded by ####.
You are not authorized to enter sales orders above customer credit limit.

This issue has been documented under PTR 79386 and resolved in Sage Pro ERP 7.4. For prior versions (7.3 and 7.3B) assign the SOCRED01 privilege as well. This will allow users to enter and edit bids that exceed a customers’ credit limit.

Q – What is the purpose of the Stock Location when entering Purchase Order Line Items?

A – When entering purchase order line items, it is possible to enter a stock location that is different from the receiving location on the header. When receiving the purchase order, the line item is received to the header location and not the stock location. 

All line items entered on a purchase order will be received to the header Receiving Loct regardless of what is entered for the Stock Loc on the Line Item Detail screen. If the Stock Loc is different from the

Receiving Loct, it will appear on the Receipt Location Exceptions report in the Purchase Order (PO) module. This report can be generated to determine if inventory transfers are required for items stocked at other locations. This is done through the Inventory Control module.  

Important
This process also applies to purchase orders entered in the Job Cost module. For additional information, please review "Entering Purchase Orders" in the PO documentation.

Back to Top^
Posted in May 2008, Newsletter | Tagged , , , , , , , , , , , , , , | Leave a comment

Sage ERP & SageCRM Tips & Tricks

Here are this month’s Tips & Tricks videos to help you learn new features and become more productive with your Sage Accpac ERP and SageCRM systems. Just click the thumbnails to watch and learn! We hope you enjoy them and find them useful. Your feedback is encouraged.

Adobe Flash Player is required

Posted in May 2008, Newsletter | Tagged , , , , , , , , , , , , , , , , , , | Leave a comment

The Importance of Keeping Your Company Current on Software Assurance

When new clients purchase their new Sage Software solution, they often ask what the software assurance line is for.  We explain that it is an investment protection plan for their mission critical software.  We also inform our clients that future releases of their products often include many additional features and functionality at no additional cost.  Luckily, a significant number of our clients listen to this advice and keep your software assurance current.  Well, we are now proud to announce that your investment is about to pay off BIG TIME!

Last Friday Sage Software announces the roll out the latest version of Sage Accpac ERP 5.5.  This new release incorporates many new features and functionality to the product. It also incorporates a number of Accpac Option products and modules that were rolled up into the core modules valued at approximately $16,000.  Imagine receiving an additional $16,000 of value for no additional cost.

The list of new Sage modules and Accpac Option products that are now included in Sage Accpac ERP 5.5 include:

  1. Sage CRM Server
  2. Sage CRM 200 Single User License
  3. Additional Language Overlays
  4. AR Inquiry
  5. Customer Number Change
  6. Vendor Number Change
  7. GL Security
  8. Account Code Change
  9. Item Number Change
  10. Ops Inquiry
  11. Lot Tracking
  12. eFile for Payroll
  13. Time Cards

What does this mean to you? Well, if you are not current on software assurance, WHAT ARE YOU WAITING FOR?  Please contact us at info@axisgp.com and we will be happy to assist you.  If your software assurance expires in the near future, please make sure to keep it current.

Posted in April 2008, Newsletter | Tagged , , , , , , , , , , , , , , | Leave a comment

Attention Sage Pro Clients – Sage Pro and Visual FoxPro Statement

We have received numerous inquiries from our Sage Pro clients regarding questions concerning Visual FoxPro.   Since the announcement by Microsoft that they will not be releasing a new version of Visual FoxPro, many clients and prospects have asked how this will affect Sage Pro.  In this connection, Sage Software has put together a statement regarding this issue along with answers to the questions that have been raised.

A copy of this statement is also available from Sage Software’s public website, www.sageproerp.com in the quick links section.

Sage Pro & Visual FoxPro (VFP)

Sage Pro has been in the market of helping clients manage their businesses for over 15 years. Its development in Microsoft Visual FoxPro (VFP) has given it a solid, well-established programming language upon which to build. Many of the customization tools in Sage Pro give it the ability to meet the unique and constantly changing needs of individual businesses. In addition, the richness of the VFP programming language offers a complete set of features that enable Sage Business Partners to program customizations far more efficiently than could be done in other languages. This unique combination provides Sage Pro customers with a lower-cost solution than may be available in other programming languages.

While the VFP language has been a versatile tool for the business management software industry, Microsoft has announced it will no longer release new versions of this product. We do not perceive this as a major concern at this time because:

  • Microsoft has committed in its Message to the Community to extend support of the platform until 2015.
  • Through extension development programs such as Sedna, Visual FoxPro-based solutions will continue to integrate with other Microsoft products and technologies.
  • Sedna will also help improve the ability for Visual FoxPro to be deployed successfully on Windows Vista.
  • The independent community of VFP developers, VFPX from CodePlex, continues to create open-source add-on releases that improve and extend VFP in conjunction with the Sedna project from Microsoft.
  • While Microsoft support for VFP is ending in 2015, functionality of applications developed in this language will still continue on. The software industry has seen the longevity of products continue long after support for a programming language has ended. Examples of this include languages like Cobol and Microsoft’s discontinued version of C and Visual Basic.

Changing events within the technology industry may have raised a few questions for you as a customer. So Sage would like to address some of the questions that have come to our attention.

Q  How will these changes to VFP affect future versions of Sage Pro?
A.  Development of Sage Pro is planned to continue for many years. We will continue to remain connected to our customers in order to build into our product the features and enhancements that our customers require. Our planning process for Sage Pro is based on our product roadmap, consisting of several new versions of Sage Pro over the next several years. This roadmap will continue to evolve as we identify features, enhancements and technologies that address the needs of our market.

Q  What is the path for Sage Pro after 2015, after extended support of VFP from Microsoft has been discontinued?
A.  While Microsoft will be discontinuing its support of VFP, that does not mean that Sage Pro will stop working come 2015. This product code will indeed still continue to provide functionality. This issue was addressed in a statement by Alan Griver of Microsoft on April 3, 2007:
"It’s never an easy decision to announce that we’re not going to release another version of a product, and it’s one that we consider very carefully. We’re not announcing the end of FoxPro. Obviously, FoxPro applications will continue to work. By some of our internal estimates, there are more applications running in FoxPro 2.6 than there are in VFP, and FoxPro 2.6 hasn’t been supported in many years. Visual FoxPro 9 will be supported by Microsoft through 2015."

Q.  What is Sage’s policy for supporting older versions of Sage Pro?
A.  Sage Software is committed to providing our customers with the support they require to use our products. Sage’s current support policy includes supporting the current version in production and one version back.

Q.  Will Microsoft’s discontinuation of support for VFP mean that I will need to move off of Sage Pro to some other product?
A.  The functional life of Sage Pro will continue well beyond the availability of support of VFP from Microsoft. By choosing a Sage Software product and working with your Sage Business Partner, you are choosing a team that will support you for the life of your business. If there comes a time when it makes sense for you to migrate to another Sage Product, we will have migration tools available for you and your partner to make the transition an easy one. No matter which Sage product you are using, you can rest assured that we will continue to provide you with great business products, and Sage Business Partner will continue to service your needs for the life of your business.

Q.  What will happen between now and the time that VFP is no longer a supported development language?
A.  Sage Software is committed to you as our customer for the life of your business. Our goal is to provide the products you need to make it easier to manage your business. With that commitment in mind, we will be building a bridge between our products today and our products in the future.
Sage Software is committed to you, our customer, both now and in the future. That commitment should make your business application decision today that much easier.  You can make your decisions based on the needs for your business today, knowing that you are partnering with a software company that has your needs in mind for the future, as well.

Posted in April 2008, Newsletter | Tagged , , , | Leave a comment

AXIS Teams Up with Key Equipment Leasing – Take advantage of temporary tax breaks

Fast track your business to success

Combine all the benefits of accelerated write-offs for your qualifying IT equipment purchases provided by these temporary tax breaks with the enhanced flexibility that comes from financing with Key Equipment Finance.

Section 179: Recently increased for 2008

For tax purposes, the IRS Code Section 179 provides accelerated write-offs for capital expenses. Businesses purchasing $800,000 or less in capital equipment during 2008 can deduct up to $250,000 of that expense immediately on their 2008 tax return. Therefore managing your purchases this year is critical.  Key Equipment loans and non-tax leases can keep you in the driver’s seat by letting you retain tax ownership of your equipment so that you can use the Section 179 write-off to your advantage.

Enjoy tax advantages for equipment acquisitions exceeding $800,000

If your 2008 budget requires more than $800,000 in capital equipment investment, you’ll need to manage the tax ownership of those assets in order to maintain your Section 179 write-off. By using the Key Accelerator Lease to finance assets over $800,000, Key Equipment Finance becomes the tax owner of the equipment, which also enables you to take advantage of special pricing resulting from limited-time 50% bonus depreciation. Therefore you can trade in unused tax benefits for an overall lower financing cost on acquisitions over $800,000, while maintaining your Section 179 deduction on assets below that threshold.

Feel free to test out our Lease calculator that includes various leasing options.  Your financing package can include hardware, software and consulting fees for terms of 24, 36, 48 and 60 months.  No time like the present to take advantage of the tax savings while investing in your future business success.

** Before entering into any equipment finance arrangement, check with your own financial advisor and legal counsel.

Posted in April 2008, Newsletter | Tagged | Leave a comment