What are Rollup Accounts in the General Ledger module?
A rollup account is an account that shows the relationships between accounts that can be used for classification, budgeting, and reporting. Creating a relationship between accounts lets you consolidate or rollup account balances (and quantities, if applicable) to provide a summary balance similar to the consolidation options provided in Financial Reporter.
When you designate an account as a rollup account, you can also add member accounts to it (using the fields in the Rollup tab that appears when this option is selected). You can also add rollup member accounts to an account’s member accounts, creating a tree.
Note: This feature is available only in the Sage Accpac 500 ERP version 5.5 of the product.
You can print rollup information on the following reports:
- Chart of Accounts:
- The Rollup Accounts report is an additional selection in the Report Format field on the Chart of Accounts report. The Rollup Account/Members report displays all rollup accounts and their directly related rollup member accounts.
- The Rollup Accounts option on the Chart of Accounts report displays the member accounts only if it has parent rollup accounts.
- The Fiscal Set Comparison Report has an option to include rolled up amounts.
- Transactions Listing report.
- Trial Balance reports.
Financial Reporter has been enhanced to include the following:
- Rollup commands in FRAMT, FRAMTA, FRDEBIT, FRCREDIT. The rollup command has a prefix of R (for example, FRAMT(“RBALP”).
- RD consolidation switch (for rollup account detail) to show only the top-level rollup accounts within the selected range.
- FR Paste – Choose the Rollup Members Account option in the FR Paste function to include balances or quantities for rollup member accounts whose balances or quantities are also being rolled up to their rollup account in the same paste function in the report.
Adding Rollup Accounts
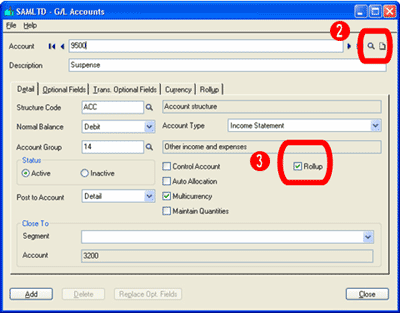
- Click the Accounts icon in the G/L Accounts folder of General Ledger. This opens the G/L Accounts form.
- Use the Finder in the Account field to select the account you are designating as a Rollup account.
- Select the Rollup option on the Detail tab.

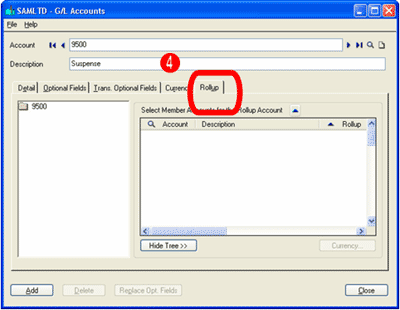
- Click the Rollup tab that appeared when you performed step 3. The Rollup tab looks like this:

To add individual member accounts, or a range of accounts:
- To add individual accounts, click the Finder in the Account column to open the Account Finder, where you select the account you wish to add.
- To add a range of member accounts, click the Zoom button beside “Select Member Accounts…”.

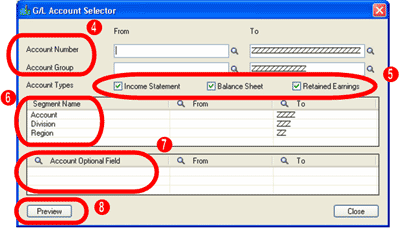
- The G/L Account Selector popup appears:

- Select the ranges of Account Numbers, Account Segments, or Account Groups that will be members of this rollup.
- Select Account Types.
Note: Accounts selected will include only those accounts whose account types match the Account Types selected here. For example, if the Income Statement option is not selected, then even if the Account Number range includes income statement accounts, those accounts will not be copied into the grid.
- Select criteria ranges based on your Account Segments (optional).
- Select criteria ranges for Account Optional Fields (optional).
- Click the Preview button to view your choices, then click Copy to return to the Rollup tab.
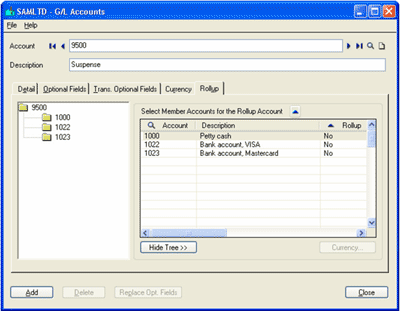
Accounts that meet all the criteria of the Select By fields and Account Type options are copied to the grid, and appear in the tree, as shown below:

Note: If the rollup account is single-currency, only single-currency accounts which meet the G/L Account Selector will be generated in the Preview window.
Accounts that already exist or were already added in the Rollup grid will not be shown again in the Preview window. - Upon previewing accounts in the G/L Account Selector Preview screen, if there are accounts which should not be added as members, you can double-click Yes in the Add column to toggle it to No, or use the space bar in the grid in the Rollup tab to toggle to No.
- Click Add, then click Close.
To delete member accounts from a rollup account:
- Highlight the account in the grid to delete an individual member.
- Press the Delete key on your keyboard. Do not click the Delete button, as that deletes the Account itself, with all its rollup members.
Additional information:
- To view details about the currency of a multicurrency member account, highlight the account, then click the Currency button.
- To hide the tree, click the Hide Tree button. To view it again, click the Show Tree button.
- Rollup is multi-level. You can double-click the account number in the tree to open the G/L Rollup Accounts form, where you can add accounts to this rollup account. (You can also do this by double-clicking on the member account in the grid, by clicking on the Rollup zoom form, or by pressing Shift+F9 to assign a member as a rollup account.)
- If an account being copied to the grid is already on the grid, it will not be copied again; an account cannot be a rollup member of itself.
After Using
Print a listing of the Chart of Accounts using the Print command on the File menu in this form or Chart of Accounts in the Reports folder.
Cautions – You should be aware of the following when setting up rollup groups:
- Parent/Child – A parent account cannot be a child of itself. That is, when you create a rollup group, you cannot add the top account as a member of that same group.
- New accounts – New accounts do not get added automatically to existing rollup groups.
- Prohibit Posting option – When you prohibit posting to a rollup account, you can still post to that account in other ledgers (A/R, A/P etc), but not in G/L.
- Security rights – Be aware that if a user is granted security rights to view a parent account, they also will be able to view the member accounts in the group.
- Member of multiple groups – An account can be a member of more than one rollup group.
- Double balances – Be careful how you set up the rollup groups so as to avoid double-balances in reports.


 Download our corporate brochure for more facts about us, our
clients and our solutions.
 Driving Revenue Growth 1
 Satisfying Customers 1