Sage
Accpac ERP |
|
Q – Can I search for Optional Field values when using
the finders within any of the modules?
A – Yes. In Sage Accpac ERP version 5.4 you can now add the Optional
field values so they will be displayed in the finders.
In order to add the Optional Fields to the finders you will use the same
method you use adding any field to a finder. Click Settings in the Finder
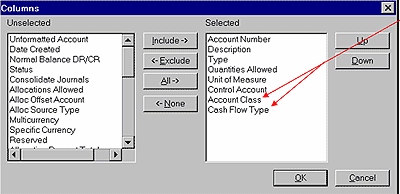
and then click Columns to open the Columns selection box (shown below).
You would then “Include” your defined optional fields in the
Selected list.
The following displays two optional fields (Cash Flow Type and Account
Class) in the Finder after the Columns selection box is closed:
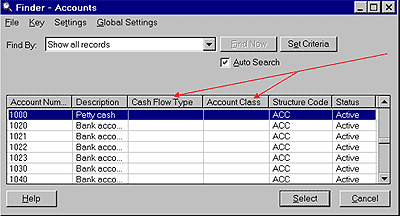
Values assigned to these optional fields are also displayed.
Q – Is it possible to enter a customer refund within the Accounts
Receivable module?
A – Yes. In Sage Accpac ERP version 5.4 the new Customer Refunds form
lets you refund customers for unapplied transactions such as credit notes,
prepayments, unapplied cash, and receipts.
In the example below a refund is entered for a credit note in the new
Refund Entry screen.
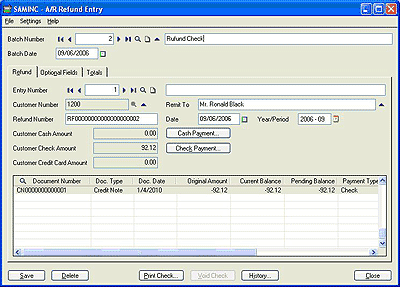
The Refund Batch List is very similar to the Account Payable Payment
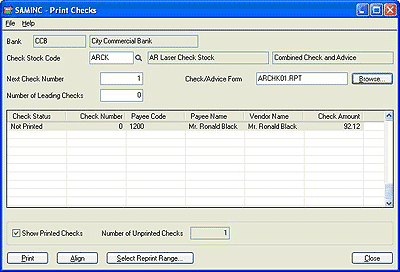
Batch List. Once the Batch Listing Report is reviewed and you are ready
to print the check, you click the Print/Post button and the Print Check
screen is brought up and you are ready to print the refund check.

|
Sage Accpac
CRM |
|
Q – Can I have more than one dashboard?
A – Yes. You can change around the content of your existing dashboard
at any time, or you can create new dashboards. For example, you could
have one suited to the type of information you want to see on a day-to-day
basis, and another one which shows you information you like to view on
a weekly basis.
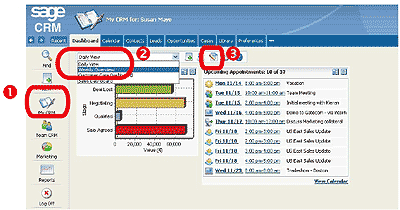
- Select My CRM | Dashboard | New Dashboard, and create a new Dashboard,
for example, Weekly Overview. Select the content and save. The new dashboard
is displayed on the Dashboard page.
- Use the drop-down at the top of the page to switch between different
dashboards.
- Use the Modify Dashboard button to change the content of an existing
dashboard.
Note: You can also customize the content of existing standard dashboards,
set up by your System Administrator. If the dashboard you are editing
is a standard dashboard, which you have modified, a Reset Standard Dashboard
button is displayed on the Edit Dashboard Details page. Selecting this
button restores the content of the standard dashboard.
Changes made to Standard Dashboards do not affect the standard dashboards
of other users. When you modify a standard dashboard, you are effectively
making your own personal version of the standard dashboard.
Q – How do I create a New Report Category?
A – There are a number of standard report categories in SageCRM, for
example, Sales, Marketing, and Customer Care. A user in CRM v5.8, who
has rights to create new reports (a System Administrator or Info Manager),
can create new report categories.
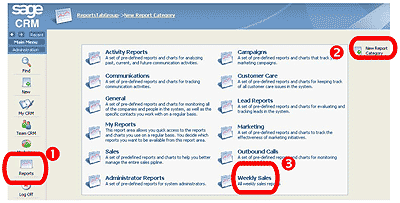
- Select the Reports menu button. The page of existing report categories
is displayed.
- Click on the New Report Category action button. The New Report Category
page is displayed. Type in a name and description, and select the Save
button.
- The new report category is displayed.
Q – How do I set up a Custom Dashboard?
A – To create your own Dashboard with all the content you need for your
day-to-day work:
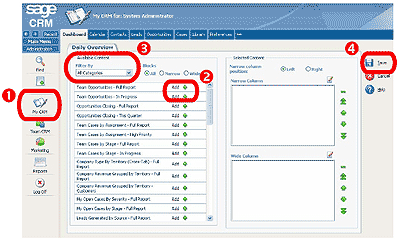
- Select My CRM | Dashboard. Type in a Name for the Dashboard, for
example, Daily Overview, and click on the Continue button.
- Select the content you want displayed on the dashboard by clicking
on the Add buttons next to the items you want.
- You can use the Filter By drop-down at the top of the screen to drill
down on content areas.
- Click on the Save button to save the dashboard. You are returned
to the Dashboard tab, where your custom dashboard is displayed.
|
Sage Pro
ERP |
|
Q – How can I edit Unposted Batches in General Ledger?
A – When trying to edit unposted batches in General Ledger (GL) it may
appear that the detail line items cannot be edited and only the header
section of the batch is editable.
- To edit unposted batches in GL follow these steps:
- Select Transactions from the menu bar and then Edit Unposted Batches.
- Select the Batch Number that needs to be edited.
- Go to the Line Item Detail tab.
- Choose the Select Line button on the left side of the screen and select
the line item that needs to be edited. Click Enter on the keyboard.
- If only the header section of the batch needs to be edited, select
the Batch Number and choose the Edit Batch button at the top of the
Edit Unposted batches screen. Select Save from the top right corner
of the screen.
Q – HOW TO: Print Bins on a Work Order Traveler?
A – Bins must be assigned to Bill of Material (BOM) component items for
them to print on the Work Order Traveler. The following steps demonstrate
the process to assign Bins to component items.
These steps may vary depending on the work flow used in a particular business
environment.
- For Bins to be enabled in Accpac Pro Series 7.3, the option must
be selected in the Inventory Control (IC) module. In IC, go to the File
menu and choose Change Setup Information. In the IC System Setup screen
select the Proceed button and save the next screen (Default GL Accounts).
In the Multi Location tab, select Use ‘Bins’ and save the changes.
Note: The company must be setup as a multi-location company (in IC Setup),
for stores and bins to be available.
- In Production Entry (PE), select the Maintain menu and choose Bill
of Materials.
- Select the BOM and component to Edit. Enter the default Bin location,
to be used for that component, in the Store/Bin field. Repeat this process
for all appropriate components and subassemblies.
- Save the changes.
- Note: Bins may also be assigned or edited during WO creation.
- In the WO module under the Transaction menu, select Change Work Orders.
Select the pick list button and when prompted to List work orders in
what order? Select WO. Choose the work order to be edited.
- In the Change Work Orders screen, select the Lines button. In the
Change Component Details
- for Work Orders screen, select the Edit button and highlight the
component that will have a
- Bin location added.
- Enter the Bin into the Bin field. Repeat steps 5 and 6 for any additional
components.
- Save the work order.
- The Work Order Traveler will now print the Bin for the component,
as part of the description.
|
| Back to Top^ |


 Download our corporate brochure for more facts about us, our
clients and our solutions.
 Driving Revenue Growth 1
 Satisfying Customers 1