Frequently Asked Questions

Sage
Accpac ERP

Q – Can you Search a blank field in the Finder in Sage Accpac ERP?

A – Yes – Below are the steps that illustrate the process for finding all the records in P/O Receipt finder with a blank "Reference" field:

  1. Click P/O Receipt finder.
  2. Click Set Criteria in the finder screen.
  3. Select "Reference" field and click Add.
  4. Double-click "Field Criteria" of the "Reference" Field. Set it to < "".
  5. Click OK.

As a result, it shows all PO Receipts with blank "Reference" field.

Q – How can I complete an Inventory Control Transfer where the previous transaction resulted in a partial transfer?

A – A partial Inventory Control transfer occurs when the requested quantity is more than the quantity available in inventory.  Here is an example:

  1. From the I/C Transaction folder, open the Transfers window.
  2. Click the New icon to create a new document.
  3. For Document Type select Transfer.
  4. In the detail grid, enter values in the Item Number, From Location, To Location, Requested Qty and Transfer Quantity fields.
    • To simulate a partial transfer, enter a transfer quantity that is less than the requested qty.  For example:
      • Enter 10 for Requested Quantity.
      • Enter 7 for Transfer Quantity.
      • This results to an outstanding quantity of 3.
  5. Click Post to post and generate the document number.
  6. Select "No" to the question "Do you want to delete this transfer after posting?"

At this point the user can no longer open the document and transfer the outstanding quantities.

To complete the transfer, a user must create a new document and use the incomplete transfer as the reference transfer number.

Perform the following steps to complete the transfer:

  1. Click on the New icon to create a new document.
  2. For Document Type select Transfer.
  3. For Transfer Number enter the transfer number of the incomplete document. Based on the example, the ‘Outstanding Qty’ should have 3 and ‘Transfer Quantity’ should also have 3.
  4. Click Post to complete the transfer of the outstanding quantities.

A – A partial Inventory Control transfer occurs when the requested quantity is more than the quantity available in inventory.  Here is an example:

  1. From the I/C Transaction folder, open the Transfers window.
  2. Click the New icon to create a new document.
  3. For Document Type select Transfer.
  4. In the detail grid, enter values in the Item Number, From Location, To Location, Requested Qty and Transfer Quantity fields.
    • To simulate a partial transfer, enter a transfer quantity that is less than the requested qty.  For example:
      • Enter 10 for Requested Quantity.
      • Enter 7 for Transfer Quantity.
      • This results to an outstanding quantity of 3.
  5. Click Post to post and generate the document number.
  6. Select "No" to the question "Do you want to delete this transfer after posting?"

At this point the user can no longer open the document and transfer the outstanding quantities.
To complete the transfer, a user must create a new document and use the incomplete transfer as the reference transfer number.
Perform the following steps to complete the transfer:

  1. Click on the New icon to create a new document.
  2. For Document Type select Transfer.
  3. For Transfer Number enter the transfer number of the incomplete document. Based on the example, the ‘Outstanding Qty’ should have 3 and ‘Transfer Quantity’ should also have 3.
  4. Click Post to complete the transfer of the outstanding quantities.
Sage Accpac
CRM

Q – Can I assign a territory when uploading company and person records to CRM?  If a territory is not assigned, the territory is set to the territory of the user performing the upload.

A – To successfully upload and assign a territory to a record, the territory ID’s are required.

If you are interested, please contact your AXIS Solution Provider or see your CRM administrator for further information.

Q – After updating our Customer AR Contact’s phone number in CRM, the area code is not updating in Sage Accpac ERP.  Is there a way to correct this?

A – This problem occurs when the phone number field is not formatted to have the area code in the Sage Accpac ERP. Follow the below steps to resolve the issue.

  1. Open Sage Accpac ERP.
  2. Go to Common Services à Company Profile
  3. Under Address Tab, enable the ‘Format Telephone Number’ check box

Now the area code changes will be reflected in Sage Accpac ERP when the customer record is edited and saved from CRM. 

Sage Pro ERP

Q – Why do the “Accounts Payable As Of Aging Report” balances not match those in the General Ledger?

A – The Accounts Payable (AP) As of Aging report is generated and printed by Transaction Posting Date. The balances on this report do not agree with the balances in the General Ledger (GL) for the same time period. Please refer to the list below for possible causes of this issue:

  • All current information has not been released and posted in GL from AP.
  • Journal Entries have been created in GL to that particular AP account that are not reflected in the aging report.
  • There are still active sessions for some AP transactions. Closing these sessions in System Manager will allow these transactions to be released to GL. These transactions may not have been previously released, due to sessions being open and active.
  • There are multiple AP accounts used in transactions. The aging report does not differentiate between these different accounts. The accounts must be summed in GL to reconcile the balances.
  • Transactions in other modules have used this particular AP account. As a result, these transactions will not appear in the aging report.
  • Data issues or illogical transaction dates entered in AP. An example of this would be entering a payment or void date prior to the invoice posting date. These would cause the aging report to see the invoice as open even when it is not.

Troubleshooting Tips

  • The Transaction Posting Date Aging Report primarily uses the APDIST.Trandte, APYDST.Trandte, APMAST.Trandte, and APYMST.Trandte fields for ordering the report data. In the case of data corruption, the problem will often reside in the APDIST and APYDST tables.
  • If the issue is data related, the primary concern is to find the transaction where the problem exists. Generate the aging report for the previous month and compare it to the GL balances for the same time period to help narrow down when the discrepancy occurred. This may also need to done for subsequent months. In many cases, the amount of the discrepancy will be a specific transaction and will be easily identifiable by that amount. If this is not the case, it will be necessary to conduct an audit of transactions during the affected time period using the Selected AP Journal report. That report uses the APDIST and APYDST tables and all of the batches that have been released to GL.

    Important
    When browsing the APDIST or APYDST tables or using the Selected AP Journal Report to establish an audit trail of transactions, it is important to remember that the invoice number (Invno field) will have the invoice number for transactions except in the case of a voided check. These records will appear with a VOID entered for the invoice number. However, these records will have the check number in the Reference field (Udref).

  • In older versions of the product, reusing an invoice number for the same vendor may cause issues. It is strongly recommended that each invoice use unique invoice numbers or incrementally add an additional character to any reused invoice numbers for a vendor. For example if invoice 100 has been voided, a new invoice may be created for the same vendor using an invoice number of 100A. This method has two major benefits:
    • Audit trails are much easier to view when unique invoice numbers are used.
    • The aging report may generate much more quickly when exact duplicates of invoice numbers are not used for the same vendor.

Q – How can I fix “Out-of-Sync” session numbers?

A – This situation may be seen in any of the following scenarios:

  • Cannot release to General Ledger and the following message appears:

    No unreleased entries found in distribution files.

  • All information does not appear in a report that is generated by session number. For example, all checks do not appear on the Check Register report in Accounts Payable (AP) when it is generated by session number.

In this process, the Company 99 APDIST table will be used as an example; however, this would apply to ICDIST and ARDIST as well. The tables and fields involved are:

  • APDIST.Apsess
  • SYSDATA.Sessno
  • SYUSESS.Usession

Important
Data edits should only be done by a Sage Certified Consultant or Business Partner. Create a full and verified backup before proceeding. This should first be attempted in a test installation and the results should be fully verified before implementing in a live system.
Follow the steps below:

  • Compare SYUSESS.Usession with SYSDATA.Sessno for Company 99 Accounts Payable (AP) module; these values should match.
  • Compare these values with the value recorded in APDIST.Apsess for Company 99. The values in SYUSESS.Usession and SYSDATA.Sessno should be equal to or higher than the value in APDIST.Apsess.

    Important
    The APDIST.Apsess will be lower than SYSDATA.Sessno when the last session number created did not result in a saved transaction. For example, a check invoice form was opened which created a session record in SYSDATA.Sessno. However, it was then immediately closed without saving and there was no distribution to APDIST. Therefore, APDIST.Apsess was not incremented.

  • If this is not the case, edit SYSDATA.Sessno to be the highest value of the three fields.
  • Open AP.
  • Begin to enter an invoice in AP but do do not complete this process and cancel.

This creates a voided session in SYUSESS.Usession and enters a corresponding record in SYSDATA.Sessno. These values will now be equal and higher than the value APDIST.Apsess

Back to Top^
Posted in June 2007, Newsletter | Tagged , , , , , , , , , , , , , , | Leave a comment

Tool of the Month

How to create databases in Microsoft SQL Server 2005 for Sage Accpac ERP

This article is meant to provide summary information concerning the proper creation of databases in SQL 2005 for use with Sage Accpac ERP. There have been significant changes made in this procedure since SQL 2000.  It is important to note that SQL 2005 is only compatible with Sage Accpac ERP v5.3B and v5.4.
Here are the steps involved in setting up the database:

  1. Connect to Server – There are a significant number of changes to the structure and configuration of SQL 2005, including how the connection to the server is initiated.
  2. Create Database Container – The database may be created once the connection to the server is successfully established.
    Important – A database container must be created for each database ID in Sage Accpac.  Each company in Sage Accpac must have two database containers in SQL: a system and company database.  Multiple companies can be connected to the same system database.  Therefore, in some cases, there will only be one system database container required for multiple companies.
  1. Create Login ID – Once the databases have been setup, SQL accounts are required to access them.
  2. Create ODBC Connection – An ODBC DSN is required if it necessary to connect to the database through an ODBC connection, as opposed to directly to the server name.
    Important – This step is optional.  Connecting to Sage Accpac data on SQL 2005 Server through a manually created ODBC connection may circumvent required defaults.  These defaults are automatically set up by Database Setup in Sage Accpac when directly connecting to the server.
    Important – The DSN must be setup in the System DSN tab so that all users can access this connection.
  1. Configure Sage Accpac ERP – The final step is to define and configure database IDs within Database Setup in Sage Accpac.  Each database ID will connect to its associated database container in SQL.
  2. Create Database ID – Since company IDs are associated with system IDs, the system database ID must be created first.

The database setup is now completed.  For detail instructions or assistance with this procedure, please contact your AXIS consultant or email us at info@axisintegratedsoltions.com.

Posted in June 2007, Newsletter | Tagged , , , , , | Leave a comment

Axis Attends and Contributes at Annual Sage Conference – What Does This Do For You?

Each year, Sage Software holds their annual conference and invites their world-wide Value Added Reseller (VAR) Channel in order to communicate their corporate messaging, new product releases and enhancements, third-party solutions and offers numerous sales, marketing and other educational courses to teach their partners how to grow their business.  Over 3,000 partners were in attendance.

AXIS principals participated as panelists in numerous sessions including participation in a 10 member Partner Advisory Board for the Accountants Network in the US.

Participating in these panels was a great opportunity to mind share with our peers and was instrumental in the creation of a new set of services designed to empower our clients beyond the borders of their finance department.  We are currently formalizing various alliances with professional service firms focused on making your company and your offerings more visible to a marketplace that needs them and wants to buy or use them.

On behalf of the AXIS team, we appreciate your confidence in us by allowing us into your organizations to deliver our solutions and business advice.  Our passion is to continue to build trust by finding ways to make your organization more successful.

Posted in May 2007, Newsletter | Tagged | Leave a comment

Have Access to Sage Product Demos Any Time Any Place

We understand that your time is valuable and limited.  In this connection, we are making available Webcasts on our home page at that will let you learn about Sage products when a product brochure is just not enough.  These Webcasts include demos for Sage Accpac ERP, Sage Pro ERP, SageCRM, Sage FAS, Warehouse Management and many other solutions.  You have the option of both live and pre-recorded sessions.  Learn about these solutions at your leisure without the sales pressure.  For more information, please visit us at AXIS Webcast.  If you require any additional information, please contact us at info@axisglobalpartners.com.

Posted in May 2007, Newsletter | Tagged , , , , , , , , , , , , , , , , | Leave a comment

Why Should I Take Backup Seriously? Think Again

Up to Five Major Atlantic Hurricanes Forecast for 2007

WASHINGTON, DC, May 23, 2007 (ENS) – Sea surface temperatures in the Pacific Ocean are cooling while Atlantic temperatures are warming – a climate recipe for an Atlantic hurricane season more active than normal, according to government scientists.

Just before the official hurricane season starts June 1, hurricane experts at the Climate Prediction Center operated by the National Oceanic and Atmospheric Administration, NOAA, said Tuesday there is a 75 percent chance that the Atlantic hurricane season will be above normal this year.

"For the 2007 Atlantic hurricane season, NOAA scientists predict 13 to 17 named storms, with seven to 10 becoming hurricanes, of which three to five could become major hurricanes of Category 3 strength or higher," said NOAA Administrator Conrad Lautenbacher.

Did You Know That Natural Disaster Causes Only 3% of Data Loss?

Natural Disasters is the least likely cause of data loss however they can kill an entire company. The eruption of natural disasters and the complete equipment failure are rare but they do occur. Although it accounts for around 3% of all data loss but the magnitude of data loss is highest.

What if I lose my information after flood, fire or power outage strikes, or my hard drive crashes, or if somebody steals my computer? The sole answer is "Data Backup".

Data Backup- Do I Really Need It?

Copious uncertainties revolve around in your mind when it comes to housing a data protection solution i.e. Data Backup. You might have bunched up a series of questions relating to Data Loss.

What if I lose my information after flood, fire or power outage strikes, or my hard drive crashes, or if somebody steals my computer? The sole answer is "Data Backup".

If you have a copy of your data saved in another location than where you have saved your information, you are on a safer side. Because you know that even if you lose one due to any reason, you still have another intact. You simply need to restore data and there you are- "Up and Running"

Now, that you understand the fundamental worth of data backup, let’s move on to the facts which give rise to the need to back up data. Lets learn the situations that may directly lead to data loss and hence the need to backup data.

Hard drives that store your information may fail due to any reason. The most common reason known to cause data loss to the highest degree is Hardware Failure. You save almost everything on computer’s hard drive but they are very much prone to failure. It might happen gradually or maybe without an alert but they will. It generally happens due to poor handling of hard drive or computer, electrical failure, sudden catastrophic failure, Head Crash or maybe controller failure.

Natural Disasters may easily sway away the data you have been saving for keeps. Flood, fires, or power outages may strike anywhere and occur in different shapes and sizes. Moreover, they can prove to be highly disastrous. They may kill an entire company. This is why an offsite backup is required so that you can still retrieve your information, which has been kept in the safe location.

Computer thefts including lap tops can be devastating to an organization and ultimately lead to data loss. Insurance companies can cover your computer but not the data that the hard drive preserves. Generally, the thief would steal it for the hardware and not the data. The computer and its components may be precious for him but for you- Data.  If you have been keeping sensitive information in your computer’s hard drive, then make sure that you have a copy of it saved somewhere. Regular backups and their regular maintenance can prove to be helpful for you to deal with disasters.

Well, this is for those who feel that these cannot happen to them- Think Again. The good news is that we can offer you an affordable solution to deal wit these types of circumstances.  CoreVault has the ability to back up your critical data in two geographically separate locations and still give you 24/7 access to it.

To view a self-running demo on how the CoreVault solutions work, please visit us at AXIS-Corevault or contact us at info@axisglobalpartners.com.

Posted in May 2007, Newsletter | Tagged | Leave a comment

Self-Promotion Through Your Chamber of Commerce

Ned Barnett, APR
Barnett Marketing Communications

Your local Chamber of Commerce offers a gold mine of effective self-promotion opportunities. Fewer than 10 percent of members actively use their Chamber’s available self-promotion opportunities; however, those who do find their business-development potential soars.  Here is one way of using your Chamber.

1. Join

If you’re not a member, invest in your future and join – you’ll quickly be listed in the membership directory, a remarkably useful placement. By doing nothing more than joining, you will already be improving your local self-promotions.

2. Analyze their publications

Chambers have member publications, including online and printed editions, that offer you avenues to successful self-promotion.  Carefully analyze each publication.  Do they feature spotlights on specific members?  Do they include columns from member experts?  Do they quote members in articles about business trends? 

Once you’ve identified the types of material they publish (don’t forget letters), determine which ones will help your self-promotion efforts.  Then come up with a reason why they should include you.

3. Determine how you fit in

If you’re thinking about a column on your specialty (be it small business accounting or Feng Shui office design), draft a sample column you’d like Chamber members to read – and remember. This column should be helpful, informative, step-by-step and simple to apply – and the right length (based on what they usually publish).  It should position you as an expert, someone others turn to for advice, ideas – or paid support.

If you’re thinking about being interviewed for a news story, consider how you fit with the topic and why Chamber members should care.

4. Make your move

Armed with your analysis of how you “fit” into the Chamber publications – including a column sample if that’s your choice – it’s time to make your pitch.  Think of this as a sales effort – use up-front, honest sales techniques.

One effective approach is a face-to-face meeting with the Chamber’s editorial director (ED).  Since business hours tend to be hectic – and considering that Chamber staffers may not be paid exceptionally well – take the ED to lunch at a nice restaurant or club. Instead of a hardball pitch, steer the discussion toward editorial needs, then offer ideas organically within the conversation.  Your study of the publications will enable you offer useful feedback that all EDs welcome.  Especially in member organizations, real feedback is very difficult to obtain. 

The ED will understand your purpose, but will appreciate the respect you show with a low-key presentation.  Whatever you do, avoid implying that the ED could be “bought” by a nice lunch.  Show respect for the ED – you’ll get respect in return.

5. Closing the deal

Once you’ve made your pitch, follow up.  The same approaches used in courting potential clients work here, too.  Each time a publication comes out, send the ED a note offering appropriate praise and constructive feedback.  When you come across an idea for an article, send that along in an e-mail – and occasionally, suggest articles that wouldn’t involve you.   If you’re going for a column, pitch ideas for free-standing columns whenever business or world news offers the opportunity to springboard into commentary.   Persistence works – with each success, you move closer to your goal of turning the Chamber into an extension of your self-promotion efforts.

6. Building on success

Once you gain a placement, put links (or, with permission, “reprint” copies) on your website.  Obtain reprints and use them in direct mail to clients and targets.  Then start working on that next opportunity.  Self-promotion is a journey, not a destination, but a well-planned trip is worth the effort.

Posted in May 2007, Newsletter | Tagged | Leave a comment

The next-generation of Workflow – Business Process Management (BPM)

What is BPM and how will it benefit my organization?

BPM is both a business and software tool. As a business tool, it calls for organizations to document, analyze and measure their business activities not in terms of discrete functions such as marketing, sales, manufacturing and customer service but in terms of end-to-end business processes that cross functional boundaries. In that sense, BPM runs counter to both traditional organizational structure and enterprise application software, both of which focus on integration within each functional unit.

As a software tool, BPM takes the form of an integrated suite of components that first model the end-to-end process from a business perspective and then create an automated implementation of the flow described by the model. Once the automated process is deployed, BPM components monitor business performance based on actual process data. Instead of treating business modeling, IT implementation and performance management as independent endeavors, BPM unites them with an integrated set of tools and an overarching management philosophy of continual incremental improvement.

Types of Workflow

Workflow and BPM are constantly confused; they are not the same. Part of this is because the term workflow itself has many meanings. Four distinct workflow permutations resonate throughout software:

1. Internal hardwired workflow within applications, including ERP, CRM, and Content Management. Workflow is part of the code and is not an abstracted layer made available to other systems.

2. Traditional workflow packages that automate form-centric activities are frequently used for claims processing in the medical and insurance industries. These applications were not strong transactionally and thus, provided the human, but not the end-to-end, workflow.

3. Integration workflow technologies that were a manifest of the need to provide flow logic when moving information to and from applications. These systems were strong transitionally but did not support human intervention well and thus did not provide a complete workflow solution.

4. BPM workflow, which cuts across all prior workflow technologies to provide enterprise wide workflow throughout the entire process-lifecycle. BPM workflow supersedes all prior workflow technologies with new levels of ease-of-use, configurability, and interoperability, and does so with new levels of efficiency and speed. BPM workflow can augment or replace in-application embedded workflow contained in ERP, CRM, Document, or Content Management systems. Doing so, brings ease of re-configurability, improvement, and direct deployment without IT involvement to these systems at the specific business function and the application as a whole. Automating in-application processes with BPM workflow also lays the foundation to facilitate cross-application business process integration. Collectively, the agility gain at each specific business functional area underpins the overall enterprise agility and competitiveness through the overall ecosystem. Web service standards that enable standards-based system connectivity are a key factor in enabling BPM workflow.

Who can benefit?

A. Applicable Industry Sectors

  • Financial Services
  • Manufacturing
  • Utilities
  • Telecommunications
  • Government
  • Insurance
  • Legal
  • Healthcare
  • General Business Process Management

B. Applicable Application Categories

  • Loan Servicing
  • Mortgage Processing
  • Content Management
  • Document Management
  • Order Management
  • Tax Management
  • Contract Management
  • Claim Management
  • Case Management
  • Regulatory Compliance Management
  • Lead Tracking Management
  • Asset and Facility Management
  • Accounts Receivable & Payable
  • Invoice Processing Management
  • Service Process Management
  • Help Desk & Customer Service
  • Procurement Review and Approval
  • Customer Relationship Management

Enhanced Workflow:

NowFORMS workflow helps your Accpac customer’s to automate repetitive business processes. Leveraging Microsoft’s Visio, users simply design workflows (the routing and movement of work/documents) using the drag and draw icons just like any other Visio drawing.

Leveraging custom Visio “stencils”, workflow allows users to define, model, simulate, and deploy workflow templates directly from the same Visio interface.

Documents flow through defined workflow steps, and are “pushed” to a workflow user’s inbox (In-boxes can be assigned to an individual, group or based on role). Users can determine within each step the required action and exposed document properties.

The software also provides built-in activities (which allow uses to delegate tasks such as approve, reject, route, notify, etc.) and also tracks the progress of their workflow with time-based reminders, escalation and management notification via e-mail.

The system can trigger a workflow based on actions (such a document submission) within the document library or route content between individual users and groups. Further, InfoPath (Microsoft’s e-form package- included in Office 2003 Professional) integration allows users to associate a process map with a specific InfoPath form. Users can even expose views within the form at different steps within the workflow allowing the user to only view and interact with specific data.

Features

  • Authors can cut, copy, paste, modify, store, & version workflow maps.
  • Supports “live-updates” which require no file import/export for process workflow template changes.
  • Track the progress of workflow with time-based reminders and management notification via e-mail.
  • Rich set of class and web services APIs for creating re-usable “work parts”, custom user interfaces, and custom integrations.
  • Provides extensions for Visual Studio .NET that allow developers to quickly extend its out-of-the-box capabilities.

Enhanced ViewDocs functionality

Need to quickly search for a vendor invoice that you just scanned? Go to Sage Accpac, bring up the invoice record and click the ViewDocs button; your invoice number and vendor code are automatically copied from your record into the correct fields in NowFORMS. Best of all you now have a direct link between Sage Accpac and the documents stored in NowFORMS.

  • Single click search from any screen in Sage Accpac ERP.
  • Relate documents in NowFORMS with data in Sage Accpac ERP.

For more information, please contact us at info@axisglobalpartners.com.

Posted in May 2007, Newsletter | Tagged , , , , , , , , , , , , , , , , | Leave a comment

What’s New in Sage Pro 7.4 Accounts Payable

In the latest release of Sage Pro ERP 7.4, there are 12 new features in Accounts Payable that provide flexibility, better reporting, and much more to this core accounting module. This article will focus on six of the new features, which range from the ability to submit EFT payments to allowing multiple invoices for a Purchase Order receipt.

The first new feature is the Electronic Funds Transfer (EFT), which is one of the most exciting of the new features in Accounts Payable. The first step is to set up any vendors that are EFT vendors with a payment priority of “T”. This indicates that payment will be made by EFT only. Select Maintain > Vendors and enter the vendor number.

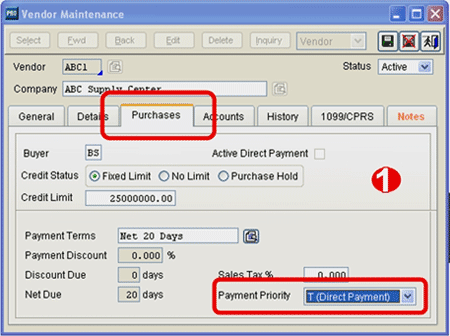
1. Click on the Purchases Tab and then on the Payment Priority selection pull down. Search until the T (Direct Payment) option appears and hit enter. Then save the changes by clicking on the green save button.

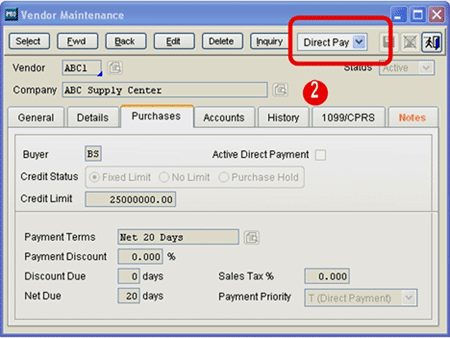
2. Click on the  at the top of the screen next to the Inquiry button and select Direct Pay. The next screen that appears is the Vendor Direct Payment Maintenance screen.

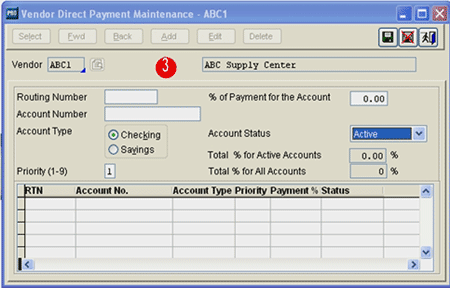
3. Enter all the pertinent information on the screen for routing number, account number, account type, and priority percent of payment for account. If this bank account is to be active, then select active for account status. The other choices are inactive and pending.

To enter a direct payment, select Transaction > Enter Direct Payments. The rest of the input screens are very similar to the Approve for Payment screens. After selecting the criteria, a screen appears that prompts if you are ready to generate EDT payments. Click on Yes and an EFT file is generated. Sage Pro ERP 7.4 gives you the batch number and then if you click on Proceed the payment is updated.

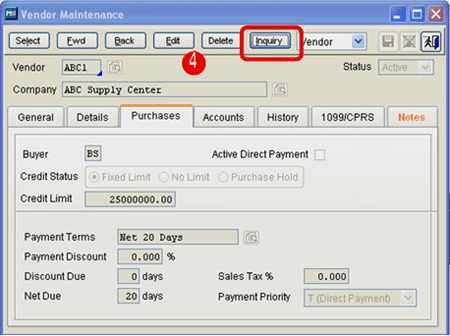
The second new feature is the ability to see credit card transactions for a vendor through the Inquiry button in Vendor Maintenance. Select  Maintain > Vendors and enter the vendor number.

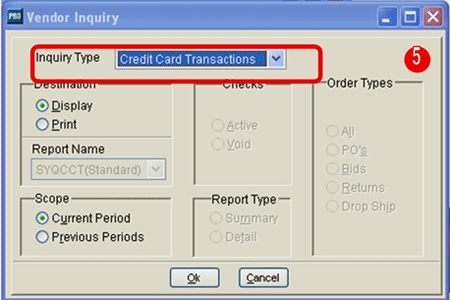
4. Click on the inquiry button.

5. Select the Credit Card Transactions option. A list of all the credit card transactions for that vendor will appear.

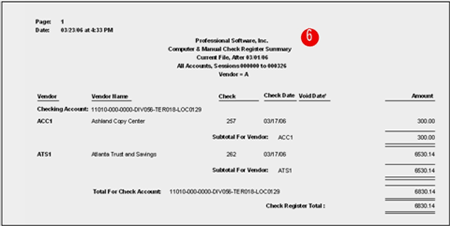
The third new feature is a summary option for the check register and the invoice register. To print a summary check register, select Print > Check Reports > Check Register > Summary and enter the criteria for the report.

6. The summary check report does not include invoice detail. The ability to run this report in a summary manner makes it more useful as a check register.

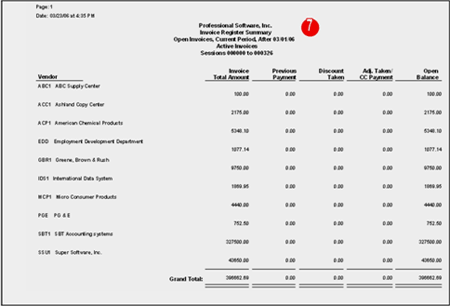
To print a summary invoice register, select Print > Payable Reports > Invoice Register > Summary and enter the criteria for the report.

7. The summary invoice register shows all vendor invoices that meet the criteria on the option grid.

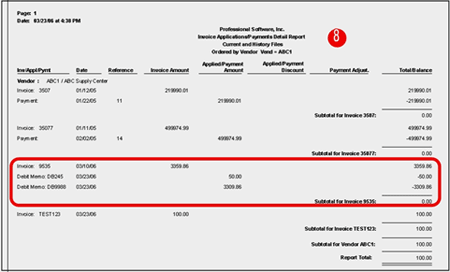
The fourth new feature in Accounts Payable is an audit trail report that shows the invoices that have debit memos applied. Select Print > Payables Reports > Invoice Applications/Payments and choose either Detail or Summary

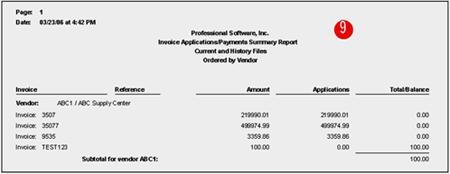
8. The detail report shows each invoice for the vendor that meets the criteria on the option grid. Both debit memos and checks that are applied to an invoice appear on this report.

9. The summary report does not give detailed payment information but does provide a “quick look” at what has been applied to an invoice.

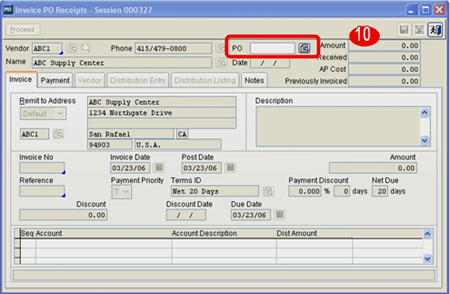
The fifth new feature gives users the ability to have multiple invoices for a single Purchase Order receipt. Enter the vendor number for the invoice.

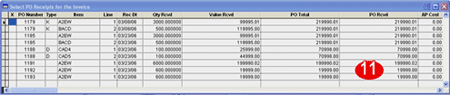
10. Click on the PO pull down button and a listing of all the unbilled purchase order receipts will appear.

11. Using the down arrow, find the purchase orders that apply to this invoice and hit the space bar for selection. Hit the enter key when all the purchase order receipts have been selected.

You will be back at the Invoice Entry screen. The amount of the invoice is total amount of the selections that were made in the previous screen. If the amount of those selections is not the same as the invoice amount, make sure to change the invoice amount to reflect what is on the vendor’s invoice. Enter the other information as required and click on proceed.

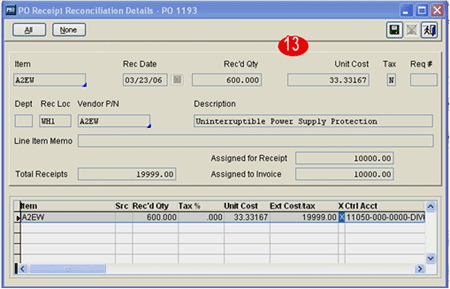
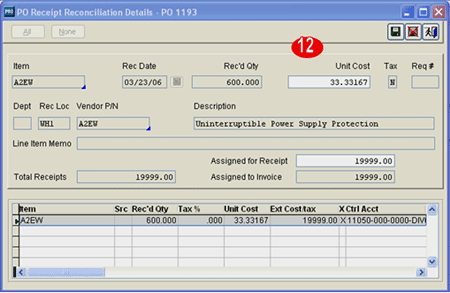
12. If a receipt has multiple line items, you will see multiple lines on this screen. Select the items that are assigned to this invoice by hitting the space bar. Hit the enter key to change the Unit Cost and the Assigned to Receipt.

13. In the example above, only a portion of the entire amount of the line item is being applied to the invoice. This leaves the remaining amount open for another invoice.

Click on save and complete the processing of the invoice.

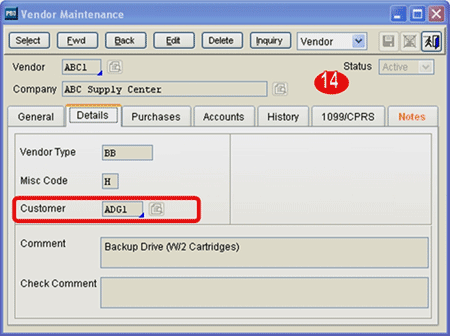
We have saved the best for last! The sixth new feature is the customer/vendor link, which means that a customer can be associated to a vendor. This function simplifies the process of payment and cash receipts when a vendor is also a customer. The first step is to set up the customer link in the vendor file. Select  Maintain > Vendors and enter the vendor number.

14. Click on the Details tab and enter the customer number that corresponds to this vendor and save the changes.

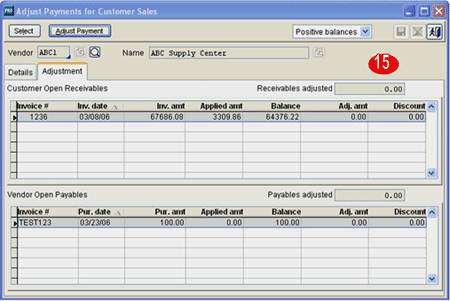
To adjust the payments, select Transaction > Adjust Payment for Customer Sales. Enter the vendor number.

15. A list of open customer receivables and vendor payables will appear.

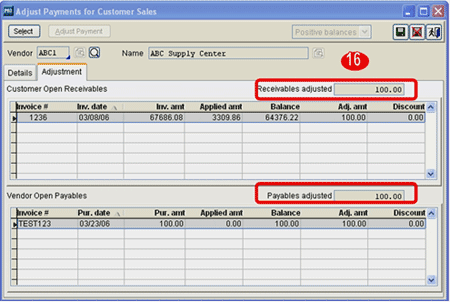
16. Click on the Adjust Payment button and enter the amounts of the adjustment for both receivables and payables and save.

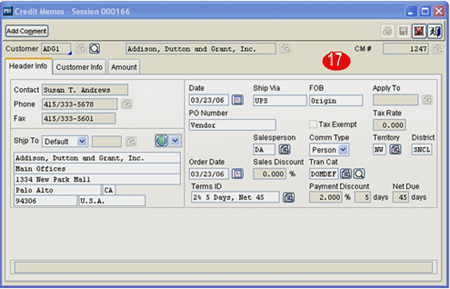
17. The manual credit memo entry screen appears. Review the information, and if correct, click on the save button.

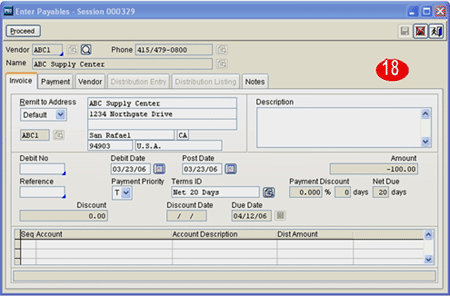
18. The enter payables screen appears. Enter the debit note number and review the remaining information. Click on proceed and then save.

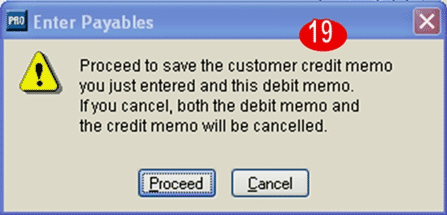
19. You will be prompted to proceed or cancel. If you want to save the credit memo and debit memo, click on Proceed.

As these articles have shown, the new features continue to bring flexibility, powerful reporting options, and clarity of entry to the Accounts Payable module.

If you have any questions or need additional assistance, please contact your AXIS consultant or email us at info@axisglobalpartners.com for more information

Posted in May 2007, Newsletter | Tagged , , , | Leave a comment

Frequently Asked Questions

Sage
Accpac ERP

Q – After upgrading to Sage Accpac ERP v5.4, we have noticed all Bank Deposits coming from Accounts Receivable do not have a Deposit Description.  In the previous versions of Accpac, the Deposit Description was the Accounts Receivable Receipt Batch Description.  Is there a way to enter a Deposit Description?

A – Starting in Sage Accpac ERP 5.4, it is now possible to have multiple Accounts Receivable Receipt Batches belong to a single Deposit.  As a result, the Accounts Receivable Batch Receipt Description is no longer used as the Deposit Description. 
In order to input a Deposit Description, a deposit must be created before creating a Receipt Batch.

  1. In the AR Receipt Entry window, create a new batch.
  2. Before entering information into the Entry section, click the Zoom button next to the New batch button.
  3. Create a new deposit by clicking the New button next to Deposit Number.
  4. Enter in the description in the field next to the Deposit Number.
  5. Close the window and continue entering information for the Receipt Batch.

When posted, this AR Receipt Batch will now have the Description which was entered in Step 4.

Sage Accpac
CRM

Q – When I open a Case in CRM and then go to Tracking tab to find out the Duration time for that case, it always shows 0 minutes.  What do I need to do to correct this?

A – This happens if you don’t have any Business Calendars created and set as default.

  1. Go to Administration > System > Timing > Business Calendar.
  2. Click New to create a Business Calendar and make sure to select the Set As Default check box.
    Click Save.

If you already have Business Calendar setup, select the business calendar and make sure to select the “Set As Default” check box and click Save. 

Q – How do you create a label template to Mail Merge into Microsoft Word 2002 or 2003?

A – Here is the procedure:
The following steps are only applicable to Word 2003 and Word 2002.

  1. Log on to CRM v5.8 and open a person or company record.
  2. On the left menu, right-click New and click Document.
  3. In the Template panel, select the "Create New Local Template" option.
  4. Click Continue.
  5. In the resulting Word window, click Tools, point to Letters and Mailings and click Mail Merge. This will open the Mail Merge wizard on the right side of the window.
    Note: If the Mail Merge wizard is already at Step 3 of 6, click Previous until the wizard is on Step 1 of 6.
  6. Under Select document type, select "Labels".
  7. Click Next: Starting Document to move to the next step.
  8. In Change document layout section, click Label options.
  9. In the Label Options window, select the label product and product number that will be used to print the label on. Click OK.
  10. Open the mail merge toolbar in Word by clicking View, pointing to Toolbars and clicking Mail Merge.
  11. In the mail merge toolbar, click the Insert Merge Fields button located to the left of Insert Word Field button.
  12. In the Insert merged field window, select and insert the desired fields to document.
  13. Once all the desired merge fields have been inserted, click Next twice at the bottom of the Mail Merge wizard to go to Step 4 of 6.
  14. Click Update all labels button to update all the labels accordingly.
  15. When finished, click File then Save As to save the template.
Sage Pro ERP

Q – How so I return a completed Drop Ship Order?

A- A drop shipment order has been entered in the Order Entry (OE) module. The order is received completely in the Purchase Order (PO) module and an invoice is created. At a later date, the Drop Ship order is returned and now reversing entries need to be made to process this return.

In this case, voiding the Accounts Receivable (AR) invoice will not correctly reverse this transaction. It will instead incorrectly bring the Drop Ship item into the DROP location. This is due to the fact that the Location field in the invoice header is defaulting to the DROP location rather than an actual receiving location.

This issue is documented under PTR 79619. A solution is provided below, f ollow the steps to reverse a fully received and invoiced drop ship order:

OE Module

Important
This process should be fully evaluated in a test company before implementing in a live system. The steps below assume that the order has been fully shipped and there are no open quantities left to be fulfilled.

  1. Under the Transaction menu, point to Enter Orders and click Returns.
  2. Select the customer who is returning the drop shipment from the Customer  picklist.
  3. Confirm the header information and ensure that the Def Loct field is set to the correct receiving warehouse location.
  4. Type the sales order number that this return applies to in the  Apply To field.
  5. In the Line Item Detail tab, click Apply Line.
  6. From the pick list, select the drop ship item that is being returned.
  7. Type the quantity being received into inventory.
  8. Verify that the Loct field is set to the same location as the Def Loct field in the header.
  9. Save the line item and order.

Important
The location entered for the line item must be the same location the item will be issued from in order to correctly change the on-hand quantity to zero.

  1. Under the Transaction menu, click Enter Shipments. This will add the item to the default receiving warehouse.
  2. When prompted to edit the cost, click No.
  3. Type the correct return sales order number in the shipment screen.
  4. Click Ship.
  5. Confirm the shipment date and choose to ship the order complete.
  6. Click Save to process the shipment.
  7. When prompted for the destination of the shipment log, click None.
  8. Exit the shipment screen.
  9. Click Batch, Individual or Cancel when prompted to print the credit memo.

The return sales order now has a credit memo for this vendor.

PO Module

  1. Under the Transaction menu, point to Enter Orders and click Returns.
  2. Select the vendor that originally supplied this drop ship item.
  3. Verify that the Receiving Loct field is the same as the return sales order.
  4. Click the Line Item Detail tab.
  5. Click Proceed when prompted that no apply to purchase order number was entered.
  6. Select the correct drop ship item from the Item picklist.
  7. Type the quantity of items being returned into the Order Qty field.
  8. Save the line and order.
  9. Receive the purchase order completely.

AR Module

  1. Under the Transaction menu, click Apply Credits/Deposits.
  2. Select the customer that returned the order.
  3. Type all appropriate information and save.
  4. Select the credit memo created for this drop ship return from the Credit Details picklist.
  5. Click Apply.
  6. Click Automatic. This will apply the Credit Memo to the original invoice that was created for the drop ship sales order.

This process has now returned the drop ship order completely and reversed any effect on General Ledger.

Q – Is Sage Pro ERP compatible with Microsoft SQL Server 2005?

A – Versions up to and including Sage Pro 7.3B are not certified to operate with SQL 2005 due to various issues that will occur. Sage Pro 7.4 supports and is certified with the following versions:

  • SQL 2005
  • SQL Express 2005 – This is a free version of SQL and is ideal for small companies whose total company database size does not exceed 4GB and do not need all the tools provided with standard editions of SQL.

Q – How do I reset or change a User Password?

A – A single user may change their password from the File menu by clicking Change Password in System Manager (SM).

Important
This procedure applies to both Microsoft SQL Server and Microsoft Visual FoxPro installations. If using the Microsoft SQL Server version of Sage Pro, the Microsoft SQL Server Administrator login and password will be required before allowing the password change To change passwords for all other logins, please follow the steps below.

  1. From the File menu, click Change User Information or in System Manager, under the Maintain menu, click Users.
  2. Select the user and click Edit.
  3. Change password and save.

Important
This process is available only to an Administrator or if an Operator has the SMUSER01 privilege assigned. The SMUSER01 privilege allows access to other functionality in the User File Maintenance screen as well.

For more information on how to add privileges to a particular user account, please refer to the System Manager manual for Sage Pro 

Back to Top^
Posted in May 2007, Newsletter | Tagged , , , , , , , , , , , , , , , , | Leave a comment

Axis Global Partners named to VAR 100 by Accounting Technology

Accounting Technology released its annual 2007 VAR 100 list and AXIS is proud to be included on this prestigious list. This recognition is earned based on revenues generated for software sales and consulting services for the year ended December 31, 2006. We are very proud of our consultants and staff whose passion is to empower our clients to manage more efficiently and profitably by leveraging the technology and business processes we recommend. This recognition helps fuel their dedication to YOU, our valued clients. We look forward to continue to earn your trust and thank you for the opportunity to be of service.

Posted in April 2007, Newsletter | Tagged , , , , , | Leave a comment