Frequently Asked Questions

Sage
Accpac ERP

Q – After upgrading to Sage Accpac ERP v5.4, we have noticed all Bank Deposits coming from Accounts Receivable do not have a Deposit Description.  In the previous versions of Accpac, the Deposit Description was the Accounts Receivable Receipt Batch Description.  Is there a way to enter a Deposit Description?

A – Starting in Sage Accpac ERP 5.4, it is now possible to have multiple Accounts Receivable Receipt Batches belong to a single Deposit.  As a result, the Accounts Receivable Batch Receipt Description is no longer used as the Deposit Description. 
In order to input a Deposit Description, a deposit must be created before creating a Receipt Batch.

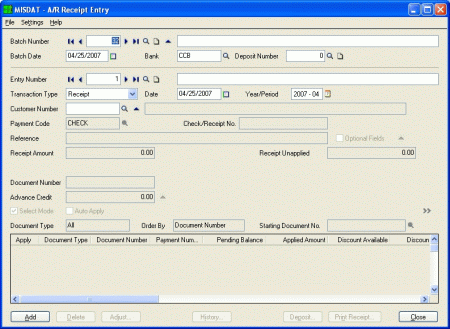
  1. In the AR Receipt Entry window, create a new batch.
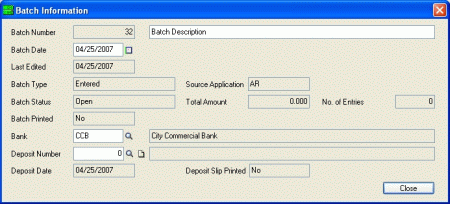
  2. Before entering information into the Entry section, click the Zoom button next to the New batch button.
  3. Create a new deposit by clicking the New button next to Deposit Number.
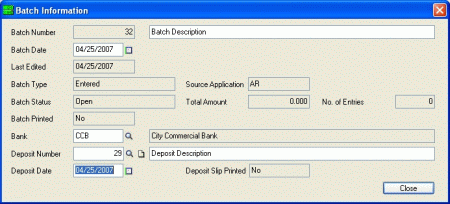
  4. Enter in the description in the field next to the Deposit Number.
  5. Close the window and continue entering information for the Receipt Batch.

When posted, this AR Receipt Batch will now have the Description which was entered in Step 4.

Sage Accpac
CRM

Q – When I open a Case in CRM and then go to Tracking tab to find out the Duration time for that case, it always shows 0 minutes.  What do I need to do to correct this?

A – This happens if you don’t have any Business Calendars created and set as default.

  1. Go to Administration > System > Timing > Business Calendar.
  2. Click New to create a Business Calendar and make sure to select the Set As Default check box.
    Click Save.

If you already have Business Calendar setup, select the business calendar and make sure to select the “Set As Default” check box and click Save. 

Q – How do you create a label template to Mail Merge into Microsoft Word 2002 or 2003?

A – Here is the procedure:
The following steps are only applicable to Word 2003 and Word 2002.

  1. Log on to CRM v5.8 and open a person or company record.
  2. On the left menu, right-click New and click Document.
  3. In the Template panel, select the "Create New Local Template" option.
  4. Click Continue.
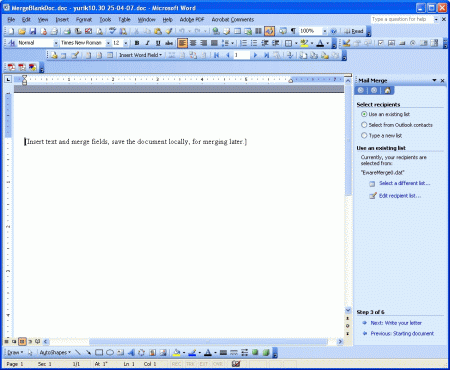
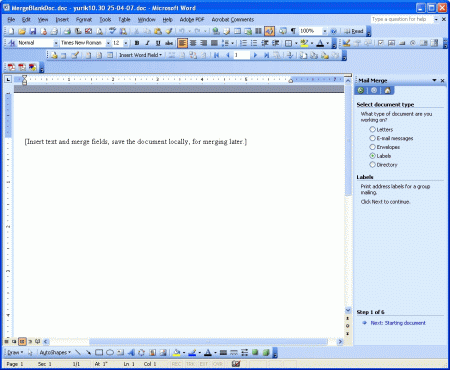
  5. In the resulting Word window, click Tools, point to Letters and Mailings and click Mail Merge. This will open the Mail Merge wizard on the right side of the window.
    Note: If the Mail Merge wizard is already at Step 3 of 6, click Previous until the wizard is on Step 1 of 6.
  6. Under Select document type, select "Labels".
  7. Click Next: Starting Document to move to the next step.
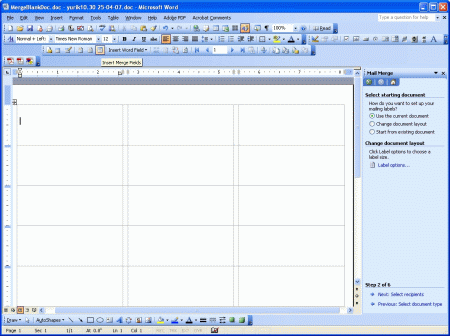
  8. In Change document layout section, click Label options.
  9. In the Label Options window, select the label product and product number that will be used to print the label on. Click OK.
  10. Open the mail merge toolbar in Word by clicking View, pointing to Toolbars and clicking Mail Merge.
  11. In the mail merge toolbar, click the Insert Merge Fields button located to the left of Insert Word Field button.
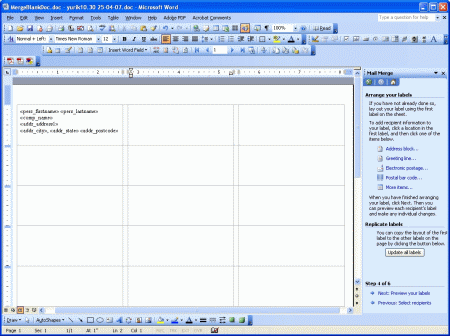
  12. In the Insert merged field window, select and insert the desired fields to document.
  13. Once all the desired merge fields have been inserted, click Next twice at the bottom of the Mail Merge wizard to go to Step 4 of 6.
  14. Click Update all labels button to update all the labels accordingly.
  15. When finished, click File then Save As to save the template.
Sage Pro ERP

Q – How so I return a completed Drop Ship Order?

A- A drop shipment order has been entered in the Order Entry (OE) module. The order is received completely in the Purchase Order (PO) module and an invoice is created. At a later date, the Drop Ship order is returned and now reversing entries need to be made to process this return.

In this case, voiding the Accounts Receivable (AR) invoice will not correctly reverse this transaction. It will instead incorrectly bring the Drop Ship item into the DROP location. This is due to the fact that the Location field in the invoice header is defaulting to the DROP location rather than an actual receiving location.

This issue is documented under PTR 79619. A solution is provided below, f ollow the steps to reverse a fully received and invoiced drop ship order:

OE Module

Important
This process should be fully evaluated in a test company before implementing in a live system. The steps below assume that the order has been fully shipped and there are no open quantities left to be fulfilled.

  1. Under the Transaction menu, point to Enter Orders and click Returns.
  2. Select the customer who is returning the drop shipment from the Customer  picklist.
  3. Confirm the header information and ensure that the Def Loct field is set to the correct receiving warehouse location.
  4. Type the sales order number that this return applies to in the  Apply To field.
  5. In the Line Item Detail tab, click Apply Line.
  6. From the pick list, select the drop ship item that is being returned.
  7. Type the quantity being received into inventory.
  8. Verify that the Loct field is set to the same location as the Def Loct field in the header.
  9. Save the line item and order.

Important
The location entered for the line item must be the same location the item will be issued from in order to correctly change the on-hand quantity to zero.

  1. Under the Transaction menu, click Enter Shipments. This will add the item to the default receiving warehouse.
  2. When prompted to edit the cost, click No.
  3. Type the correct return sales order number in the shipment screen.
  4. Click Ship.
  5. Confirm the shipment date and choose to ship the order complete.
  6. Click Save to process the shipment.
  7. When prompted for the destination of the shipment log, click None.
  8. Exit the shipment screen.
  9. Click Batch, Individual or Cancel when prompted to print the credit memo.

The return sales order now has a credit memo for this vendor.

PO Module

  1. Under the Transaction menu, point to Enter Orders and click Returns.
  2. Select the vendor that originally supplied this drop ship item.
  3. Verify that the Receiving Loct field is the same as the return sales order.
  4. Click the Line Item Detail tab.
  5. Click Proceed when prompted that no apply to purchase order number was entered.
  6. Select the correct drop ship item from the Item picklist.
  7. Type the quantity of items being returned into the Order Qty field.
  8. Save the line and order.
  9. Receive the purchase order completely.

AR Module

  1. Under the Transaction menu, click Apply Credits/Deposits.
  2. Select the customer that returned the order.
  3. Type all appropriate information and save.
  4. Select the credit memo created for this drop ship return from the Credit Details picklist.
  5. Click Apply.
  6. Click Automatic. This will apply the Credit Memo to the original invoice that was created for the drop ship sales order.

This process has now returned the drop ship order completely and reversed any effect on General Ledger.

Q – Is Sage Pro ERP compatible with Microsoft SQL Server 2005?

A – Versions up to and including Sage Pro 7.3B are not certified to operate with SQL 2005 due to various issues that will occur. Sage Pro 7.4 supports and is certified with the following versions:

  • SQL 2005
  • SQL Express 2005 – This is a free version of SQL and is ideal for small companies whose total company database size does not exceed 4GB and do not need all the tools provided with standard editions of SQL.

Q – How do I reset or change a User Password?

A – A single user may change their password from the File menu by clicking Change Password in System Manager (SM).

Important
This procedure applies to both Microsoft SQL Server and Microsoft Visual FoxPro installations. If using the Microsoft SQL Server version of Sage Pro, the Microsoft SQL Server Administrator login and password will be required before allowing the password change To change passwords for all other logins, please follow the steps below.

  1. From the File menu, click Change User Information or in System Manager, under the Maintain menu, click Users.
  2. Select the user and click Edit.
  3. Change password and save.

Important
This process is available only to an Administrator or if an Operator has the SMUSER01 privilege assigned. The SMUSER01 privilege allows access to other functionality in the User File Maintenance screen as well.

For more information on how to add privileges to a particular user account, please refer to the System Manager manual for Sage Pro 

Back to Top^
This entry was posted in May 2007, Newsletter and tagged , , , , , , , , , , , , , , , , . Bookmark the permalink.

Leave a Reply