| Sage Accpac ERP |
|
Q – How do you create an offsetting entry in the Reconcile Statements screen in Bank Services to equal the General Ledger account balance? A – The book balance can be corrected by entering a bank entry to bring the book balance amount equal to the General Ledger account balance:
Note: Backup the data before proceeding with the above steps. Note: Verify that no transactions have been reconciled and no Bank Entries have been entered before performing the above steps. Q – How is the Book Balance calculated in the Reconcile Statements window in Bank Services? Is the balance taken from the General Ledger account in the General Ledger module? A – The “Book Balance” amount is not taken from the General Ledger account. The Book Balance equals the last period closing book balance, plus deposits from receivables, and minus withdrawals from payables and payroll. The book balance should always equal the G/L account balance. If there is a previously incorrect bank reconciliation, the balance may not equal. When there is a difference, all future reconciliations may also be off by the same amount. However, this can be corrected by making an offsetting entry to bring the book balance amount equal to the General Ledger account balance. |
| Sage Accpac CRM |
|
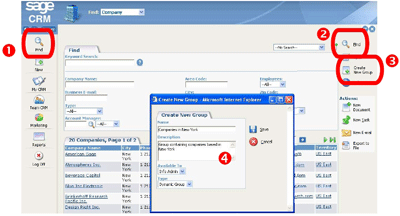
Q – Can I create a Group based on a Main Entity search? A – Yes. As an Info Manager or System Administrator, you can create a group based on a search on any of five main CRM entities – Company, Person, Case, Opportunity, or Lead. For example, you might want to create a group based on the results of a search for all companies based in New York. To create a group based on a search for all companies in New York:
Type New York in the City field on the Company Find screen.
The Create New Group dialog box is displayed.
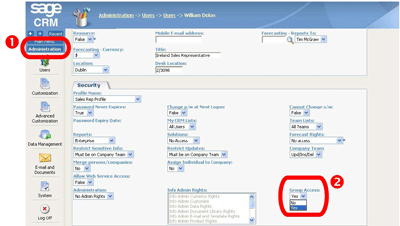
Select the Save button to save the new group. The new group is now available on the Groups tab in My CRM. Q – How can I control access to “Groups” functionality? A – In Accpac CRM v6.0, System Administrators can control access to “Groups” functionality. Users who have not been granted “Groups” access cannot view, create, or edit groups. To grant a user access to groups:
Click on the user’s Last Name to open the User Details screen and select the Change button.
Click on the Save button.
|
| Sage Pro ERP |
|
Q – Why are discounts being posted to an account that is different from the Accounts Payable Setup discount account? A – This is the scenario: A payable with an applicable discount is entered and saved. It is then approved and paid within the discount period and, as a result, a discount is applied to the payable. However when the transaction records are examined in the APDIST table, the discount has been posted to an account that is different from the Discount Account in Accounts Payable (AP) Setup. The discount account that is used in this situation is the one that is specifically assigned to the checking account. When a checking account is added to AP, a Discount Account and Adjustment Account are assigned to it. These accounts can be different from those in AP Setup and override those settings. To verify which account is assigned to each checking account, follow the steps below:
Important Q – Why are Payment Priority "C" Payables Not Found When Editing or Voiding the Payable? A – This issue occurs for payables with a Payment Priority of "C" and the Reference field is populated. After the Accounts Payable module has been closed, the following situations may occur:
This issue was documented under PTR 78777 and fixed in Sage Pro ERP 7.3 Build 3300 Service Pack 3. For prior versions, this issue can be avoided if the Reference field is not populated for payables with Payment Priority of "C." Q – Why Does the Inventory Journal Report Show a Cost Update Record? A – The IC Journal Report shows a Cost Update record under the Transaction Type heading for an item distribution. The Reference and Src headings display Adjust cost, tranno xxx and PO. There is no indication of why this cost adjustment was made. Important In this scenario, a cost adjustment was created in the Purchase Order module. The cause of this cost adjustment record is the result of one of three things:
In Sage Pro ERP over shipping an item will automatically freeze the average cost of the item at the last recorded cost. When a receipt is applied to that over-ship record, the cost will be adjusted to account for any differences and the cost of the item will be unfrozen. |
| Back to Top^ |
Search The Site
RSS & Newsletter Subscription
Axis Videos
-
Recent Posts
Categories
Blog Archives


 Download our corporate brochure for more facts about us, our
clients and our solutions.
 Driving Revenue Growth 1
 Satisfying Customers 1