Frequently Asked Questions

Sage
Accpac ERP

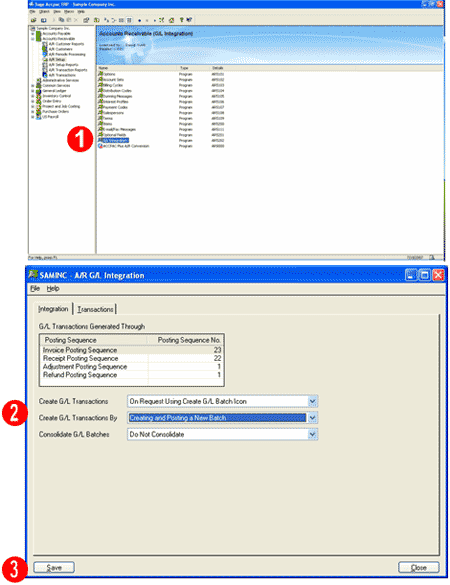
Q – Can I configure Accpac to automatically post the resulting General Ledger batch after posting the Accounts Receivable batch?

A – To configure Accounts Receivable to post the General Ledger batch please follow these steps:

  1. Under A/R Options, open the G/L Integration window.
  2. Select “Creating and Posting a New Batch” from the drop down menu next to the Create G/L Transaction By option.
  3. Click on the Save button. Make sure all users have their Accpac windows closed in order to save the changes.

Q – When a financial report is run with the Drill down Information selected, a comment box saying “Right-click and choose FR…” will be displayed for every cell that has drill down. This can cover the whole spreadsheet if there are many columns. Is there a way to turn this off?

A –To remove the comment boxes:

  1. In Tools Menu in Excel select Options
  2. Select view
  3. In the comments section, select comment indicator only
Sage Accpac
CRM

Q – I would like to add a field into an email template that I am creating, but the field I want to add is not listed in the “Choose Field to insert into the E-mail” list.  Is there a way to add the field to the list?

A – First, you need to determine the Field’s Column Name:

  1. In CRM, click Administration then Customization.
  2. In the Customization screen, click Translations.
  3. Select the option Inline Translation Mode. Doing so will add an asterisk to all the fields.
  4. Go to the screen where the field that needs to be added to the e-mail template is located.
  5. Locate the field and click the asterisk next to the field.  This will popup a Translation window.
  6. Make a note of the value in the Caption Code field. This value is the field name.
  7. Return to the Translations screen and de-select the Inline Translation Mode option.

Next, you will need to insert the Field into the Template:

  1. Click  Administration then E-mail and Documents.
  2. Click E-mail Templates.
  3. Click New or click an existing e-mail template where the field will be added.
  4. Type the field name in between pound signs (#) in the subject or body of the e-mail.  For example, #user_mobile#.
  5. Repeat the steps above as needed. Once finished, click Save.

Q – How can you select multiple e-mail address when sending outbound email message in CRM?

A – First, you need to make sure you have the proper e-mail screen position selected:

  1. In the Main Menu, click My CRM.
  2. Click the Preferences tab.
  3. Click Change.
  4. In the E-mail Screen Position: field, select either "Split" (recommended) or "Popup."
  5. Click Save.

Now you should be able to select multiple e-mail addresses:

  1. Find the company that contains the people’s e-mail addresses.
  2. Select the company to see its details in the Summary tab.
  3. Click the People tab.
  4. Click one of the e-mail addresses to open the e-mail screen.
  5. If a split e-mail screen comes up, the top half of the screen should continue to display the people’s e-mail addresses.  However, if a popup screen is used, move the screen so that the rest of the e-mail addresses are visible.
  6. Click on the second email address and repeat the step as required.
Sage Pro ERP

Q – How do I know what privilege is required to run a process in Sage Pro ERP?

A – Process IDs (Also referred to as privileges.) are assigned to each user in Sage Pro ERP to allow access to companies and applications. Process IDs also allows access to processes that include entering cash receipts, shipping sales orders, and receiving purchase orders.

If a user does not have the required Process ID for a process, a message will appear indicating either the process cannot be accessed or permission is required to complete a process. To determine which Process ID is required for a specific process for versions prior to Sage Pro 7.4, users must look through a list of privileges from the Select Privileges screen (Refer to the "Assigning Privileges" section of the System Manager documentation located on the DoconDisk). In Sage Pro 7.4, a Process ID can be assigned to users for displaying the Process ID that a process requires.

In order for a user to view the Process ID required for a process, the Process ID SMDSPPV must be assigned to a user. For detailed step, please follow the steps listed below.

Important
A user with ADMN level privileges is required to add this Process ID.

  1. Under the File menu ,click Change User Information; the User File Maintenance screen appears.
  2. Type an user ID into the User ID field.
  3. Select Privileges from the list, the Maintain Privileges screen appears.
  4. Click the List button, the Add Privileges from List screen appears.
  5. Click the Company ID picklist and select the appropriate company.
  6. Type the date range for the Process ID in the  Begin Date and End Date fields. Entry for these fields are optional.
  7. Type the time range for the Process ID in the Begin Time and End Time. Entry for these fields are optional.
  8. Click OK, the Select Privilege screen appears.
  9. Locate and select the Process ID  SMDSPPV.
  10. Click OK, a message box appears prompting the following "Merge with changes with other users?"
  11. Select either Yes or No.
  12. Select OK for the new privilege to take affect.

Once these steps are completed, a message will display the Process ID required to access a process.

Q – What information is contained in the PRO.INI file?

The pro.ini file can provide the following database information for a Sage Pro ERP installation:

  • Whether this is a Microsoft Visual  FoxPro (VFP) or Microsoft SQL Server (SQL) installation.
  • The name of the SQL server being used.
  • The name of the system database for the Sage Pro installation.

Important
Sage Pro may not function correctly when editing the pro.ini file.

The pro.ini provides three categories of information; profiles, Pro and database information. The first two categories provides build, edition and license information that applies to both SQL and VFP installations.
The last category provides database information. Listed below are the description for each database parameters provided in the pro.ini file.

Sage Pro 7.3B SQL Installation

 Parameter

 Description

 DBMS=SQL Server   

 Database system used by installation

 ServerName=[server name]\[instancename]

 SQL server name used by installation

 SysDatabase=PROSYS73B

 SQL server name used by installation

 Dsn=ACCPAC PRO SERIES  

 ODBC Data Source name used by installation

Sage Pro 7.4 SQL Installation

Parameter

Description

DBMS=SQL Server

Database system used by installation

ServerName=[server name]\[instancename]

SQL server or instance name used by installation

SysDatabase=PROSYS74

SQL server name used by installation

Dsn= ACCPAC PRO ERP

ODBC Data Source name used by installation

SQLMajorVersion= SQL2005 (new parameter for Sage Pro 7.4)

Type of SQL database used by installation

Sage Pro VFP Installation

Parameter

Description

DBMS=Microsoft Visual Foxpro

Database system used by installation

ServerName=xxx    

This parameter only applies for Sage Pro SQL installations

SysDatabase=PRODATA

Refers to the Database container name

Dsn= sss

Not used in a VFP installation

Additional information about the pro.ini file:

  • If the Pro.ini file is removed, the Pro.ini not found message will appear and the program will not launch.
  • If the Pro.ini file is removed prior to a reinstallation or conversion, the program assumes a new installation is being done. This may be indicated by the following message:
    The System and/or Temp Databases already exist 
    The installation should not prompt for these database names since they already exist, if the Pro.ini file is present.
  • If the pro.ini file contains invalid information, the following message will appear:
    Invalid User ID or Password or Could not connect to the database. 
    Please refer to solution 21377 for additional information.
  • The database information provided by the pro.ini file applies to Microsoft SQL Server. However it will indicate if the Sage Pro installation is using a VFP database by referring to the DBMS parameter.
  • Make a backup of the pro.ini file before editing the file.

Q – What are the possible causes of message “Invalid User ID or Password or Could not connect to the database” when logging into Sage Pro ERP using Microsoft SQL Server?

A – Important
This information should be reviewed by a Microsoft SQL Server Database Administrator (DBA) before implementing on a live system. This is provided for informational purposes only and is not supported by Sage Customer Support.
In order to use Sage Pro with SQL, each workstation needs an ODBC connection to SQL server. The ODBC Data Source is automatically added to the workstation when logging into Sage Pro with SQL for the first time. This will not occur when logging onto the workstation without the proper privileges, the ODBC Data Source will not be installed. This can be corrected by logging onto the workstation with Administrator privileges and then logging into Sage Pro with SQL. The required ODBC Data Source will be created and allow access to the program. Please refer to the list below for additional information regarding the ODBC connection:

  • The required ODBC Data Source is not manually added to the workstations. It is automatically added when logging into Sage Pro SQL for the first time with the proper workstation privileges.
  • Once the ODBC Data Source has been added, Sage Pro SQL does not require additional privileges on the workstation.
  • The workstation installation is not connected to this process.
  • The default name for the ODBC Data Source is "ACCPAC Pro Series" or "Sage Pro ERP."  However, this may changed during the initial Sage Pro installation. It is stored as the DSN in the Pro.ini file located in the Sage Pro root directory. This is the name of the System Data Source created in the ODBC Data Source Administrator.

In Sage Pro 7.4, SQL 2005 and SQL 2005 Express databases are supported. To use these databases, the TCP/IP protocol in the SQL Server Configuration Manager must be enabled. Follow the steps below:

  • Open the SQL Server Configuration Manager.
  • Click Protocols for [SQL Server Name]
  • Click TCP/IP.
  • Right-click TCP/IP and click Enable.
  • The following message appears:

    Any changes made will be saved; however, they will not take effect until the service is stopped and restarted.

  • Click OK.
  • Click SQL Server 2005 Services.
  • Stop and restart the SQL Server FullText Search, SQL Server, SQL Server Agent and SQL Server Browser.

The TCP/IP protocol for both SQL 2005 or SQL 2005 Express has now been enabled. Both databases can now be installed and used with Sage Pro. For more information on the SQL Server Configuration Manager, please refer to the SQL Server 2005 manual or a Microsoft SQL Server Database Administrator.

Back to Top^
This entry was posted in July 2007, Newsletter and tagged , , , , , , , , , , , , , , . Bookmark the permalink.

Leave a Reply