| Sage Accpac ERP |
|
Q – Is it possible to copy an Order Entry Order from one customer to another customer?
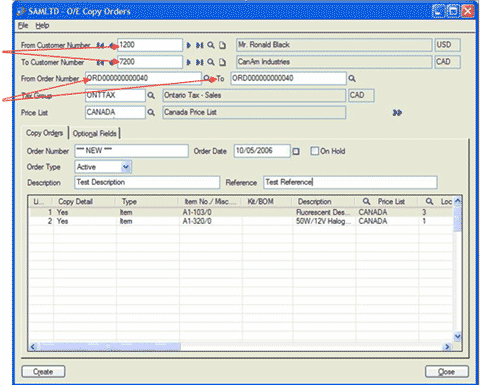
A – Yes. In Sage Accpac ERP version 5.4 the new Copy Orders form lets you duplicate an order from one customer to another.
To create an order from an existing order (or orders)
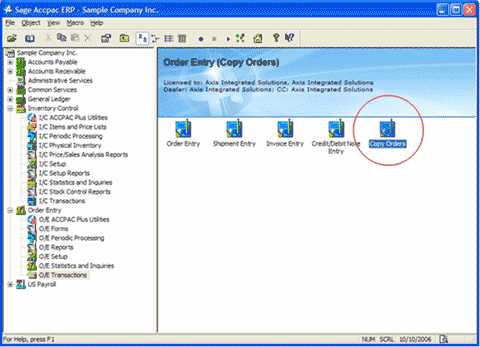
- Choose the Copy Orders form from the O/E Transactions folder
- In the From Customer Number field, type the code for the customer you are copying the order from, or use the Finder or the navigation buttons
to select it.
- In the To Customer Number field, type the code for the customer for whom you are creating the new order, or use the Finder or the navigation
buttons to select it.
- Enter the order, or range of orders, you wish to copy in the From Order Number and To Order Number fields.
Note: You may only select existing orders placed for the customer you are copying the orders from.
- If the customers are different and have different tax groups, enter or select the tax group for the To Customer.
- If the customers and the customer currencies are different, enter or select the price list for the To Customer. (If the From and To Customer
is the same, the program copies the prices directly from the previous orders.)
- Click the Go button (button with the two right blue arrows) to add the details from the existing orders to the new order.
- In the Order Number field, type an order number if you wish to assign a number manually, or accept the ***New*** entry to let the program assign
the next number in the order number sequence.
- In the Order Date field, enter or choose the date for the order. The program automatically displays the session date as the order date.
- If you need to put the order on hold for any reason, select the On Hold option.
- Enter a Description and a Reference for the order, if you choose.
- Use the detail grid on the Copy Orders form to edit the details as you require.
To delete a detail line, you simply click the detail line, then press the Delete key on your keyboard.
- When you have finished entering information for the order, click the Create button to generate the order.
You can then view, edit, and post the order using the Order Entry form.
Q – What does it mean when I receive an error batch in Accounts Receivable or Accounts Payable and how do I correct it?
A – When an error batch is created, it simply means that one or more of the transactions in the batch you just tried to post had an error,
and Accpac created a new error batch and moved the transaction(s) with the error(s) to this new batch. The remaining transactions that did not have
any errors are posted successfully. This new error batch can be opened for review of the transactions, to correct them, and then post. The easiest
way to find the errors is to print the Posting Errors Report located under Transaction Reports for both Accounts Receivable and Accounts Payable.
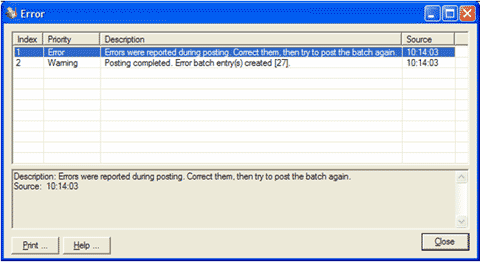
When an error batch is created, the dialog box when posting the original batch notifies you that there was an error and that an error batch has
been created.
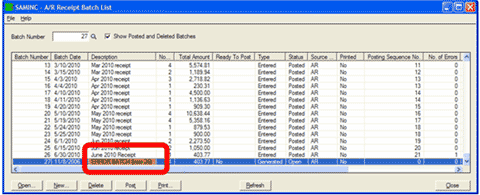
In this example, an Accounts Receivable Receipt error batch has been generated.
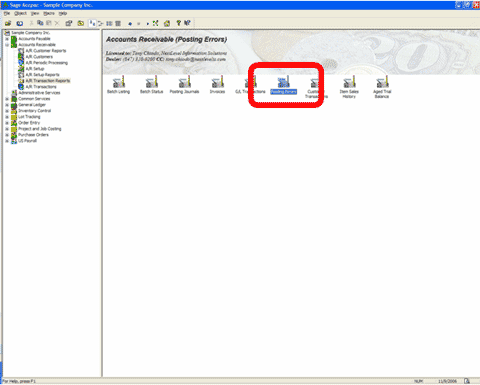
Print the Posting Errors Report located under Transaction Reports.
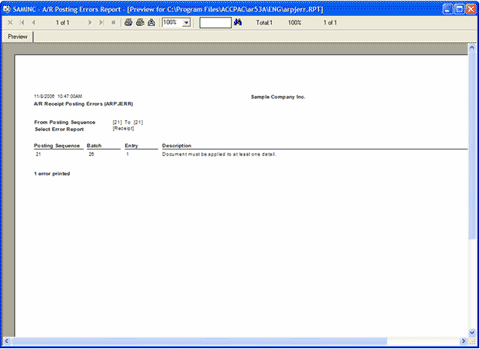
The Posting Errors Report gives you a description of what caused the error. In this example, the receipt was not applied to any invoices.
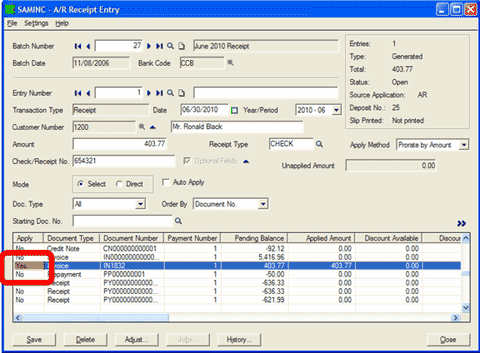
Open the error batch and change the batch description as well as correct the transaction by applying the receipt to an invoice or invoices, save
the transaction, and post the batch.
|
| SageCRM |
|
Q – Is there a way to change the Logo displayed on the standard reports? The default Panoply Technologies logo is currently
being displayed.
A – A customized company logo can be used to replace the Panoply Technologies logo.
Important
Before attempting the following steps, ensure all users are logged off from CRM.
- On the CRM server, browse to [drive]:\Inetpub\wwwroot\[install name]\Reports (for SageCRM 5.7) or [drive]:\Program Files\Sage\CRM\[CRM]\WWWRoot\Reports
(for SageCRM 5.8) folder, where [drive] is the name of drive where CRM was installed and [install name] is the name of the instance at the time
the product was installed.
- In the Reports folder, rename the PDFLOGO.JPG file to PDFLOGO_def.JPG by right-clicking PDFLOGO.JPG and clicking Rename.
- Place a copy of the customized logo in the in the Reports folder.
- Rename the customized logo to PDFLOGO.JPG
Important
The customized logo needs to be in JPG format and should have approximately the same dimensions as the original PDFLOGO.JPG file.
Q – Is Microsoft Office 2007 Compatible with SageCRM?
A – SageCRM version 6.x, to be released later this year, will be compatible with Microsoft Office 2007. The current versions of Sage Accpac
CRM are not compatible with Microsoft Office 2007.
Q – Is there a way to prevent the Sage Accpac ERP address from being modified in SageCRM?
A – The way to prevent the address from being modified is to disable the "ACCPAC AR Address" option.
If you are interested, please contact your AXIS Solution Provider or see your CRM administrator for further information.
|
| Sage Pro ERP |
|
Q – Are Sage Accpac and Sage Pro Compatible with Microsoft Small Business Server 2003?
A – A letter was sent by Sage to the partner channel in the summer of 2004 to clarify the support of SBS 2003 server with Sage products. Generally,
the SBS 2003 server will function correctly with Sage Pro and Sage Accpac; however, the Sage Business Partner or Certified Consultant and customer
should determine the user levels and services to avoid possible performance issues. Review the list below for some key points from the letter:
- For adequate performance of applications and services, ensure that only necessary services on the server are used. A single server cannot provide
satisfactory performance when it acts as the domain controller, Microsoft SQL Server database server, SharePoint server, Exchange mail server,
Web server and continue to provide file and print services in all but the smallest of client installation sites.
- Additional Random Access Memory (RAM) and processor speed may not improve the performance of the server applications.
Q – What is the Recommended Procedure for Closing General Ledger?
A – To Perform the Closing Procedure for General Ledger, please refer to the checklist below:
Important
These are only guidelines to follow before closing GL. Each company should develop, with the help of a certified consultant, their own procedures
to follow before closing.
- Release all information from linked applications to GL.
- Post all batches for the period being closed.
- Create a full and verified backup of the data files prior to closing. This backup is separate from the daily backups.
- Verify that all users are out of the system.
- Clear all flags from System Manager (SM).
- Reindex all application files in SM.
- Reindex all system files in SM.
- Close period or year for each module in the following order:
- PO, OE, AP, AR, IC, JC, PR and GL.
- Payroll should be closed at the end of every quarter.
- GL should always be closed last.
- Print the following reports from GL:
- General Journal – period to date detail
- Trial Balance – Total Company
- Balance Sheet – Total Company
- Income Statement – Total Company
- Print all other relevant financial reports after consulting with an accountant.
- Save all reports and registers for the audit trail.
Related Reading
For more information, please refer to the GL and SM documentation.
Q – How Can Payroll and Accounts Payable be Linked?
A – PR can be linked to AP from the PR Change Setup Information screen. Once linked, both modules share checking account information and the same
check and payment numbering sequence. Also, all transactions originating from PR can be viewed and reconciled in the AP Bank Reconciliation.
Important
Once PR is linked to AP it cannot unlinked. If the link needs to be changed, create a new PR company must and copy the information over from the
old company. For more information, please review "Linking to ACCPAC Accounts Payable" in the PR manual
|
| Back to Top^ |


 Download our corporate brochure for more facts about us, our
clients and our solutions.
Download our corporate brochure for more facts about us, our
clients and our solutions.
 Driving Revenue Growth 1
 Satisfying Customers 1