
| Sage Accpac ERP |
|
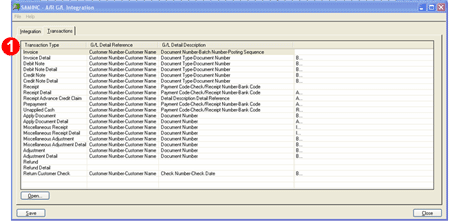
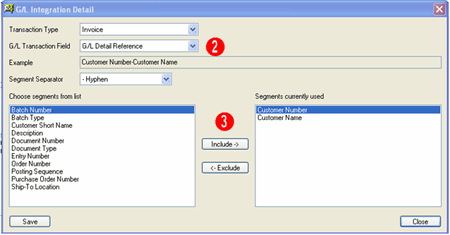
Q – Is there a way to transfer additional information to the General Ledger when posting Accounts Receivable Invoice entries? We would like to include the Customer Name and Number information in the GL Reference Field and the Document Number, Batch Number, and Posting Sequence Number in the GL Description Field in the Transaction Listing report in the General Ledger. A – In Sage Accpac ERP v5.4, there is new icon called G/L Integration under Accounts Receivable – A/R Setup.
Q – Is there a way to setup security where a user cannot see costs when entering a receipt? A – In Sage Accpac ERP v5.4, users with Receipt Entry rights only in the Purchase Order module can create receipts from POs, specify quantities received, and post receipts, but they cannot see any cost information. |
| Sage Accpac CRM |
|
Q – How do I activate “On-screen Coaching” A – In SageCRM v6.0, when “On-screen Coaching” is activated, text can be displayed in a frame at the top of each screen to explain where the user is and what they can do in that screen. The content of “On-screen Coaching” frames is determined by the administrator and there is no limit on the amount of content that can be included on any one screen. You must have Administrator rights in order to activate “On-screen Coaching” To activate “On-screen Coaching”:
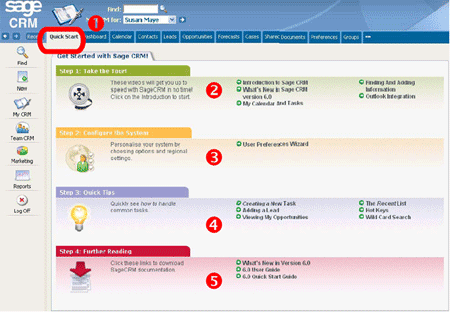
Q – What can I access from the new Quick Start tab? A – There is a new Quick Start tab on the My CRM screen in SageCRM v6.0. From this tab, you can access CRM system documentation, online training videos, system quick tips, the User Preferences wizard, and the System Administrator Quick Setup Guide. To access features on the Quick Start tab:
|
| Sage Pro ERP |
|
Q – Which temporary files can be deleted from Sage Pro ERP? A – Important Sage Pro uses these three types of temporary files:
Do not delete any files beginning with "0" that appear in the DocOnDisk directory. Also, do not delete any .XLS or any .MEM files that begin with FR. For example, do not delete FRSAVE.MEM. Other temporary files can safely be deleted from all the Sage Pro directories and subdirectories as long as there is no one logged into the program. For more instructions on how to delete these files, please refer to Sage Pro documentation. Q – Where does the Accrued Time Report get the Pay Rate information from? A – The Pay Rate information displayed on the Accrued Time Report is taken from either: Employee Pay Type Maintenance Screen
The Employee Master Maintenance Screen If the Use Regular Pay Rate option is checked in the Employee Pay Type Maintenance screen, the Accrued Time report will use the Pay Rate specified in the General tab of the Employee Master Maintenance screen. Q – Why the Bill of Material configuration screen does not recognize the explosion method set in Work Order Setup? A – In Sage Pro ERP a multi-level Bill of Material (BOM) is set to Configure During SO Entry and Generate WO on SO Entry. The Default method of explosion is set to "Bottom" in the Work Order (WO) Setup Information screen. When a sales order is created and this BOM is selected as a line item, a dialog box appears asking whether to sell the item or create a work order. When the option to create the work order is chosen, the BOM Configuration screen launches. It lists all the components and subassemblies for the BOM but does not explode the components of the subassemblies as expected for a Bottom explosion. The Default method of explosion defined in WO has no direct effect on the BOM Configuration screen during sales order entry. The Default method of explosion setting in the Production Entry (PE) Setup Information screen affects the explosion of the components on the BOM Configuration screen. Therefore to see the components of the subassemblies exploded to the lowest level, the Default method of explosion should be set to "Bottom" in PE setup. |
| Back to Top^ |

Search The Site
RSS & Newsletter Subscription
Axis Videos
-
Recent Posts
Categories
Blog Archives


 Download our corporate brochure for more facts about us, our
clients and our solutions.
Download our corporate brochure for more facts about us, our
clients and our solutions.
 Driving Revenue Growth 1
 Satisfying Customers 1