Frequently Asked Questions

Sage
Accpac ERP

Q – How do you setup a sick pay earning code when
it is being paid through a third party company?

For example, when an employee is unable to work due to illness
and they receive sick pay based on their benefits plan, the insurance
company (or another party) will issue the sick pay directly to the employee.
Some of these companies prepare W2 forms indicating this which they send
to the employee who are receiving pay from them but some do not.

In the cases where W2 forms are not issued by the third-party
payer, the employer is responsible for accounting for this pay on the
employee’s W2 form.

A – This can be setup in the US Payroll module by creating a new
Benefit type Earnings code. On the Employer tab of the Earnings and Deductions
window under Payroll Setup, select “Sick Pay Not Includible as Income
(3rd Party Sick Pay)” in the W2 reporting drop down box.

Q – F1 Help or Menu Help Is Not Available or No Help Content
Is Present. This may occur after installing the Microsoft Windows Server
2003 Service Pack 1, or Microsoft Security Update #896358 and #840315.
How can we correct this?

A – In order for Help to display properly, please follow these steps:
*** Note: This article contains information about modifying the registry.
Manually modifying the registry can cause problems with the normal operation
of your computer including preventing Windows from starting up. AXIS Integrated
Solutions is not responsible for problems arising from the manual editing
of information in the Windows registry. Before modifying the registry,
it is important to verify there is a known good back up. For information
about how to back up, restore, and edit the registry, please refer to
article 256986 in the Microsoft Knowledge Base located at http://support.microsoft.com ***

1. Click Start, click Run, type "regedit"
in the Open field, and click OK.
2. Browse to the following Registry Key Paths:
HKEY_LOCAL_MACHINE | SOFTWARE | MICROSOFT | HTMLHelp | 1.x
a. If HTMLHelp does not exist, then with MICROSOFT highlighted in the left-hand pane, right-click on the right-hand pane
and select New – Key.
b. Type HTMLHelp and hit enter on the
keyboard.
c. If 1.x does not exist, with the HTMLHelp key highlighted in the left-hand pane, right-click on the right-hand pane
and select New – Key.
d. Type 1.x and hit enter on the keyboard.
3. With 1.x highlighted in the left-hand pane, right-click
on the right-hand pane and select New – Key.
4. Type ItssRestrictions and hit enter on the keyboard.
5. With ItssRestrictions highlighted in left-hand pane,
right-click on the right-hand pane and click New, then
select DWORD Value.
6. Type MaxAllowedZone and hit enter on the keyboard.
7. Double-click on MaxAllowedZone or right-click and
then click Modify.
8. In the Value data field, type 1 and then click on OK.
9. With ItssRestrictions highlighted in left-hand pane,
right-click on the right-hand pane and click New, then
click String Value.
10. Type UrlAllowList and hit enter on the keyboard.
11. Double-click on UrlAllowList or right-click and then
click Modify.
12.In the Value data field, type:

\\ServerName\Share\ACCPACFOLDER;file://\\ServerName\Share\ACCPACFOLDER
and click on OK.
Where ServerName = Name of Server
Share = Location of Network Share
ACCPACFOLDER = Location of Shared Data for Accpac
For example: \\Win2003\Accpac;file//\\Win2003\Accpac

Sage Accpac
CRM

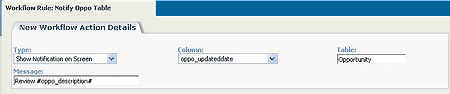
Q – We want to display a notification at the top
of the screen of the “Assigned To User” showing the Opportunity Description
when the opportunity is set to the Stage of "Qualified". Is
this possible?

The "Show Notification on Screen" workflow action for
an Escalation Rule is not triggered when the Escalation rule is created
using a View. However, the actions are triggered when the Escalation rule
is created using a Table.

A – The key is when the Escalation Rule Action is created with the
type "Show Notification on Screen", make sure
that the Table: field found under the "New
Workflow Action Details
" screen points to the entity where
the view is stored under.


Image.1

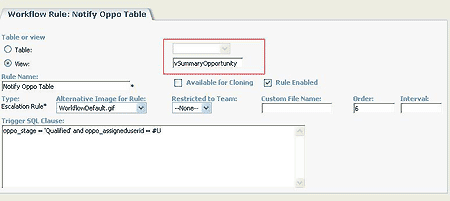
For example, when you create an Escalation Rule using the vSummaryOpportunity
as per the image below and you click on the New icon
to create a new Action, the view name used to create the Workflow Rule,
gets automatically transferred to the Table: field in
the "New Workflow Action Details" panel as
per image 3 below.


Image.2


Image.3

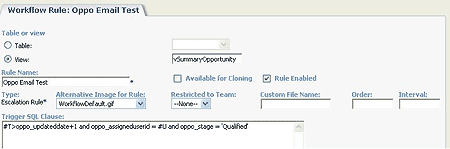
What you need to do is manually change the Table: field
to the Entity name where the view is stored under as per Image 1.

This Escalation rule will be triggered when an Opportunity that is assigned
to the current logon user is set to the Stage of "Qualified".

A notification displaying the Opportunity Description of the opportunity
will appear at the top of the screen when the escalation is triggered.

Please note that this example is based on an Escalation rule that is
created outside of a workflow.

Q – We would like to setup CRM so that it will automatically
send an email out to the Opportunity’s assigned user when the opportunity
meets a certain condition. Is this possible?

A – Here are the steps to setting up the Escalation Rule:

1. The Escalation Rule is created under Administration | Advanced
Customization | Escalation | New.

2. Type the name of the escalation under the Rule Name:
field.

3. Create the Escalation rule using a view or table.

4. Make sure you enable the escalation rule by making sure the Rule
Enabled
check box is selected.

5. Enter the SQL Clause that defines the criteria for the Escalation
Rule action to trigger.

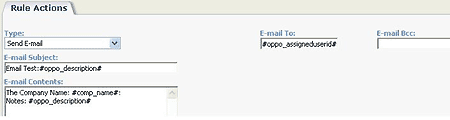
6. Click on the New icon to create a Workflow action
and select Send E-mail action.

7. Under the E-mail to: field enter: #oppo_assigneduserid#.
Make sure that the user email addresses are entered correctly under the
Users area in the application.

8. In the E-mail Subject: and E-mail Contents:
fields you can use #[field name]# with any field from the current table,
view that is used to in the Escalation rule or any field from the User
table.

Other settings to verify the system is ready to perform this
action

1. Confirm that you are able to send email out of SageCRM by
sending an email out from a Person’s email address.

2. Ensure that the Escalation: rule feature is activated
under Administration | Advanced Customization | Workflow &
Escalation Configuration.

3. On that same Workflow & Escalation Configuration screen, enter
a name and an e-mail address under the Notify E-mail name & Notify E-mail address: fields. The name specified
here appears on an e-mail sent by the system. The e-mail address should
be a valid e-mail account that is used to send the e-mails.

Sage Pro
ERP

Q – What are the limitations of the
Bill of Materials Module as Compared to Production Entry?

A – The Bill of Materials module is a simplified
version of the Production Entry (PE) module. It was designed to allow
for the creation of single level Bill of Materials (BOM) only. This is
ideal for kitting, however, it is not optimal for building to stock. This
article clarifies and compares the functionality of the Bill of Materials
module to the PE module.


The following table displays the differences between the Bill of Materials
and Production Entry

modules and which features are available in each:


Ability
Bill of Materials
Production Entry
Revision Levels
N
Y
Subassembly/Multi Level BOMs
N

(Allows only single level BOMs)
Y
Kit During SO Entry
Y
Y
Generate WO on SO Entry
N
Y

(Work Order module must be installed)
Explode on SO Shipment
Y
Y
Configure During SO Entry
N
Y
Post Completed Manufacturing/Back Flushing
N
Y
Replace BOM Items

(found under the Maintain menu in PE module)
N
Y
Import Bills of Materials

(found under the Maintain menu in PE module)
N
Y
Print PE reports
Y

(Except the Configuration report)
Y

Q How to determine if a client needs Bills
of Materials, Production Entry, or Production Entry

and Work Orders?


A – There are three main questions that must be determined:


1. Do component parts need to be allocated?

2. Does a production document separate from the sales order need to be
created?

3. Is the Material Requirement Planning report needed?


If the answer to any of the above questions is "Yes", then
Production Entry and Work Orders may be the best solution.


If the answer to all of the above questions is "No", then
ask:


1. Are subassembly parts specified on the bills of material?

2. Do parts need to be configured during sales order entry?

3. Is there a build-to-stock requirement independent of sales order shipments?


If the answer to any of the above questions is "Yes", then
Production Entry may be the best solution.


If the answer to all the above questions is "No", then Bill
of Materials may be the best solution.


Q What is the general purpose and usage
of the Work Order Traveler?


A – A picking ticket may be needed after a work order
is created: the Work Order Traveler may be used in this regard.


To use the Work Order Traveler as a picking ticket the following steps
may be used:


1. Set up the Bill of Materials (BOM) in either the Production Entry
(PE) or Work Order (WO) module. Go to the Bill of Materials Maintenance
screen under the Maintain menu and create the BOM.


2. Create the work order by one of the following two methods:

a. Set the BOM to "Generate WO on SO Entry" through the BOM
Maintenance screen.

b. Create the work order in the WO module through the Transaction menu
and selecting Enter Work Orders.


3. Go to the WO module, choose the Print menu and select Work Order
Travelers. There is the option to print the Work Order Traveler as a Batch
or Individually. Refer to the page 149 of the WO Module Doc on Disk, for
details on how to use the printing options.


4. The Work Order Traveler may now be printed for all work orders
that need to be completed. It can be sent to the shop floor and issued
to an employee who can use the Traveler to determine the location and
quantity of the item to select.

Sage Accpac
HR

Q – Our company needs the ability to send out
COBRA notices to employees whom have quit or left the organization and
I do not want to pay a third party administrator. What can we do?

A – Sage Accpac HRMS Series allows companies to print HIPAA Certificates
of Coverage, with COBRA notices or separately, at any time for their employees.
Medical coverage and COBRA can be maintained with third party administrators
or can be independently by your company in ACCPAC HR

Q – Our company would like the ability to track additional information
on our employees. Is this a feature of the system and how do we go about
doing this?

A – Sage Accpac HRMS Series allows users to easily create an unlimited number
of custom tabs and fields in minutes. This flexibility allows clients
to track and report on anything that is important to them. Custom tabs
can include up to 12 custom fields per tab.

Back to Top^
This entry was posted in January 2006, Newsletter and tagged , , , , , , , , , , , , , , , , , . Bookmark the permalink.

Leave a Reply