
| Sage Accpac ERP |
| Q – Can you create a General Ledger Journal Entry that will adjust the balance in a Subledger Control Account?A – A General Ledger (GL) account designated as the control account for a subledger can only accept transactions that originate from that subledger. By default, a direct GL journal entry cannot be created that will affect the balance in this control account.
To make a General Ledger journal entry in a control account, using Accounts Payable (AP) as an example, directly from the General Ledger module, do the following: 1. After logging on to a company, expand General Ledger in the explorer pane and click GL Accounts. 2. In the windows pane, open Accounts. 3. Using the account finder, select an AP control account. 4. Click the Subledger tab. Only AP will be listed in the Subledger table. 5. Click anywhere inside the Subledger table and then press INSERT to create a new entry. 6. With a new line highlighted, click the table heading to open the subledger finder. 7. In the finder, select the entry where Source Ledger is “GL” and Source Type is “JE” and click Select. 8. Click Save in the GL Accounts window to save the information. A journal entry can now be made which will affect the AP control account. Once this journal entry has been entered and posted, the setup information for this control account may be changed back to its original setting if this is required. Q – How do you delete Inactive Inventory Items using the “Delete Inactive Records” function? A – The Inventory Control (I/C) Periodic Processing option “Delete Inactive Records” allows the program to search and delete inactive inventory records. However, in some cases, an item marked inactive does not get removed by the process. The following is a list of the item requirements the program checks for in order to successfully remove the inactive records: 1. The quantity of the item in stock at each location, on sales order, 2. The total cost of the item at each location is zero. 3. The item is not a master item or a component item on any bills of material. 4. Run day-end processing again if any transactions are posted for the item since the last day-end processing. To delete an item that does not meet these conditions, enter shipments, transfers or adjustments (as required) until the specified conditions are met, then make the item inactive. Use the Items form to make items inactive. Print the Item Status report to identify inactive item records and their quantities on hand, on purchase order, and on sales order. Select the Inactive Items option from the list beside the Print field. Select also the Profile option and the Quantity By Location option. Print the Item Valuation report to determine the total cost of each inactive item on the Item Status report. |
| Sage Accpac CRM |
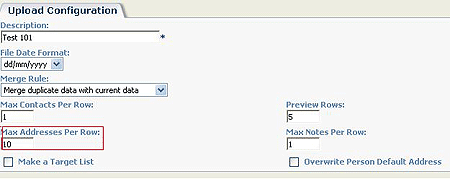
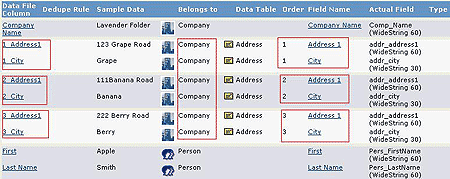
| Q – Is it possible to upload multiple addresses for the same company?A – You can upload more than one address for a company. There are several important steps that need to be completed in order to successfully complete this procedure. The first step is the upload file needs to have all the addresses in the same row as per the example below.
The next step is to configure upload configuration screens in CRM. On the Upload Configuration screen – Step 1 of 4, specify the maximum number of different addresses you included in the upload for any one company and enter that number in the Max Addresses Per Row field.
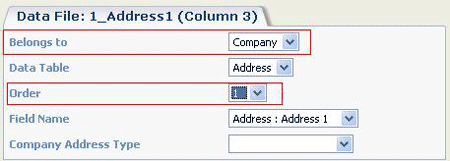
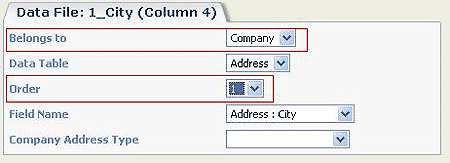
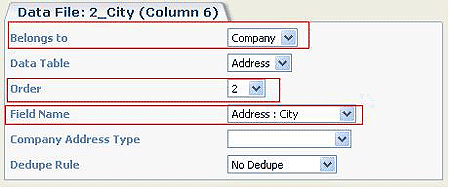
On the Upload Configuration screen – Step 2 of 4, map the fields in an orderly manner. Because there are multiple addresses in a row, it can get confusing. We would suggest that the addresses be numbered by order such as 1_address1, 1_ address2, 1_city, 1_state, then 2_address1, 2_ address2, 2_city, 2_state, and so on. This method should avoid any confusion with the multiple addresses. Because you specified the Max Addresses Per Row: number in Step 1 of 4, you will be able to specify the order of the address fields. In addition, since you would like to import different addresses into one Company, you need to map the address field so that it “Belongs to:” a Company, instead of a Person. The system automatically maps address fields to “Belong to:” Person, so you will need to adjust that.
Mapping Address1 field
Mapping City field
Mapping City2 field To make sure you are mapping the fields correctly, please note the name of the column, which should tell you the order of the address and the type of address field as per the above images. Once the fields are completely mapped, the “Step 2 of 4” screen should look as follow:
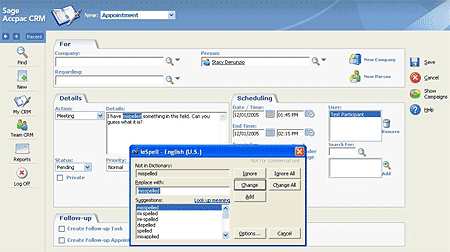
Note the order of the address fields and that they are mapped to “Belong to:” Company. Once the data is successfully uploaded, you should see multiple addresses under the Address tab from within a Company. You can then create a new Person and select any of the uploaded addresses using the Select address from list icon on the Address screen panel when you create a New Person. Q – Is there any way to spell check entry fields in CRM? A – Yes. There is an add-in tool to Internet Explorer that will spell check Forms with the click of a button. It can be downloaded at http://www.iespell.com/download.php If you want to customize CRM to automatically check the spelling of an entry field after it’s filled in by a user: 1.Download the iespell API at http://www.iespell.com/rel/ieSpell_api.zip 2. Unzip the contents into your CRM Installation CustomPages directory 3. In CRM go to Administration->Customization and choose the table the desired field is in. (ex: Communication). 4.Click the Screens tab and choose the screen in which the desired field is in. (ex: CustomCommunicationDetailBox) 5. Add the following code to the Screen’s Custom Content box: <script language=’JavaScript’ src=’/CRM/CustomPages/ieSpell.js’></script> 6. Add the following code to the desired field’s OnChange script. (ex: Communication : Details) checknodespelling(this) 7. The following example illustrates the Communication Detail field being automatically spell checked:
|
| Sage Pro ERP |
| Q – Why the Generate Recommended Orders Screen is Not Displayed After Saving a Drop Ship Sales Order?A – There are two conditions that must be met in order for the Generate Recommended Orders Screen to appear after saving a drop ship sales order:
1. The Purchase setting must be selected for the Drop Ship item in the Item Master Maintenance screen. To verify whether this setting is selected, follow the steps below. • Under the Maintain menu, point to Inventory Items and click Item Master. • In the Item Master Maintenance screen, type the drop ship item ID into the Item field. • Navigate to the Settings tab and ensure that Purchase checkbox is selected. 2. The Drop Ship check box should be selected in the Line Item Detail tab of the Enter Orders screen. Q – How do I Reset or Change User Passwords for ACCPAC Pro Series? A – A single user may change their password from the File menu by clicking Change Password. Note: This procedure applies to both Microsoft SQL Server and Microsoft Visual FoxPro installations. If using the Microsoft SQL Server version of ACCPAC Pro Series, the Microsoft SQL Server Administrator login and password will be required before allowing the password change To change passwords for all other logins, please follow the steps below. 1. From the File menu, click Change User Information or in System Manager, under the Maintain menu, click Users. 2. Select the user and click Edit. 3. Change password and save. Note: This process is available only to an Administrator or if an Operator has the SMUSER01 privilege assigned. The SMUSER01 privilege allows access to other functionality in the User File Maintenance screen as well. For more information on how to add privileges to a particular user account, please refer to the System Manager manual for Pro Series. Q – Why sometimes the Detail Shipments Report do not display all records from history? A – The Detail Shipments report may be incomplete and missing orders when it is generated for historical records. These orders may have appeared on the report in the prior period. At that time, the records were current and stored in the current tables. When the report was generated for current records, the orders may have appeared on the report. To Generate the Detail Shipments report 1. Go to the Order Entry (OE) module. 2. Under the Print menu, select Transaction Reports and choose Shipments. 3. Ensure that this report is set to run in detail format. This is signified by a D to the right of the Summary/Detail menu item. This report obtains its data from the ICITEM, SOMAST, ICTRAN, SOYMST and ICYTRN tables. When generating the report for current records, the report uses the SOMAST and ICTRAN tables but when generating for historical records, the report uses the SOYMST and ICYTRN tables. If the OE module is closed and the Inventory Control (IC) module is not, the data will not be in sync. In OE, the records will be in the history table (SOYMST) while in IC the records will be in the current table (ICTRAN). Therefore, filtering for historical records may produce missing records since these orders could be missing from the IC history table (ICYTRN). To prevent this issue, the IC module should be closed at the same time as the OE module. This will ensure that all records are in corresponding tables in both modules. If this was not done and the generated report is displaying missing records, closing the IC module should resolve the issue. |
| Sage Accpac HR |
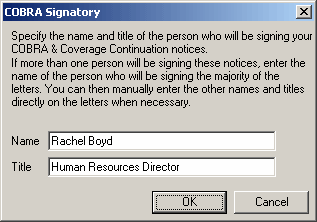
| Q – Sage Accpac HRMS Series™ allows companies to print HIPAA Certificates of Coverage, with COBRA notices or separately, at any time for their employees. Can these forms be modified?
Standard HIPAA forms come with HR Series. To modify the signatory of the forms, log into System Manager, choose Setup and select COBRA Signatory, make your changes and click ok.
These forms may be modified to reflect your company’s specific information. For assistance with this modification, please contact our offices. Q – Can employees be allowed to updated there own information in HR? A- This can be accomplished with the “My Self” section of the Sage Accpac HRMS Series™ Employee Self-Service module permits employees to view and update personal information (such as addresses, phone numbers and emergency contacts) using a company intranet. |
| Back to Top^ |
Search The Site
RSS & Newsletter Subscription
Axis Videos
-
Recent Posts
Categories
Blog Archives


 Download our corporate brochure for more facts about us, our
clients and our solutions.
Download our corporate brochure for more facts about us, our
clients and our solutions.
 Driving Revenue Growth 1
 Satisfying Customers 1