Back to Basics: What Exactly is CRM? April 2007 By Dr. Nancy Rauseo

Search the term ‘CRM’ on the Internet and you’ll get millions of hits, with about 98% of them being software or technology related. Consider that about 50 to 60% of CRM software implementations have been considered huge challenges, and in many cases, failures. Could the market’s understanding of CRM have anything to do with these less-than-desirable implementation rates?

Then consider that optimism in small-to-mid size businesses has dropped in the last couple of months due to deteriorating expectations about future economic performance. Expectations for growth have softened, leading to less investment spending. Despite these economic trends, increased competition and more demanding consumers require that businesses make smart decisions about what customer strategies they should pursue, how they should spend their resources and what these investments will do for their customers. So how can you survive without CRM?

CRM is a given in today’s survival. This article addresses the importance of clearly understanding what CRM really is – not merely a software program, but a strategy. Education about CRM is crucial to this understanding. As you read this article, take time to reflect on your own understanding of CRM.

Defining CRM
If CRM is not software, then what is it? Below is a small sampling of the thousands of CRM definitions available in the CRM literature. Read through them and ask yourself which definition best represents your understanding of CRM?

“CRM is the core business strategy that integrates internal processes and functions, and external networks, to create and deliver value to targeted customers at a profit. It is grounded on high-quality customer data and enabled by information technology.”
Francis Buttle (2004)

“A business strategy that uses information technology to provide the enterprise with a comprehensive, reliable, and integrated view of its customer base so that all business processes and customer interactions help maintain and expand mutually beneficial relationships.”
Zikmund, McLeod, and Gilbert (2003)

“An enterprise-wide business strategy for achieving customer-specific objectives by taking customer-specific actions.”
Peppers & Rogers (2004)

“CRM is a business strategy to select and manage the most valuable customer relationships. CRM requires a customer-centric business philosophy and culture to support effective marketing, sales and service processes. CRM applications can enable effective customer relationship management, provided that an enterprise has the right leadership, strategy & culture.”
CRMGuru.com (2003)

“CRM is a philosophy and a business strategy, supported by a system and a technology, designed to improve human interactions in a business environment.”
Greenberg (2004)

Did You Know That~

  1. CRM is a business strategy and philosophy? It is future-oriented. It requires careful planning and clear metrics.
  2. CRM is based on customer information? This is the raw material of CRM ~ intelligence is applying it.
  3. CRM requires the design of product & service offerings and interactions that deliver ongoing value and branded customer experiences?
  4. CRM is a set of processes? The experiences and processes are the products of CRM.
  5. CRM is not technology? Technology merely enables it. It is the machinery that enables CRM to work.
  6. CRM requires an organizational orientation based on customer-centricity, learning, the right people, collaboration and value-based behaviors? The people in the organization are the power supply.
  7. CRM adoption requires a roadmap to align the company with the CRM strategy?
  8. CRM requires clear and integrated project management?

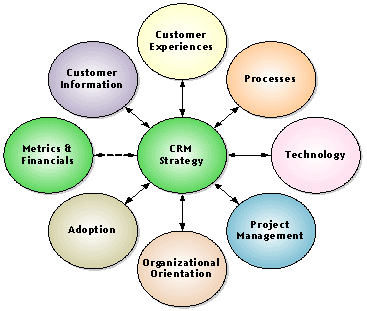
In the diagram below, we see the key elements of CRM. The CRM strategy is at the center because it serves as the compass or the direction for other strategies and actions. There are two-way arrows going to and from each component because these are all related in some way to each other. You must view these elements in an integrated fashion; they are interdependent.
How Ready Are You for CRM?
If you are considering launching a CRM initiative, the first step, after making sure you are clear on your current and desired CRM states, is to assess your company’s readiness. How big is the gap between where you are today and where you want to be? How prepared is your company and your team, culturally and organizationally?

One of the hands-on tools we provide to students of the Online CRM Professional Certificate Program is a GAP Analysis Worksheet(Sample available in the Tool of The Month Section of the Newsletter). This link allows you to assess an excerpt of this tool so you can begin to assess your level of understanding of CRM for each of the elements discussed earlier. This is an Excel spreadsheet with statements about each CRM element and space to indicate the current and desired states, on a scale from 1 through 5.

Download the GAP Analysis Worksheet in Excel format

The goal is to have each employee affected by CRM, complete these questionnaires. You can tabulate the results for all employees, by functional area, or even by job level, and identify where each of these is in terms of their CRM readiness.

CRM Education: Next Step
Before embarking on the CRM journey, it is important to take time to educate those involved in the CRM decision-making and implementation processes. There are many good textbooks on the market that address some of the CRM elements noted here earlier. There are also many websites that provide white papers, best practices, and articles relating to successful and not-so-successful CRM initiatives.

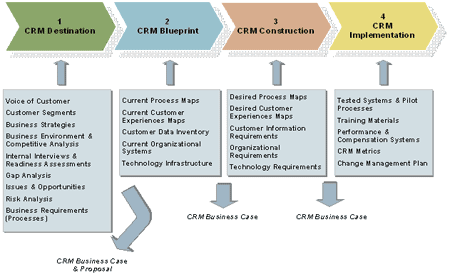
One program that you may want to consider is the Online CRM Professional Certificate program offered at Florida International University’s College of Business. The program takes you through a best practice CRM process, shown in the diagram below. For more information about this program, visit CRM ONLINE COURSE.
Dr. Nancy Rauseo is on the faculty of Florida International University’s College of Business Administration where she teaches marketing and CRM. Nancy holds a Bachelor of Science in Industrial Engineering from Purdue University and an M.B.A and Ph.D. from Nova Southeastern University. Prior to her teaching career, she held various senior management positions for over 20 years in the areas of sales, marketing and technology implementation.

Posted in April 2007, Newsletter | Tagged , , , , , , , , , , , , , , , , , | Leave a comment

Efficient Warehousing – Warehouse Efficiency Strategies Pyramid

Axis Global Partners is introducing a series of articles over the next few months that will address how companies can strive to improve their warehouse efficiencies.  These articles are provided from the experience that AXIS Integrated Solutions has gained over the years on “onsite” implementations and from the publishers of the software products implemented.

These articles will be a warehouse technology and process selection roadmap, giving Small and Mid-sized Business (SMB) distributor’s insight into initial investments that they can afford. Additionally, it outlines an upgrade path with incremental investments that result in greater operational sophistication and savings.

Warehouse Efficiency Strategies Pyramid 

In light of the proliferation of WMS in the SMB market, we suggest the following pyramid as a model to consider when formulating your own strategy for implementation. This model allows you to start small, think big, and step up your savings over time while keeping business disruption at a minimum.

We selected a pyramid structure because as you ascend the pyramid, each layer of technology represents process improvement and cost savings over the previous layer. Companies may elect to skip stages in the pyramid. The appropriate approach for each company depends on organizational resource availability, tolerance to change over time and requirements that will define the scope of the solution. This paper describes the different levels of possible incremental investment.

Stage 1 – Current Process Automation
Stage 2 – Business Process Re-engineering
Stage 3 – Infrastructure & Business Process Re-engineering
Stage 4 – Integrating Warehouse Automation Equipment into Business Processes

Stage 3 – Infrastructure Re-engineering
The third level of the pyramid lets you achieve productivity and profitability by optimizing all the resources within the warehouse including labor, equipment, storage, space and inventory. This strategy typically results in a revamped warehouse layout that cuts down on picking and can make huge differences in order cycle time and warehouse efficiency.

Define warehouse layout, configuration and rules
Your warehouse, and any WMS you install, will perform best if you draw up a plan that optimizes the layout of the facility based on warehouse activities, size of product and handling requirements. Sometimes, this may require outside advice or consultation. The plan should include contingencies for warehouse expansion.

Re-slotting re-defines your warehouse
Effective slotting is necessary to achieve commonality, which helps the picking process run at peak efficiency. Most companies can apply Pareto’s law to their product mix- 20% of their products can be found on 80% of their orders.

  • Put the fastest moving products in the golden zones – High velocity products are placed in a "golden zone" to reduce bending and reaching activity. Heavy or oversized items are placed on lower levels in the pick zone or placed in a separate zone where material-handling equipment can be utilized.
  • Some items require special handling – Slotting sometimes involves identifying handling requirements of a product, such as ‘hazmat’ for hazardous material, heavy materials requiring special equipment to lift, or perishable products requiring refrigeration or freezing. Keep these items together to optimize use of special equipment or resources required for handling them.

Stage 4 – Automation Equipment
The highest level of the pyramid involves the implementation of automation equipment such as vertical or horizontal carousels, “smart” conveyors and pick-to-light equipment. These systems need corresponding WMS software to optimize their operation. They can
be combined with traditional RF-Based warehouse management systems to create a complete high-efficiency warehousing solution.

Automate your distribution center using carousels
With carousels, bins are brought to pickers at a fixed workstation significantly reducing travel time. Carousels can also let the warehouse store a high density of product in a smaller area.

“Smart” Conveyors
Cartons and totes can be tracked and routed through the warehouse making consolidation for shipping much more efficient. Routing happens automatically via fixed scanners on the conveyor and barcodes or RFID tags located on the cartons and totes.

Pick-to-light systems
Pick-to-light systems offer paperless picking using lights to identify bins from where picks are required. In addition to identifying the bin, the quantity for each product is also displayed.

Where Do You Go From Here?

The benefits of a WMS have been well documented from various sources and case studies. Any warehouse can benefit from some WMS technology and processes, but the extent and timetable for implementation is up for discussion.  A business has to make clear decisions about its objectives, both long term and short term. The next step is to determine what kind of WMS technology and re-engineered processes best serve those objectives.

The plan for implementation also needs to be evaluated. Is it better to adopt WMS technologies in a piecemeal fashion with minimal disruption, or is it best to make a plan and go for it all at once? One can argue that if you are going to involve your warehouse time and staff in such an endeavor, it may be better to undertake the entire installation at once, despite the intensity.

In the final analysis, cost and ROI must be thoroughly explored and plans for WMS technology and processes must be tailored for each business. Regardless of the when and how, WMS technology must be embraced as a means to profitability in today’s economic environment.

This article has provided some insight on why now more and more business are moving to improve their warehouse operations to gain efficiencies.  If you are interested in obtaining more information on warehousing, please feel free to contact us directly via email at info@axisglobalpartners.com.  To view previously published articles on warehouse management solutions please visit us at AXIS Newsletter Archive.

Four Ways To Efficient Warehousing, Version 1.3, Radio Beacon Inc., Copyright © 2004 Radio Beacon Inc.

Posted in April 2007, Newsletter | Tagged , , , , , , , , , , , | Leave a comment

The SMB users guide to data protection By: Steven Pofcher, CoreVault

All businesses, regardless of size, run on information. When that information is lost or access is interrupted, the impact on a business can be critical or even fatal. According to Gartner, 40% of businesses suffering a business interruption fail within 5 years.

The extreme impact of data loss on a business puts a premium on protecting and securing critical business information. Small and mid-size businesses (SMBs) are often at a disadvantage when trying to adequately protect valuable business information, as they typically do not have the budgets and internal IT expertise of large corporate enterprises. As a result, SMBs are especially vulnerable to data loss, since they often lack the policies, procedures and equipment for proper data protection. Gartner estimates that less than half of all mid-size businesses and only 25% of small businesses have disaster recovery plans in place.

Smaller businesses face the same fundamental backup and data protection concerns as large businesses: What is the most cost-effective method to reliably protect and recover business-critical information? For many small businesses, the problem is even more difficult because they do not have an IT staff to design, deploy and manage data storage backup and recovery systems.

What Are the Risks?

There are many. Natural disasters such as earthquakes, hurricanes and floods; equipment failure and theft; and external threats such as viruses, worms, hackers and unauthorized users can destroy, corrupt or deny access to critical business information. However, human error is the most common problem, which occurs when computer users inadvertently delete files and/or re-format hard disks.

The Compliance Factor

Ensuring that critical company information is securely stored and protected is not only a good business policy for SMBs but, in some cases, it is now a legal requirement. A focus on records retention to comply with new federal laws has caused many businesses to re-evaluate their data storage infrastructure and data protection, backup and archiving methodologies. The challenge to comply with government regulations such as HIPAA and Sarbanes-Oxley can impact small, privately held businesses as well as large publicly traded companies. Business owners should check with legal counsel as to which regulations apply and the liabilities that could be incurred.

A Data Protection Plan

The traditional focus on backing up critical information was to minimize the cost of recreating the information from original paper documents. That model is mostly irrelevant today, as much information exists only in digital form; there is no paper copy. Therefore a proper data protection plan is even more critical for smaller businesses.

A backup and data protection plan needs to encompass desktop and laptop PCs, in addition to network servers. Many businesses may do an effective job of backing up data stored on company servers, but ignore information stored on company desktop PCs and laptop computers, placing a huge amount of critical data at risk. According to a report from International Data Corp. (IDC), more than 300 million business PCs have a combined 109 petabytes of data–about half of all the corporate data residing on PCs and laptops–that is not backed up regularly. Companies with a highly mobile workforce (such as field sales staff) also need to recognize the vulnerability of not backing up information on laptops, which account for 25% of all computer sales, according to Gartner.

As a backup and data protection plan is developed, organizations must include policies and procedures that include regular backups of non-server data. Good software tools can automate this process, utilizing software that recognizes when specific laptops and PCs have missed a scheduled backup operation and then gives backup priority to those computers the next time they attach to the network.
At AXIS, finding a solution for our clients that simplifies an organization’s backup, recovery, and archiving processes, and virtually eliminating the problems associated with traditional tape-based backup is a priority. With 24×7 customer support and a team of data protection specialists available to them, our clients can create an off-site data protection program that fits their organization’s needs and growth.
To view a self-running demo on how the CoreVault solutions work, please visit us at AXIS-Corevault or contact us at info@axisglobalpartners.com.

Posted in April 2007, Newsletter | Tagged , , , , , | Leave a comment

Sage Accpac ERP version 5.4 New Feature – Accounts Receivable Refund

In Accounts Receivable this new feature is used to:

  1. Refund prepayments, credit notes, unapplied cash, and partially applied receipts
  2. Issue cash, check, or credit card refunds
  3. Process refunds for jobs you manage using Sage Accpac Project and Job Costing. Specifically in Receipt Entry, the new Refund feature will allow you to refund particular details of job-related documents. 
  4. Assign optional fields to a refund. (Note optional fields are available only if you use Sage Accpac Transaction Analysis and Optional Field Creator)
  5. Print checks for the refunds you issue, and void printed checks, if necessary. 

Note: You do not use the Refund Entry form to enter returns or advance credit for returned goods. You use the Invoice Entry form to process a credit note for damaged goods or returned goods you have received. You use the Receipt Entry form to issue advance credit for goods the customer has returned, but which you have not yet received.

Working with Refund Batches

Before creating new batches of refunds, you must add the following information for Accounts Receivable:

  • In Bank Services, on the Banks form, for each bank you use to issue refunds, specify the check stock and check forms to use when refunding by check. 
  • On the Transactions tab of the A/R Options form, specify whether Accounts Receivable displays an error message, a warning, or no message when you try to process a refund using a check number that has been issued for the same bank.
  • On the Numbering tab of the A/R Options form, enter the prefix and next number to assign to refunds.
  • Update currency information and exchange rates in Common Services.
  • Find out the rate type, rate date, and exchange rate to use for each multicurrency refund you plan to add to the batch.
  • If you are refunding by credit card, make sure you have the credit card information, including the authorization code you must use with the refund.
  • Create or select the refund batch to use.
  • If you use optional fields, define refund optional fields using the Optional Fields setup form (available in the A/R Setup folder).

Creating or Selecting a Refund Batch

Before you can add refunds, you must either create a new refund batch or select an existing batch. To create a new batch, you click the New button beside the Batch Number field in the Refund Entry form, or you can click the New button on the Refund Batch List.  You can also use the Finder or the navigation buttons to select an open batch to which to add or edit transactions from either of the refund entry forms or from the Refund Batch List.

Refund Payment Types

Accounts Receivable lets you refund your customers by cash, check, or credit card, so you can refund them in the same tender in which they paid you.

You can process a single refund using any combination of cash, check and credit card. The total amounts refunded for each payment type appear on the Refund tab as Customer Cash Amount, Customer Check Amount, and Credit Card Amount.

When adding a refund, you specify a tender for each refund detail in the Payment Type field. Accounts Receivable displays the payment type used by default payment code specified on Options form, but you can change the payment type for individual details.

You specify additional information for the cash, check, and credit card refunds using separate forms designed specifically for each payment type.

Using the Cash Payment Form

You use the Cash Payment form to identify the cash account or bank code to credit for the total amount you are refunding in cash.

In a multicurrency ledger, you also specify the currency, and, if the cash refund is not in your customer’s currency or your functional currency, the exchange date, rate, and type.

The information you enter on the Cash Payment form applies to all the details you are refunding in cash.

Using the Check Payment Form

You use the Check Payment form for check refunds to specify the check language and whether to print the check using Accounts Receivable.

In a multicurrency ledger, you also specify the currency, and, if the check refund is not in your customer’s currency or your functional currency, the exchange date, rate, and type.

The information you enter on the Check Payment form applies to all the details you are refunding by check.

Using the Credit Card Payment Form

For credit card refunds, you enter the card type, card holder, and your authorization number separately for each detail line using the Credit Card Payment form.

In a multicurrency ledger, you also specify the currency, and, if the refund is not in your customer’s currency or your functional currency, the exchange date, rate, and type.

Adding Refund Transactions

If you have a multicurrency ledger, and you are adding a multicurrency refund, you specify the bank and the currency for each tender (cash, credit card, or check) you use on the refund. You use one bank and one currency per tender, although you can issue a single refund that uses different tenders and currencies.

If you are refunding in a currency that is neither your functional currency nor your customer’s currency, you specify the rate type, rate date, and the exchange rate on the payment form.

If you are refunding in your customer’s currency and it is different from your functional currency, you use the Rates tab to specify the exchange rate for amounts you are refunding by cash or check.

Allocating a Job-Related Refund

Accounts Receivable maintains outstanding balances for details on job-related documents. Therefore, when you refund a job-related credit note or prepayment, you must specify how much to refund for each detail.

You can accept the allocation that Accounts Receivable calculates using the apply method you specify for the refund, or you can allocate amounts to specific details manually using the Job Details form.
When you post refunds for job-related prepayments, Accounts Receivable updates the Total A/R Customer Receipts information on the Activity tab for the project in Project and Job Costing.

Assigning Optional Fields to Refunds

When you add a new Refund, the program assigns any refund optional fields that are set up for automatic insertion, along with their default entries.

To check or to change the optional field entries for a Refund, click the Optional Fields tab, which lets you view and edit refund optional fields.

Accounts Receivable assigns default entries as follows:

  1. If you assigned exactly the same optional fields to the customer record as you defined for refunds, the entries from the customer record appear.
  2. If an optional field is defined for refunds, but is not assigned in the customer record, the value specified in the Optional Fields record appears as the default entry.

You can accept the entries that appear as defaults, or you can delete any optional fields that are not required fields. You can also add different refund optional fields.
If an optional field is a Required field, it must contain an entry before you can save the refund.
If an optional field is a validated field, you must specify an entry that is defined for the optional field in Common Services. If the optional field is not validated, you can select an entry from Common Services, or you can make any entry that is consistent with the type of optional field.

Printing Refund Checks

Accounts Receivable provides two ways to print a refund check. You can:

  • Print a single refund check using the Refund Entry form.
  • Print a range of checks using the Refund Batch List form.

When you accept the check and the payment advice, if you printed one, Accounts Receivable posts the check information to Bank Services, and closes the Print Checks form.

Voiding Printed Checks

Accounts Receivable provides two ways to void printed checks:

  • If you successfully printed a check, then realize after closing the Print Checks form that there is a problem with the check, display the refund in the Refund Entry form, then click the Void Check button.
    The Print Check button becomes available again, letting you reprint the check.
  • If you are using the Print Checks form to print checks, and you cannot reprint immediately, set the check status to Not Printed to void the checks when you close the Print Checks form.

If you do not void printed checks, Accounts Receivable sets the batch status to Check Creation In Progress, and you must reset the batch status in order to edit the batch later.

Voiding Printed Checks When You Reprint

Accounts Receivable assigns check numbers to checks just before printing them.

If you did not cancel the previous check run, Accounts Receivable must void the old check numbers and issue new ones when you reprint checks.

Voiding Printed Checks that You Accepted as Correct

Once you accept checks as correctly printed (and advices, if printed separately), Accounts Receivable posts the check information to Bank Services, and closes the Print Checks form.

Resetting Batch Status from Check Creation In Progress

Accounts Receivable sets the batch status to Check Creation In Progress if you reject a printed check, then leave the Print Checks form without voiding the check.
When the Refund Batch List next appears, you see that Accounts Receivable has reset the batch status.

If you are interested in the detail process including screen shots please contact us at info@axisglobalpartners.com or call your AXIS Solution Provider for further information.

Posted in April 2007, Newsletter | Tagged , , , , , | Leave a comment

Frequently Asked Questions

Sage
Accpac ERP

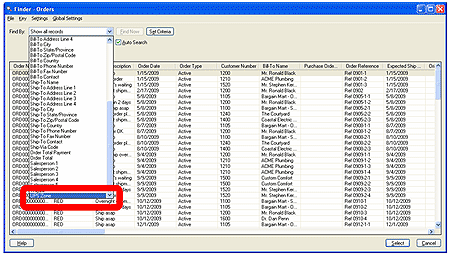
Q – I added the Order Entry Header “UPS Zone” optional field to my finder screen so the field column now displays, but the field is not available in the “Find By” drop down list.  Is there a way to change this?

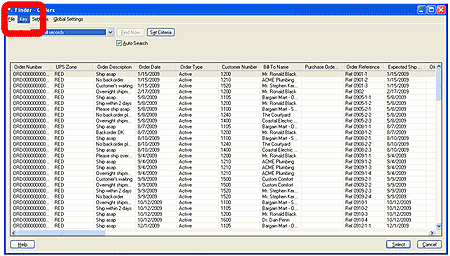
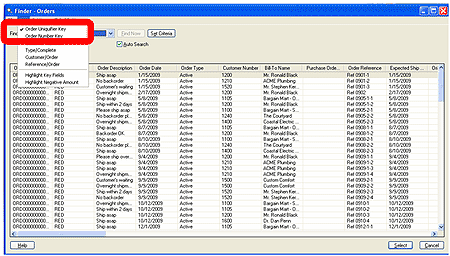
A – Searching by Optional Field within the finder is a new feature that was introduced in Sage Accpac ERP v5.4.  Once you have added the optional field to the finder screen, go to the Key menu.

Click on the Order Uniquifier Key. 

The optional field will then be available in the "Find by" drop down list.

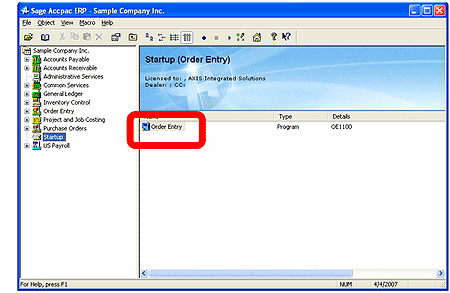
Q – Is there a way to setup Accpac so when I first open our Accpac company the Order Entry window will automatically open?

A – Yes.  Follow these steps:

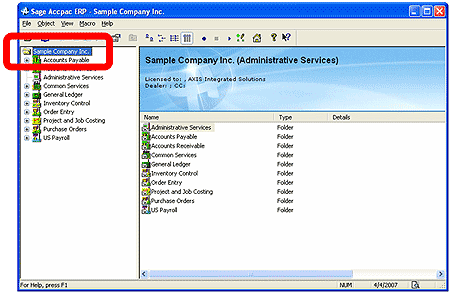
  1. Login to the Sage Accpac company where you want the window to openautomatically.
  2. On the Accpac Desktop, click on the company name in the left sidetree.
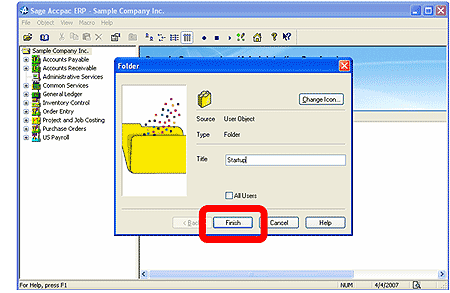
  3. On the right hand side, right click in the white space and select New – Folder
  4. Create a folder called "Startup”.  Click on Finish
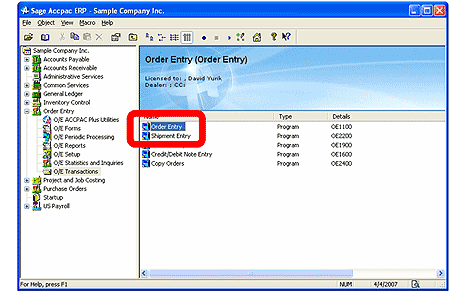
  5. Go to the Order Entry icon under Order Entry – O/E Transactions.
  6. Left-click and Hold the mouse button and drag the icon to the Startup folder and then release the button.
  7. Click on the Startup folder and the Order Entry icon is now also under the Startup folder.  The next time you sign into the company the Order Entry window will open automatically.

NOTE: Please make sure the icon is working before closing out of the company.  If there is a problem with the icon, Sage Accpac will give an error during login and kicks the user out of the program. The only way to get rid of the error is to rename the xxx_c.ism (where xxx is the company database id) file in the users folder to clear all the customized settings.

Sage Accpac
CRM

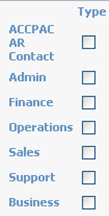
Q – Can you hide the person type option check boxes on Person Entry screen?

A – This process can be completed by a CRM Administrator by adding several lines of script to the Custom Content field under the Administration – Customization area.

Enter a Custom Script

  1. Log on to SageCRM as an administrator.
  2. On the left navigation menu, click Administration then Customization.
  3. On the Customization screen, click Person.
  4. Click the Screens tab.
  5. Click the Person Entry Screen link.
  6. In the Custom Content field, enter the following:
    <script>
    window.attachEvent("onload",MyFunction);
    function MyFunction()
    {
    document.EntryForm.PeLi_TypeARContact.style.visibility= ‘hidden’;
    document.EntryForm.PeLi_TypeAdmin.style.visibility= ‘hidden’;
    document.EntryForm.PeLi_TypeFinance.style.visibility= ‘hidden’;
    document.EntryForm.PeLi_TypeOperations.style.visibility= ‘hidden’;
    document.EntryForm.PeLi_TypeSales.style.visibility= ‘hidden’;
    document.EntryForm.PeLi_TypeSupport.style.visibility= ‘hidden’;
    }
    </script>
  7. Click Save.

Important
The line "document.EntryForm.PeLi_TypeARContact.style.visibility= ‘hidden’;" may be removed if SageCRM is not integrated with Sage Accpac ERP or Sage Pro.
Modify the Translation

  1. On the left navigation menu, right-click Customization then click Translations.
  2. Enter "Link_CompPers" in the Caption Family field.
  3. Click Find.
  4. Click the Admin link.
  5. Click Change.
  6. Enter "<&nbsp>" in the US Translation field.
  7. Click Save.
  8. Repeat the above steps for the other five results.

Refresh the Metadata

  1. On the left navigation menu, right-click System then click Metadata.
  2. Select the option "Refresh All."
  3. Click Execute Refresh.

Q – How do you create a report for Companies displaying all of the information that has been recorded in the Notes tab?

A – The current view in the system, vNotes, displays information stored in the Notes table. This view can be found in the Views tab under the secondary entity Notes. Since this view is not joined with a primary entity, such as Company, it cannot specifically display notes associated with a company record; it only displays all notes that have been entered.

To create a report that displays information stored in the Notes tab for a company, we need to create a view that joins the Company entity with the Notes entity.

Below is an example of how to create a report to display company specific notes.

  1. Log on to SageCRM as an administrator.
  2. Click Administration then Customization.
  3. In the Customization screen, click the Secondary Entities list and click Notes.
  4. Click the Views tab.
  5. Click New.
  6. In the View Name field, enter a name for the new view. For example, enter "vCompanyNotes."
  7. In the View Script field, replace SELECT * FROM NOTES with the following:
    SELECT Note_Note, Note_CreatedDate, Note_ForeignTableId, Comp_Name
    FROM Notes
    INNER JOIN Company ON Note_ForeignId = Comp_CompanyId
    WHERE Note_Deleted IS NULL AND Note_ForeignTableId = 5
  8. Select the option "Reports View."
  9. Click Save.

Generally, the view follows the following structure:
SELECT Note_Note, Note_CreatedDate, Note_ForeignTableId, [Primary Entity Field(s)]
FROM Notes
INNER JOIN [Primary Entity] ON Note_ForeignId = [Primary Key]
WHERE Note_Deleted IS NULL AND Note_ForeignTableId = [Primary Entity Table ID]
Primary Entity Field(s) are fields belonging to the primary entity. Below is a table of the primary entities, their keys, and table ID’s:

Primary  Entity

Primary Key

Primary Entity Table ID

 Company

comp_companyid

 5

 Person

pers_personid

 13

 Cases

case_caseid

 3

 Lead

lead_leadid

 59

 Opportunity

oppo_opportunityid

 10

Here is another example of a view that will display person specific notes:
SELECT Note_Note, Note_CreatedDate, Note_ForeignTableId,  Pers_firstname, Pers_lastname, comp_name
FROM Notes
INNER JOIN Person ON Note_ForeignId = Pers_PersonId
INNER JOIN Company ON Pers_Companyid = Comp_Companyid
WHERE Note_Deleted IS NULL AND Note_ForeignTableId =13

Sage Pro ERP

Q – What are the Drilldown Objects?

A – In Sage Pro 7.4, there are three default Drilldown Objects defined:

  • CUSTOMER
  • VENDOR
  • ITEM

These three objects are maintained in System Manager (SM) and can be defined to look up reports, open transactions, dataviews or maintenance screens to name a few. In certain transactions screens, a small blue triangle indicates that the value in that field is a Drilldown Object. On certain reports the customer, vendor or item IDs are in blue indicating that they are also Drilldown Objects. Furthermore, a Drilldown Object can also be accessed within dataviews, as long as the field contains a Drilldown Object value such as customer ID.

Important
The small blue triangle is called a Chisel.

Example One

  • In the Order Entry (OE) screen, type a value into a field that has a Chisel.
  • Right-click this field and point to Drill down to… A list appears displaying all of the information that can be viewed.

    Important
    The value needs to be entered into a Chisel first before the object can be accessed.

Example Two

  • Open Accounts Receivable.
  • Generate the Invoice Register Detail report.
  • Click Preview.
  • Click Drill down View.
  • Click any of the blue hyperlinks to launch the Customer Maintenance or Change or Void Invoices/Credit Memos screens.

Important
The Drill Down View option is available for most reports in Sage Pro, however, not all Drill Down Views will have the Drilldown Objects active for a report. Also, the reports should be run in Detail format in order to activate the Drilldown Objects.

To create a new Drilldown Object a new Driller ID needs to be defined in SM. Under the Maintain menu click on Drill Down, this will launch the Drill ID Maintenance screen. This maintenance screen is used to create and maintain Drilldown Objects and to define what each object can do.

Related Reading
For more information on the Drilldown Object feature please refer to the What’s New section of the Sage Pro Doc on Disk and in the SM documentation for Sage Pro 7.4, starting on page 401. The documentation provides an example of adding a new Driller ID.

Q –
Is there a way to reverse a customer overpayment instead of posting it as a credit against their account?

A –
The example below describes this process and uses Company 99 as the sample data.

Customer ACP1 was invoiced for $1,000 but accidentally paid $2,000 instead. Of this amount, $1,000 was applied to the invoice and the $1,000 overpayment was posted as a credit to the account. To return the extra $1,000, follow the steps below:

  1. Create a negative cash receipt for $1,000.
  2. Click Apply.
  3. Click No to decline including this refund in bank reconciliation. This will later take place in Accounts Payable (AP) and there is no need to repeat it here.
  4. Click Manual and apply the negative cash receipt against the outstanding balance.
  5. Open AP.
  6. Create a payable. This will debit the cash account and credit the AP Control account.
  7. Approve the payable and print the check.
  8. Reconcile the check in bank reconciliation.

The overpayment has now been reversed and customer ACP1 has received their money back in the form of a check.

Related Reading
For more information on reversing cash receipts and deposits, please refer to the Accounts Receivable documentation.

Q –
I want to keep the Recommended Purchase Order Screen from appearing when saving a Sales Order. How do I do that?

A –
The POGNRR02 privilege is designed for this specific situation. This privilege can be deactivated for Operator type users to prevent the Recommended Purchase Order screen from appearing in OE, even if stock falls below predefined levels.

This solution will not apply to Administrator type users, since privileges are not used for them. In this case, the user must be made an Operator type user and grant them all privileges except for POGNRR02. This will allow the user access to all previous functionality, except access to this screen in OE. One exception is that the user would not receive the option to override the login if they exit the program ungracefully. This is only available to Administrator type users.

Back to Top^
Posted in April 2007, Newsletter | Tagged , , , , , , , , , , , , , , | Leave a comment

Tool of the Month

Gap Analysis Worksheet Give Away

Download Excel Sheet

Posted in April 2007, Newsletter | Tagged | Leave a comment

AXIS Earns Chairman’s Club Honor

Sage Software announced its Chairman’s Club members for 2007, representing the elite of the Sage Software Business Partner community.

Chairman’s Club membership is earned by Sage Software Business Partners that develop an exceptional level of new business with Sage Software through defined sales and marketing programs, making these the top-selling Sage Software Business Partners in North America. Chairman’s Club members receive a variety of marketing benefits and attend an annual business retreat with Sage Software executives to discuss industry issues and business strategy.

“Chairman’s Club members are among the most successful business partners in North America helping small and mid-sized businesses achieve great results with Sage Software solutions,” said Sage Software President and CEO Ron Verni. “Like Sage Software, they place the customer at the forefront of their business to build exceptional programs for success.” 

We would like to take this opportunity to thank our dedicated team of consultants who are passionate about helping our client’s achieve success and all of our clients who have placed their trust in our hands. This award only makes us more committed to continue to earn your trust and our mutual success.

Posted in March 2007, Newsletter | Tagged | Leave a comment

Measuring CRM’s Bottom Line Impact – Part 1 By Dr. Nancy Rauseo

Sometimes the most challenging part of implementing CRM is selling it internally to your company’s management and to the employees that will end up living and breathing CRM. Regardless of a company’s size, you will likely need to quantify the benefits and justify the expenses associated with your CRM initiative. This article addresses the need to measure the impact of CRM, at the beginning, during and after its implementation.

An important component of shifting from a product focus to a customer-centric focus is a change in your measures of performance. New business metrics and supporting analyses are required to continuously monitor the customer dimension of your company. There are two ways of looking at CRM business metrics: 1) the value the company creates for customers as a result of CRM, and 2) the value customers create for the company as a result of CRM. In this article, we will focus on the second – business metrics needed to support your company’s transformation to CRM. You can only improve what you measure.

Getting buy-in for a CRM initiative requires a solid, comprehensive, yet simple business case with CRM metrics to show others, objectively, what can happen if CRM is implemented throughout various parts of the company. According to the Yankee Group, it’s difficult to show a solid return on CRM, despite the fact that it’s a highly visible initiative. Hard, quantifiable metrics, however, can be used to measure the impact of customer intelligence, technology, business processes, customer experiences and training in order to help managers make an intelligent business decision.

Companies consider CRM initiatives for several reasons, including growth in revenues, reduction in expenses, and/or increased competitive advantage. The first step in quantifying the return on investment of CRM is to define the objectives you plan to accomplish with your initiative. Below are general CRM objectives, divided in the three key reasons. These are meant to serve as a guide when developing your own.

Growth in Revenues

  • Retain existing customers
  • Obtain new customers
  • Increase customer profitability

Reduction in Expenses

  • Realize sales efficiencies
  • Realize service efficiencies
  • Realize marketing efficiencies
  • Recognize operational efficiencies

Increased Competitive Differentiation

  • Increase customer knowledge
  • Increase knowledge of market opportunities
  • Increase knowledge of competition
  • Improve customer service

Objectives only define WHAT you want to achieve, not HOW you are going to achieve them. Every objective must be a statement of strategic intent and desired result. When developing a business case, you must define metrics or key performance indicators (KPI) which can be used to measure the value of the objective over time. A CRM metric or KPI must be easily quantifiable, obtainable, reliable, precise, and always expressed as a number.

In the small table shown below, we can observe three objectives for growth in revenues, along with some metrics that can be used to track ongoing results. By no means are these the only metrics. There are hundreds of metrics in general, with some being specific to industries or markets. Also shown is a target performance, generally a preset corporate target, which is based on a baseline, capability, competition, process limits, and customer expectations – this is an actual number.

Objective

Metric

Target Performance

Retain existing customers
Obtain new customers
Increase customer profitability

Retention rate
New customer acquisition rate
New profit per customer

60%
10% annually
$5,000

For example, the objective to retain existing customers can be measured using retention rate as the metric and setting the target performance at 60%. Throughout the CRM initiatives, retention rate can be tracked to determine the degree of progress being made.

So why should you bother to define CRM metrics? CRM aids in:

  • setting and gauging the progress and level of success in meeting CRM program and project objectives;
  • establishing performance baselines and standards;
  • providing feedback for adjusting the CRM strategy and implementation;
  • monitoring the customer experience with your company at all relevant touch points;
  • acting as a tool for change management;
  • changing the way employee performance is measured and compensated; and
  • in communicating the goals of the company in relation to its competition.

In our next article, we will look at the components that will help us determine the specific ROI or return on investment of CRM projects or initiatives. ROI tends to be the most effective measure of program success. ROI’s components are costs and benefits.  To view previously published articles on CRM, please visit us at Newsletter Archives.

Dr. Nancy Rauseo is on the faculty of Florida International University’s College of Business Administration where she teaches marketing and CRM. Nancy holds a Bachelor of Science in Industrial Engineering from Purdue University and an M.B.A and Ph.D. from Nova Southeastern University. Prior to her teaching career, she held various senior management positions for over 20 years in the areas of sales, marketing and technology implementation.
Posted in March 2007, Newsletter | Tagged , , , , , , , , , , , , , , , , , , , , , , , | Leave a comment

Efficient Warehousing – Warehouse Efficiency Strategies Pyramid Level 2 – Business Process Re-engineering

Axis Global Partners has introduced a series of articles over the past few months and will issue future articles on how companies can improve their warehouse efficiencies.  If interested in past articles please visit Newsletter Archives.  These articles are provided from the experience that Axis Global Partners has gained conducting “onsite” implementations and from the publishers of the software products implemented.

These articles will be a warehouse technology and process selection roadmap, providing Small and Medium Business (SMB) distributors insight into affordable solutions for their organizations. Additionally, it outlines an upgrade path with incremental investments that result in greater operational sophistication and savings.

Warehouse Efficiency Strategies Pyramid 

In light of the proliferation of WMS in the SMB market, we suggest the following pyramid as a model to consider when formulating your own strategy for implementation. This model allows you to start small, think big, and step up your savings over time while keeping business disruption at a minimum.

We selected a pyramid structure because as you ascend the pyramid, each layer of technology represents process improvement and cost savings over the previous layer. Companies may elect to skip stages in the pyramid. The appropriate approach for each company depends on organizational resource availability, tolerance to change over time and requirements that will define the scope of the solution. This paper describes the different levels of possible incremental investment.
Stage 1 – Current Process Automation (Feb 2007 Issue)
Stage 2 – Business Process Re-engineering
Stage 3 – Infrastructure & Business Process Re-engineering
Stage 4 – Integrating Warehouse Automation Equipment into Business Processes

Stage 2 – Business Process Re-engineering
The second level of the pyramid lets you go beyond current process automation, allowing you to evaluate your current warehouse processes and make improvements. This strategy assumes that you wish to maintain your current physical infrastructure, but are willing to modify warehouse processes to optimize productivity.

The benefits of business process re-engineering include:

Improve picking effectiveness
Implementing an effective picking/packing strategy can dramatically increase the number of lines picked per day. A unit pick warehouse can see picking productivity improvements by as much as 700%.

  • Reduce picker travel – A significant amount of a picker’s day is spent traveling to and from pick locations to gather products on each order. Because paper-based processes are limited in how workloads can be distributed to the picking team, WMS implementation provides a valuable opportunity to reduce the amount of travel required per order line picked.
  • Improve workload management – Optimally, workloads should be gathered by pickers, who start the pick path with an empty cart or pallet, and return full. The most successful workload is one that travels the shortest distance to fill the cart. In most paper-based warehouses, pickers gather limited quantities, one order at a time. Picking multiple orders at a time and re-balancing the existing warehouse into ABC ranked zones should help the average pick and pack warehouse fill up carts while reducing the mileage per workload.
  • Improved picking speed – Because every warehouse is different, each distribution centre needs to find suitable picking/packing strategies. Batch, wave, simultaneous/sequential zone, pick and pass, and product picking are examples of different types of picking styles that can be employed by a WMS to increase workload effectiveness. In any given environment, it may be necessary to implement a variety of picking methods to correspond to different order compositions, product sizes and warehouse layouts.
  • Eliminate the order checking function – Most warehouses that use warehouse management software to re-engineer the picking process can eliminate the checking function altogether. The result is a significant labor cost savings and faster order fulfillment. Many warehouses experience enormous capacity increases with their current staff.

Improve receiving accuracy and efficiency

Accurate, efficient receiving is the right way to begin the warehousing process. The right product, received accurately is then available to promise or to ship against backorders. An efficient receiving process means that product is checked-in faster which results in shorter vendor lead times and less inventory requirements.

Receiving incorrect products or quantities turn into inventory errors down the line; pickers grab the wrong product, customer service promises what they don’t have and additional inventory needs to get ordered to compensate for the mistake.

  • Electronically receive against open purchase orders – Lots of time is spent reconciling actual receipts against paper purchase orders. Using a handheld computer, a warehouse solution can effectively receive any product in any sequence against any purchase order and be capable of reconciling electronically.
  • Receive product against purchase orders in any sequence – Much time is spent matching product against purchase order lines. Using a mobile device, receiving efficiency can be dramatically improved by automatically matching in the background.
  • Receive multiple purchase orders simultaneously – Multiple orders are frequently received simultaneously. A trailer pulls up or a UPS shipment arrives. In a paper based environment, receipts must be segregated and reconciled against their individual purchase orders. An effective solution increases receiving efficiency by allowing a receiver to receive multiple purchase orders simultaneously.
  • From dock to stock faster – When receiving multiple purchase orders, the amount of inventory to be received can be overwhelming. An effective solution will allow multiple receivers to receive multiple orders simultaneously so that product can be moved into stock quickly. The net result is faster availability for sales orders and reduced vendor lead times.

Improve pick-bin replenishment effectiveness

Dramatic warehouse performance can be realized through automated, managed pick-bin replenishment.
In a paper-based pick and pack warehouse, much time is spent replenishing pick locations based on the assumption that pickers need to pick as much product as the assigned pick locations can hold. Stock handlers walk through the pick locations and arbitrarily decide how much product is needed to fill pick locations to their maximum capacity.

  • Manage pick locations better – An effective replenishment strategy will fill the right bins with fast moving product and leave dead stock where it belongs, in the high bay racking until they are required. In most warehouses, the demand created for the top 5% of products exceeds pick location capacity on a daily, if not more frequent, basis. The bottom 5% may not move in a year, or even less frequently. The result is that pickers walk past locations full of dead stock to reach to empty locations where fast moving product should be on hand.
  • Eliminate pick-bin stock-outs – The lost productivity when a picker runs into an empty pick location is only part of the replenishment challenge in the typical paper-based pick and pack warehouse. Replenishment and picking share similar challenges.
  • Improve stock handler effectiveness – Stock handlers cover large areas of warehouse, only partially filling their pallets because they are picking products to satisfy the orders left short when pickers run into empty bins. Replenishment activities are typically reactive, resulting from a lack of organization when gathering product from overstock and filling the pick locations. Business process re-engineering helps to smooth out this procedure by better analyzing pick location demand and driving workflow so those pallets get filled as efficiently as possible.
  • Better forecast bin requirements – Advanced replenishment enables the WMS to request inventory from overstock before the products are actually required to fill sales orders. This process minimizes the likelihood of a sales/work order being delayed because pick-bins need to be replenished. Advanced replenishment uses historical velocity to anticipate replenishment requirements based on the minimum quantities of a product that should be stored in a bin, or by the minimum number of days that a product should be on hand in a bin.

Improve shipping effectiveness
Shipping systems can be integrated in varying degrees with a WMS, and many WMS functions support and accelerate the shipping process.

  • Integrate shipping into the picking process – Shipping labels produced at the start of the picking process and direct picking to shipping cartons can eliminate the need for a separate shipping station in some cases.
  • Rate shop for the most cost effective carrier – Instead of having your warehouse personnel guess at the most cost effective shipping methods, a warehouse solution can automatically determine the best shipping method based on destination and service level requirements.
  • Eliminate shipping errors – Seamless shipping integration ensures that the orders end up where intended. Eliminate shipping the wrong box to the wrong customer.
  • Attach the right documentation – When printing packing slips, carton content labels and compliant freight labels, customs and dangerous goods documents are all required for accurate order shipments. Having this documentation integrated into the shipping process ensures that the right documents go with the right orders.

If interested in obtaining more information on warehouse management solutions or on ways we can help you improve efficiencies please contact us at info@AXISintegratedSolutiosn.com.  Future articles include:

  • Apr 2007 – Warehouse Efficiency Strategies Pyramid  and introduction to Level 3 – Infrastructure & Business Process Re-engineering
  • May 2007 – Warehouse Efficiency Strategies Pyramid  and introduction to Level 4 – Integrating Warehouse Automation Equipment into Business Processes
  • June 2007 – How to Choose a Warehousing System
  • July 2007 – Essential Warehouse Management System Features
  • Aug 2007 – Warehouse Management System Key Feature Check List
  • Sept 2007 – Picking a Software Vendor and Solution Provider to implement  a Warehousing System
  • Oct 2007 – Planning a Warehouse Management System Implementation
  • Nov 2007 – Implementing a Warehouse Management System
  • Dec 2007 – Utilizing your Warehouse Management System to increase efficiencies.

Four Ways To Efficient Warehousing, Version 1.3, Radio Beacon Inc., Copyright © 2004 Radio Beacon Inc.

Posted in March 2007, Newsletter | Tagged , , , , , , | Leave a comment

What To Do When Disaster Strikes and Data Loss Occurs

Natural Disasters is the least likely cause of data loss however they can kill an entire company. The eruption of natural disasters and the complete equipment failure are rare but they do occur. Although it accounts for around 3% of all data loss but the magnitude of data loss is highest.

The disaster may strike anywhere and occurs in many shapes and sizes. Natural disasters may occur in the form of fire, flood, lightening strikes followed by power surges.

Flood:

When a single drop of water can short out your computer, what when the whole equipment is completely submerged in the river water. Calculate the extent of damage when it is sunken not only for an hour but for days. However, no matter what, your data can still be recovered if you follow the following measures.

  • Make sure that you turn off the computer and do not turn it on. It is because the drive may seem dry but there is small amount of water, which may still be present on the components and can cause a short when powered on.
  • You may think that drying the wet drive may be of help but it is not the case. However, dried water leaves contaminants on the drive and can cause a head crash to occur when the system is powered on. Hence, it is recommended to place the media in a plastic airtight bag instead.
  • Do not store your mission critical data in a flood plain.

Fire Damage:

When the fire catches your computer, it may damage the plastic encasings and components of the computer but the data present in the metal hard drive may still be recovered. There are many data recovery software & Service companies, which provide data recovery from fire damages.

When the fire strikes, you can do a bit from your end to lessen the extent of damage.

  • When your computer becomes wet from fire hoses, take the wet hard drive out of the system and do not dry; instead place it in a plastic and airtight bag. It is because during a fire, with the help of small air vents, extreme pressure changes pull the contaminants and water inside the drive.
  • If you notice that you are not able to pull the hard drive out of the melted computer because it is sealed, then leave it like that.

Power outage/ surge:

Power outages are known to be the most common cause of data loss than all other natural disasters.

When you notice a spark, smoke or you observe that your hard drive does not spin and if it is, you are unable to access the information, then your system might be victim of a power surge. Power problems caused by small surges, spikes, sparks and line sags in the electricity make it essential to protect servers, workstations, and networks.

When you think of preventing data loss due to power supply problems, you automatically think of connecting your system to a UPS (Uninterrupted power supply), surge protectors, isolation transformers, or a surge suppressor. However, you can follow these protective measures to prevent your computer from a disastrous effect.

  • Make sure that you unplug all the power cords connected to your system in order to prevent further damage to have occurred. The cords could be a power cable, modem, printer, or network cable.
  • The most severe damage to your hard drive occurs when the power supply returns. Therefore, after the power returns, wait for at least half an hour for the power to get stabilized and then you may power on the computer.
  • UPS main objective is to provide continuous, sufficient-grade power to electronics possessing valuable information. So, make sure that you connect your system with a UPS or a surge protector to prevent your computer from further power attacks. It is for the reason that extreme power fluctuations can damage sensitive electronic components.\

You can protect your valuable information from getting destroyed by the evil effects of a disaster by following the above-mentioned preventive measures.

Since, it is statistically unlikely for natural disasters to occur in two locations simultaneously. Hence, the perfect solution to protect your system from a natural disaster is an offsite backup i.e. you can keep your data in two different locations away from each other.  (By Park Oskar Published: 9/4/2006).

Similar to purchasing property insurance, insurance for your data is just as important and necessary to keep your business up and running in the event of a natural disaster.

CoreVault has the ability to back up your critical data in two geographically separate locations and still give you 24/7 access to it.

To view a self-running demo on how the CoreVault solutions work, please visit us at AXIS-Corevault or contact us at info@axisglobalpartners.com.

Posted in March 2007, Newsletter | Tagged | Leave a comment